Bulk Row Operations
This guide explains how to perform bulk operations on table rows using row selection, JavaScript queries, and SQL with a configured SQL data source. PostgreSQL is used in the examples, but the same approach applies to other SQL databases.
Prerequisites
- A connected SQL data source
- A Table component added to the canvas
- Basic familiarity with:
- Table row selection
- JavaScript queries
- SQL queries
Setup
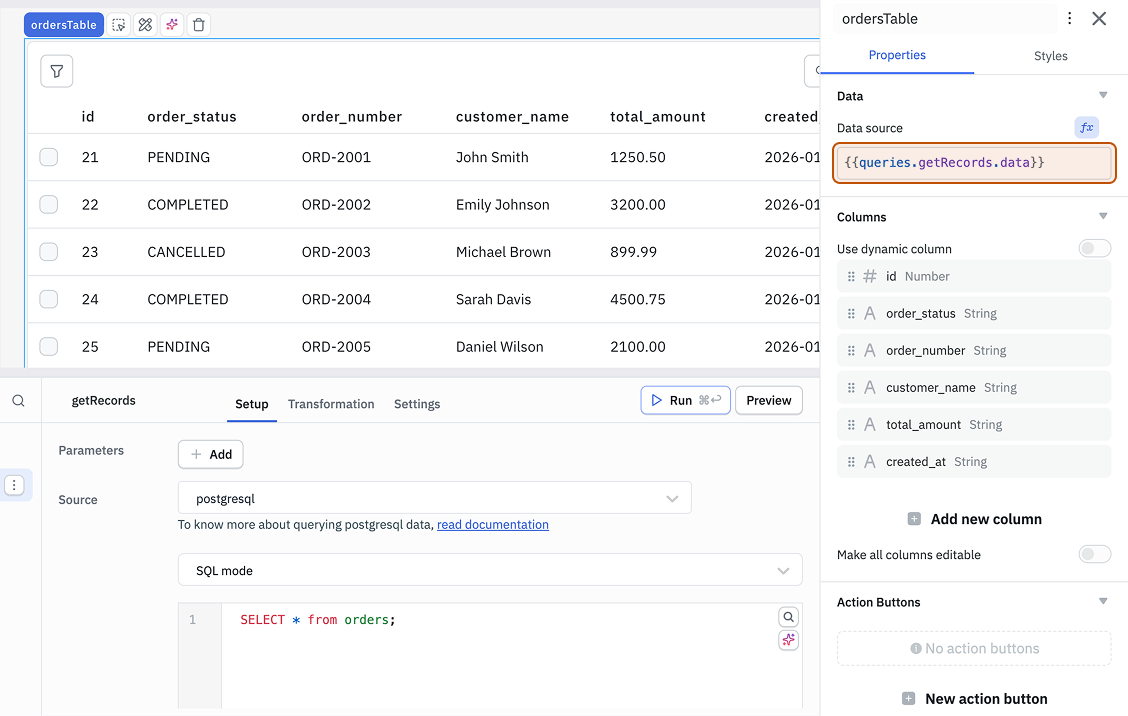
Step 1: Fetch Data from the Database
- Create an SQL query named getRecords.
- Use:
SELECT * FROM <table_name> - Enable Run query on application load.
Step 2: Populate the Table
- Add a Table component.
- Set the Data property:
{{queries.getRecords.data}}
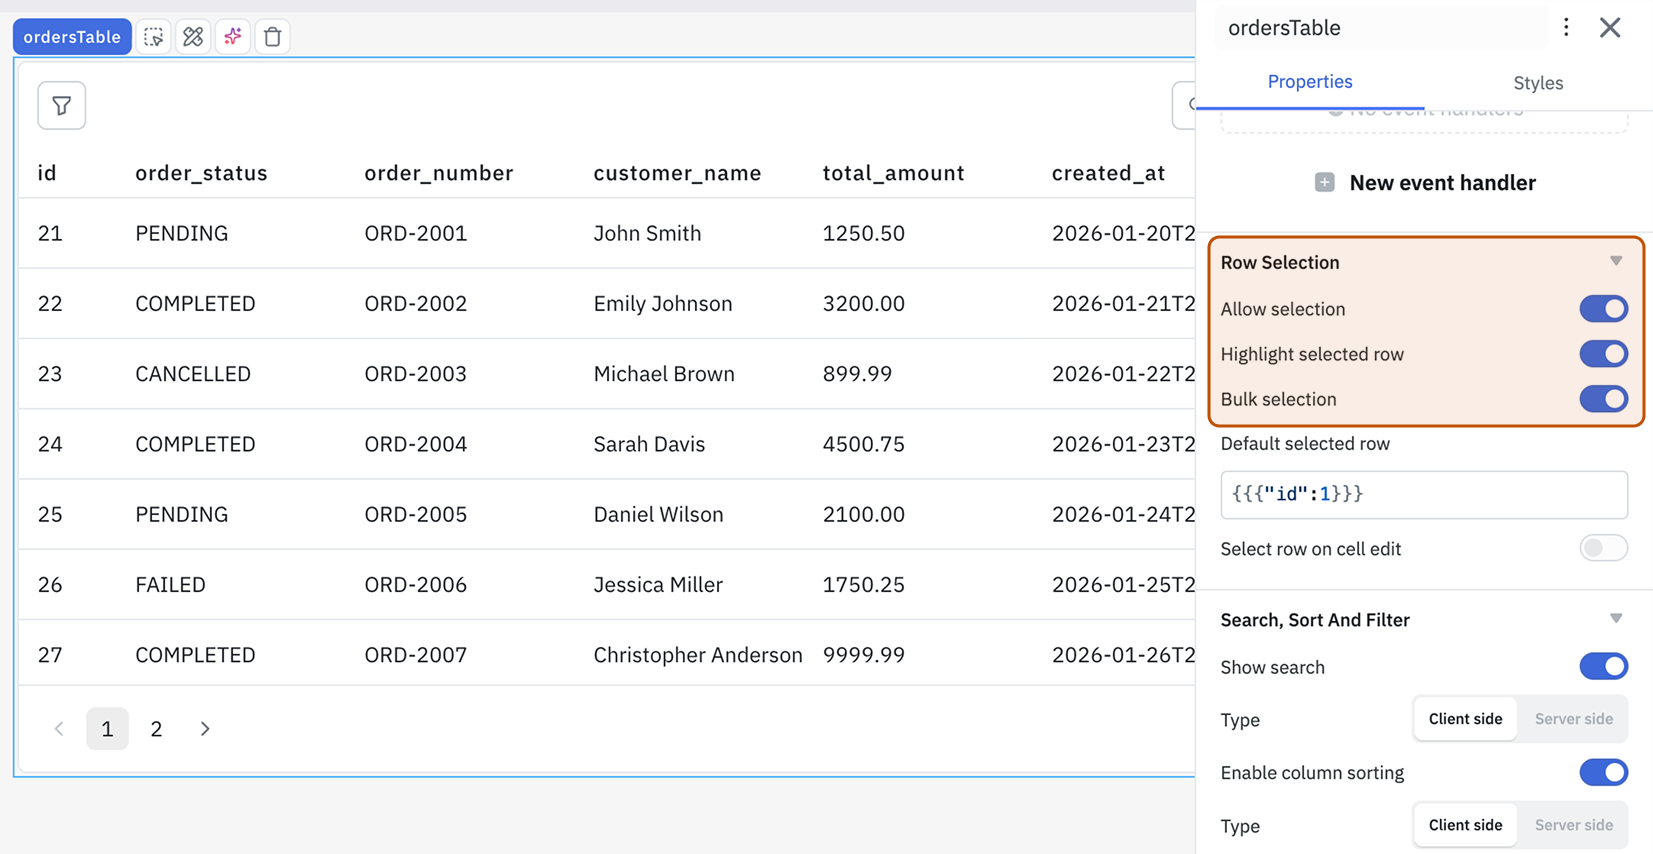
Step 3: Enable Row Selection
In Table properties, navigate to Row Selection and enable:
- Allow selection
- Highlight selected row
- Bulk selection
Bulk Delete Rows
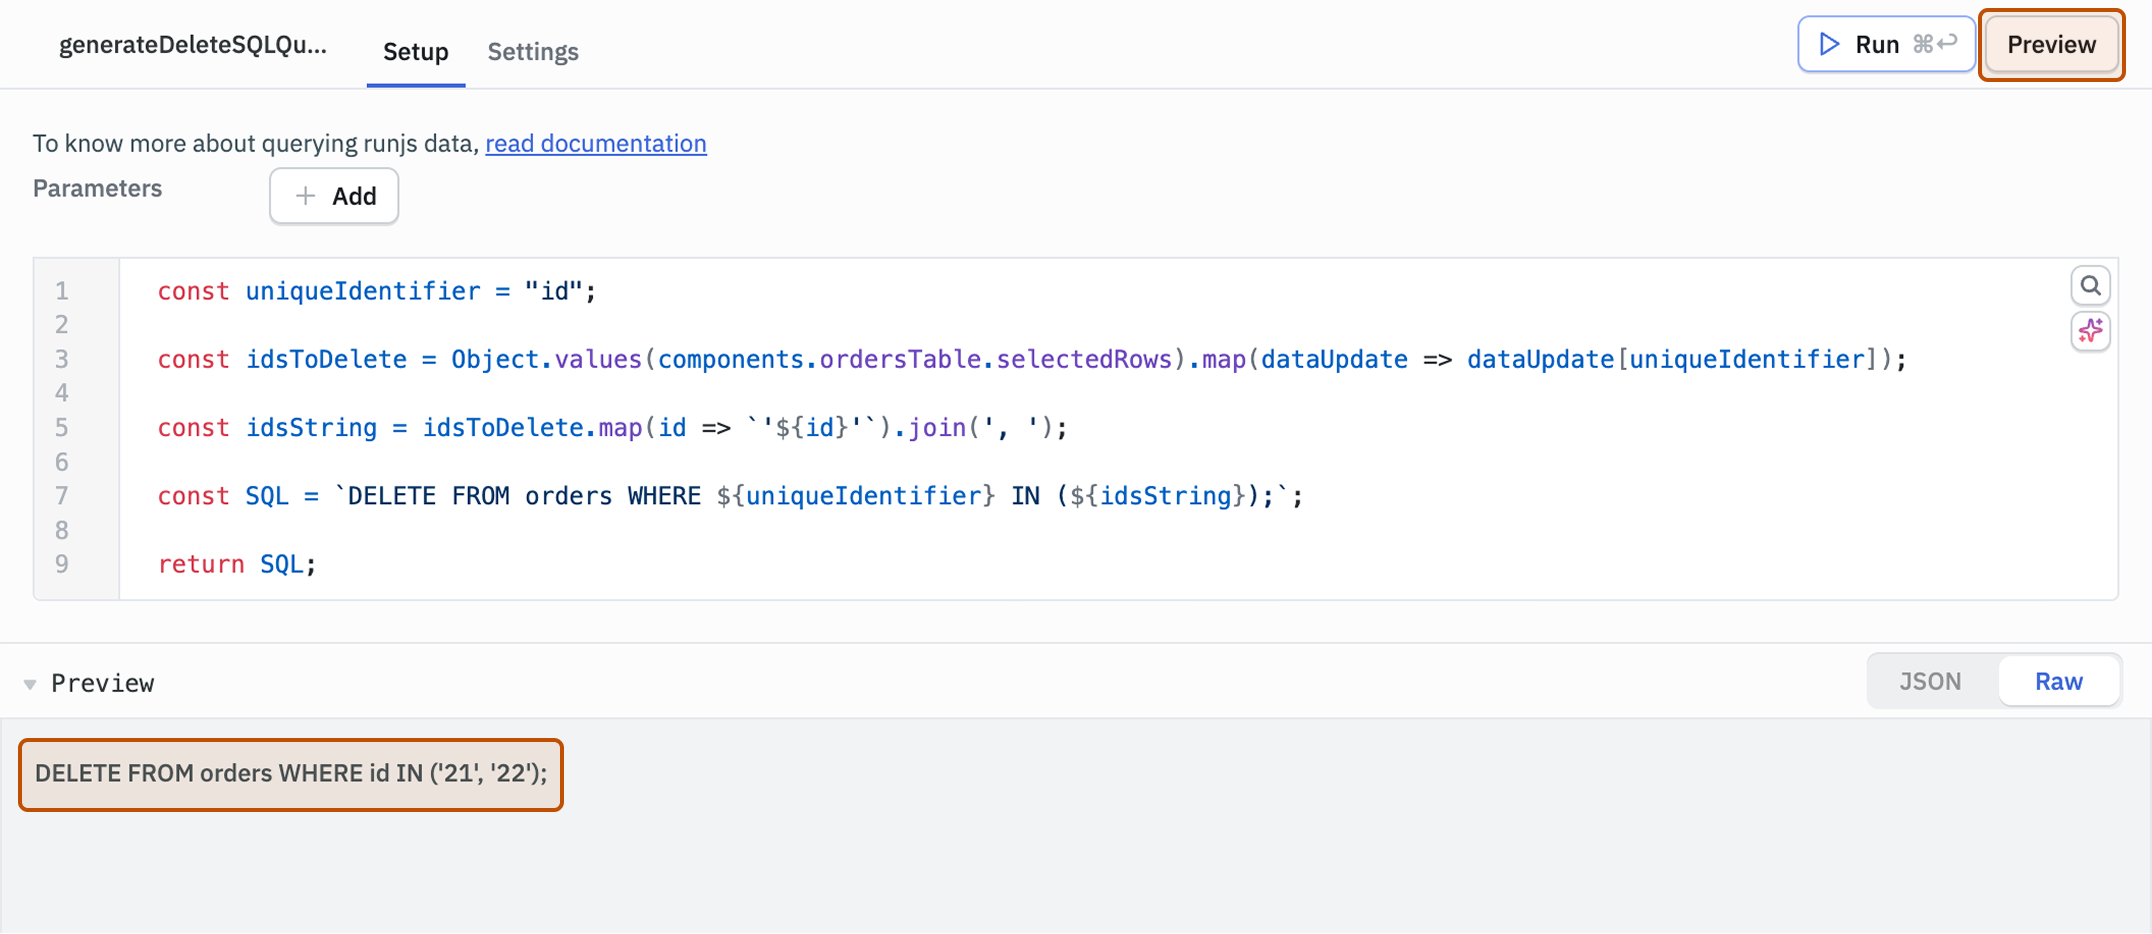
Step 1: Create a JavaScript Query to Generate Delete SQL Query
-
Create a RunJS Query named
generateDeleteSQLQueryto read selected rows from table and generate a DELETE query. -
Enter the following code:
const uniqueIdentifier = "id";

const idsToDelete = Object.values(components.ordersTable.selectedRows).map(dataUpdate => dataUpdate[uniqueIdentifier]);

const idsString = idsToDelete.map(id => `'${id}'`).join(', ');

const SQL = `DELETE FROM orders WHERE ${uniqueIdentifier} IN (${idsString});`;

return SQL; -
Click on the Preview button to see the SQL statement generated by the query.
Step 2: Create a New Postgres Query to Delete the Data
-
Create a Postgres Query named
deleteRecordsto run the query returned from generateDeleteSQLQuery and delete the data. -
Select SQL Mode.
-
Enter the following code:
{{queries.generateDeleteSQLQuery.data}}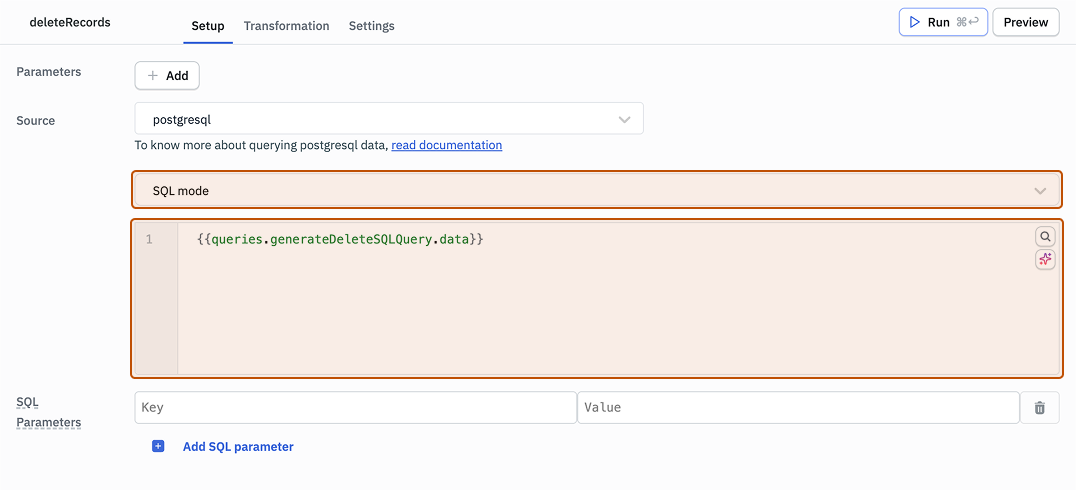
-
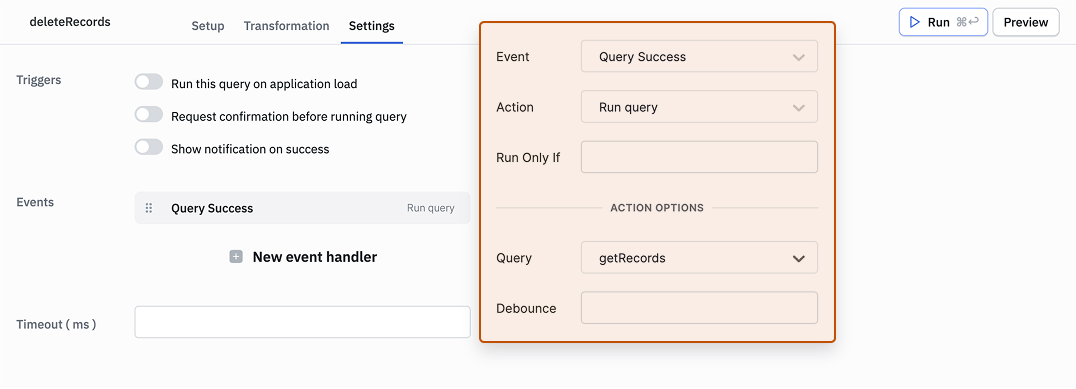
Go to Settings. Add a new Event handler. Select Query Success as Event, Run Query as Action and getRecords as Query. This ensures the data is refreshed upon deletion of data.
Step 3: Link the JavaScript Query to the Delete Query
-
Open Settings for the generateDeleteSQLQuery.
-
Add a new Event handler. Select Query Success as Event, Run Query as Action and deleteRecords as Query.
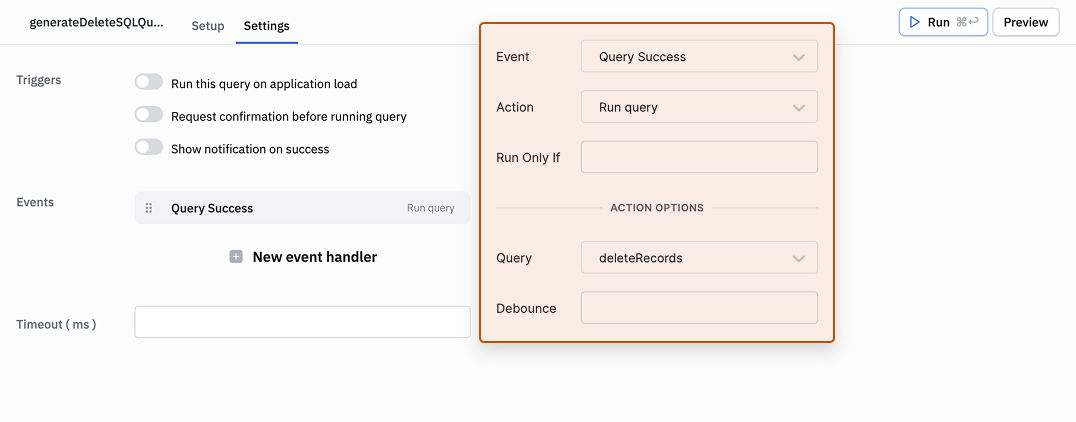
This ensures that once the SQL is generated successfully, the delete query runs automatically.
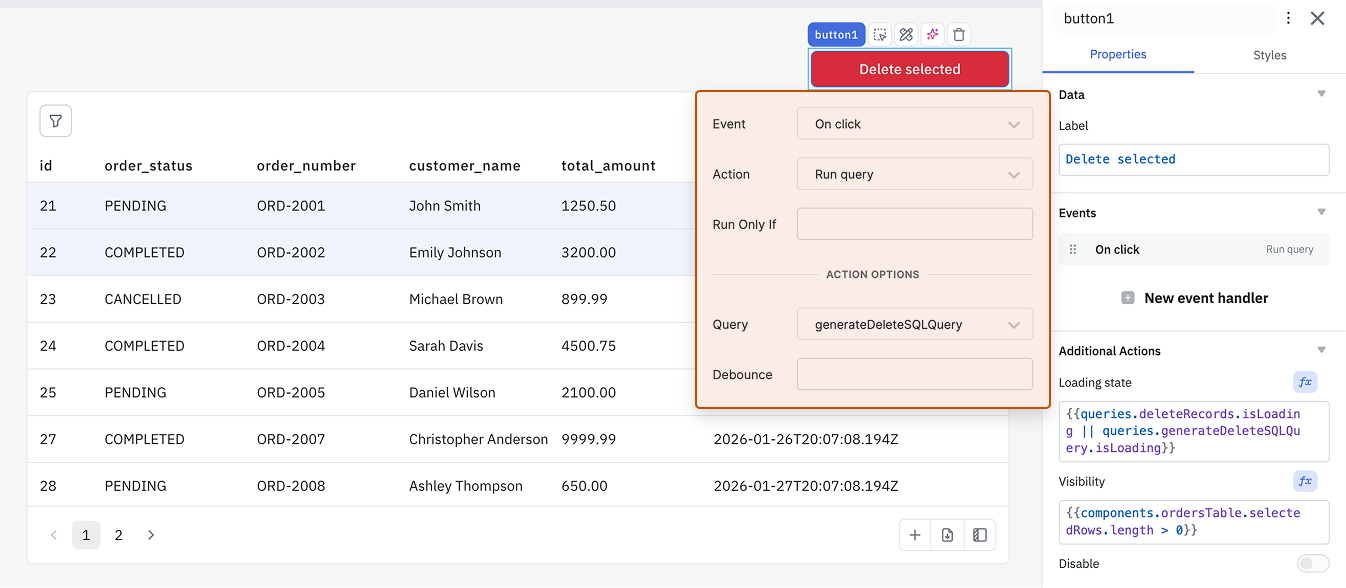
Step 4: Add a Button to Delete the Selected Rows
-
Edit its properties and set the Label property to "Delete selected".
-
Add a new Event event handler to the button.
-
Select On click as the Event, Run Query as the Action, and generateDeleteSQLQuery as the Query.
-
Optionally, we can add a Loading state and Visibility as well.
Bulk Update Rows��
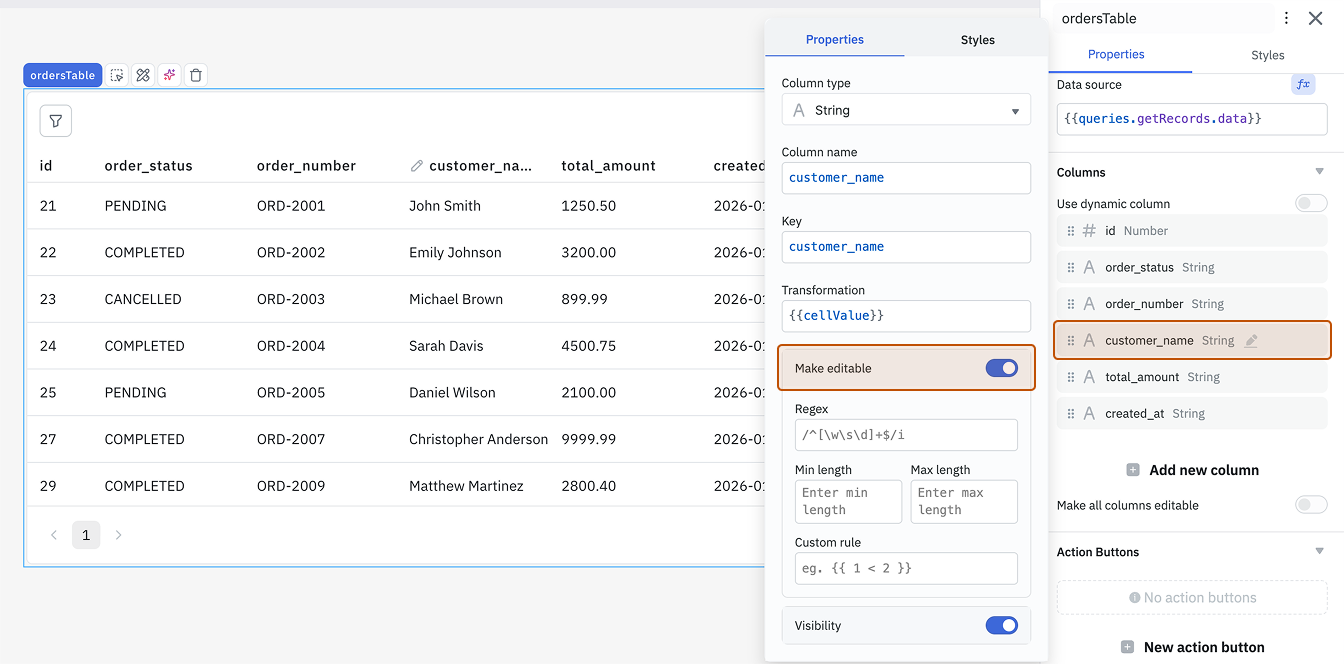
Step 1: Make Columns Editable
Under Table Columns, enable Make editable for required columns.
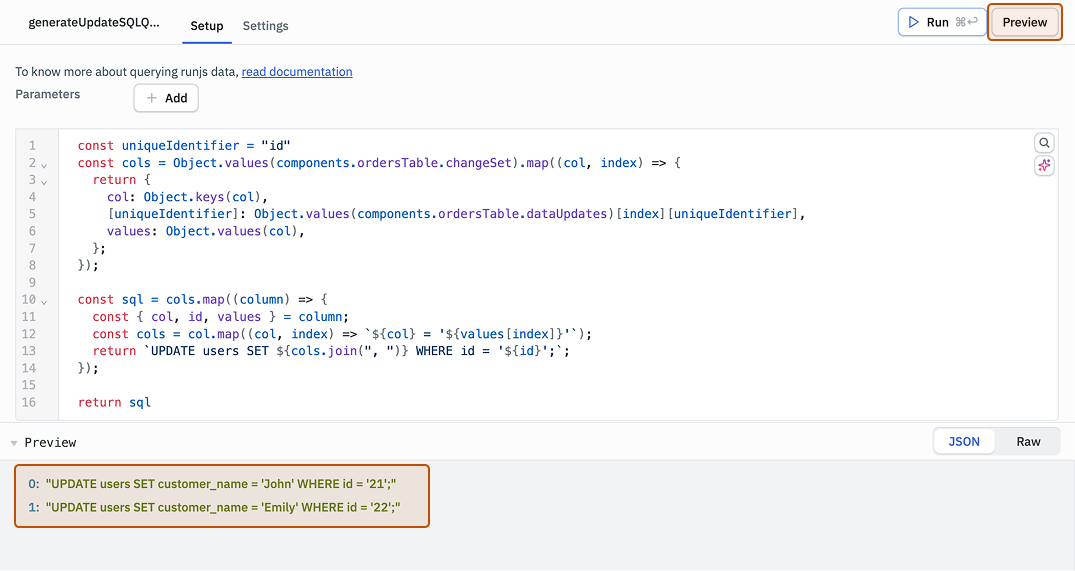
Step 2: Create a JavaScript Query to Generate Update SQL Query
-
Create a RunJS Query named
generateUpdateSQLQueryto read selected rows from table and generate an UPDATE query. -
Enter the following code:
const uniqueIdentifier = "id"
const cols = Object.values(components.ordersTable.changeSet).map((col, index) => {
    return {
        col: Object.keys(col),
    [uniqueIdentifier]: Object.values(components.ordersTable.dataUpdates)[index][uniqueIdentifier],
    values: Object.values(col),
};
});

const sql = cols.map((column) => {
    const { col, id, values } = column;
const cols = col.map((col, index) => `${col} = '${values[index]}'`);
return `UPDATE orders SET ${cols.join(", ")} WHERE id = '${id}';`;
});

return sql -
Click on the Preview button to see the SQL statement generated by the query.
Step 3: Create a New Postgres Query to Update the Data
-
Create a Postgres Query named
updateRecordsto run the query returned from generateUpdateSQLQuery and update the data. -
Select SQL Mode.
-
Enter the following code:
{{queries.generateUpdateSQLQuery.data.join(' ')}}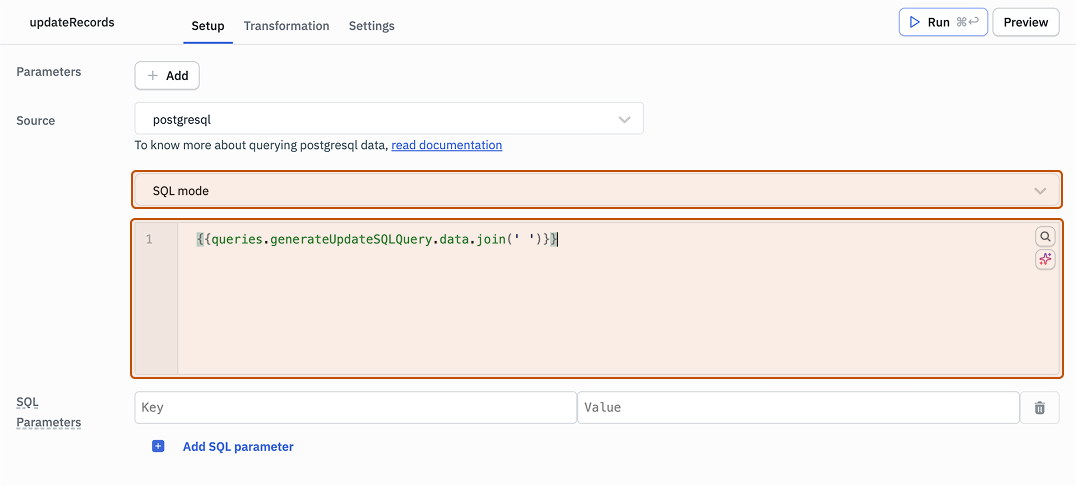
-
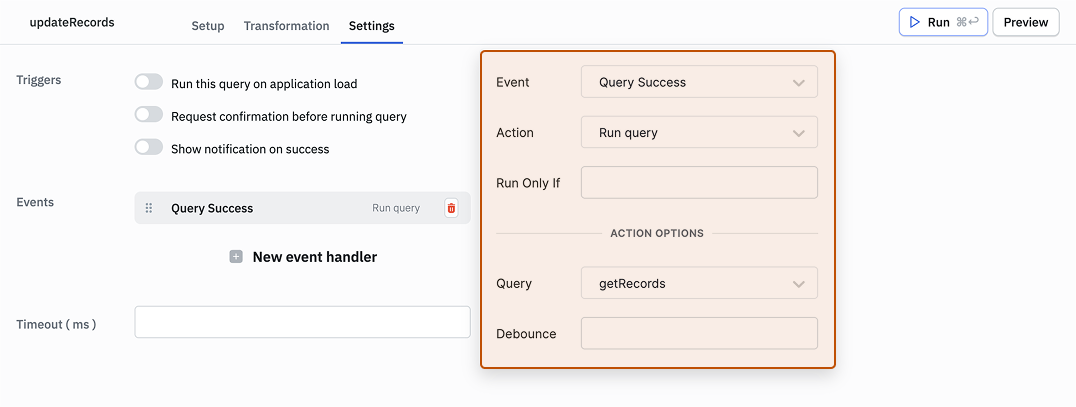
Go to Settings. Add a new Event handler. Select Query Success as Event, Run Query as Action and getRecords as Query. This ensures the data is refreshed after the update operation.
Step 4: Link the JavaScript Query to the Update Query
-
Open Settings for the generateUpdateSQLQuery.
-
Add a new Event handler. Select Query Success as Event, Run Query as Action and updateRecords as Query.
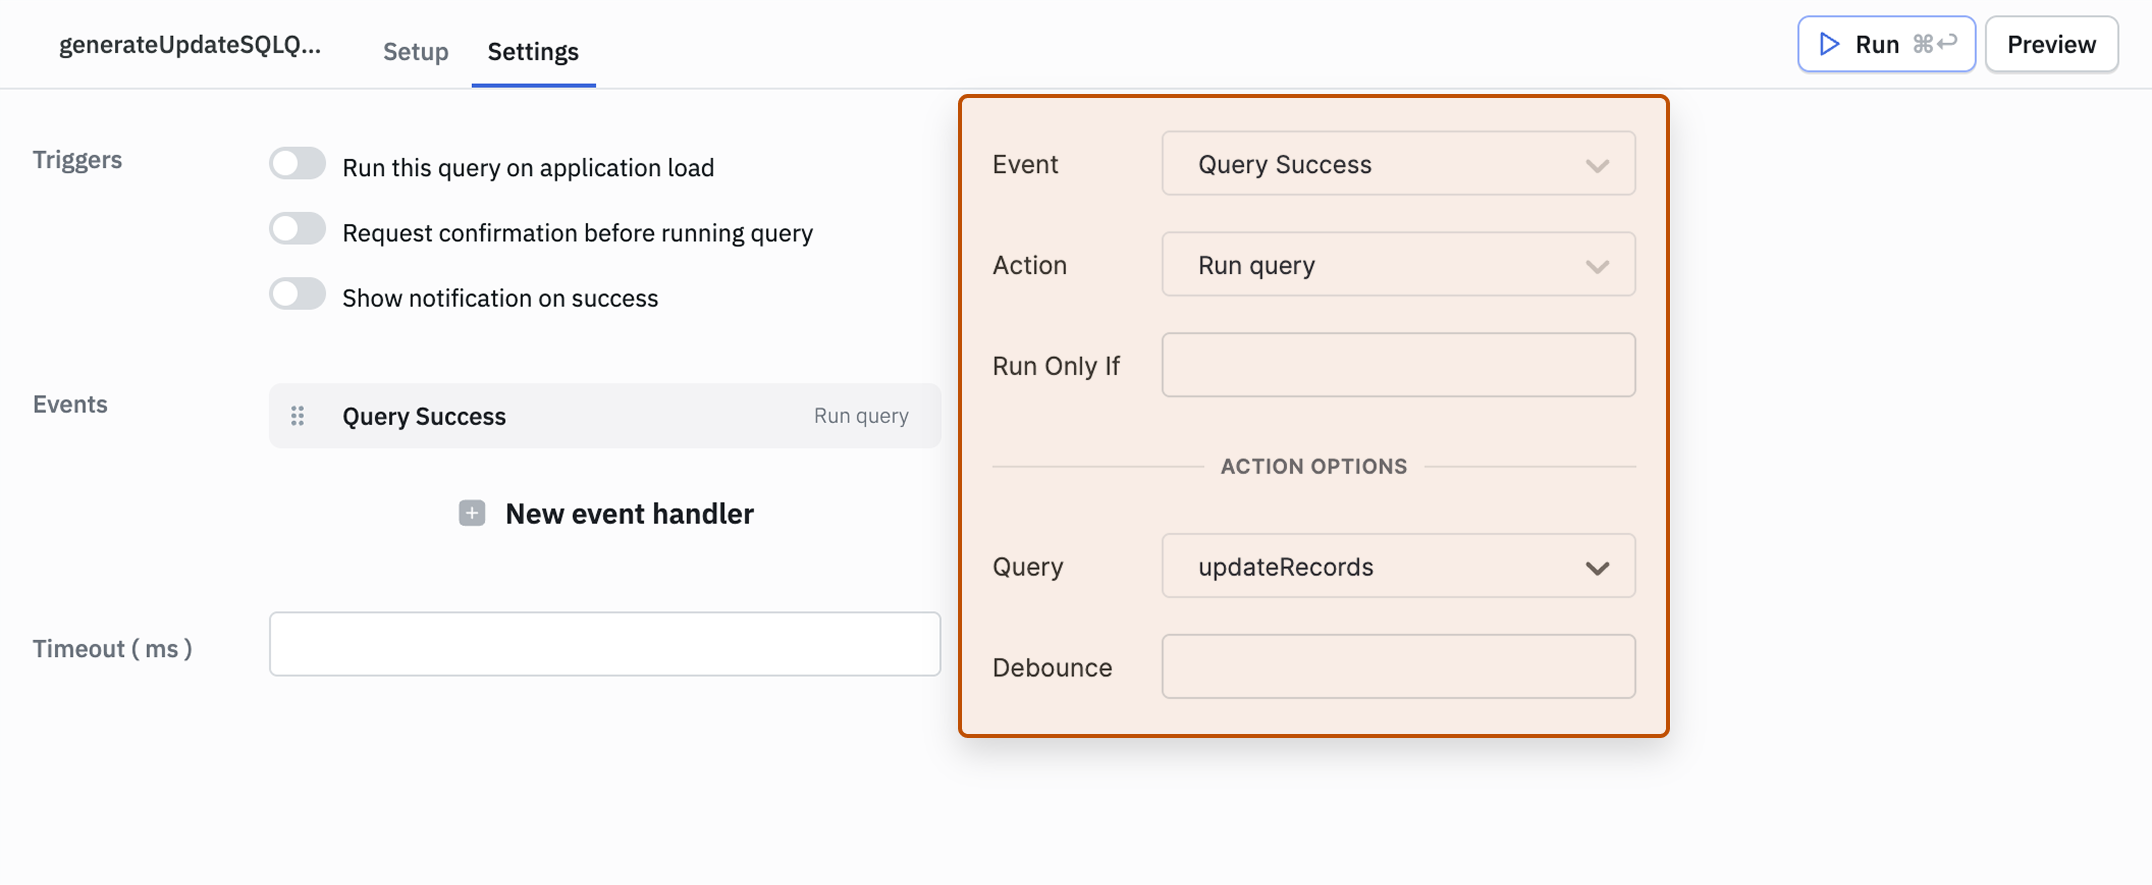
This ensures that once the SQL is generated successfully, the update query runs automatically.
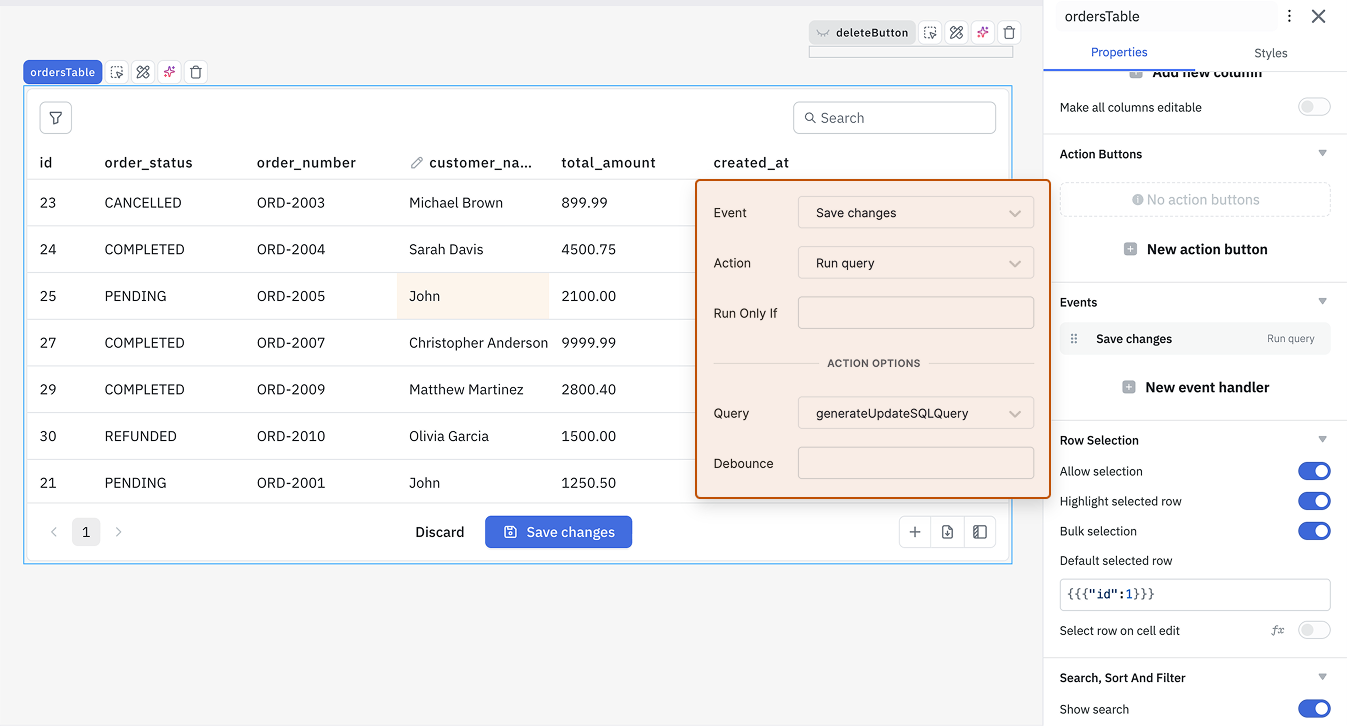
Step 5: Adding Event Handler to Update the Data
-
Edit the ordersTable component and add an event handler for Save Changes event so that whenever a user will edit the Table and hit the Save Changes button the generateUpdateSQLQuery query will run.
-
Optionally, add loading state to the Table by clicking on fx next to the Loading state property and using the following code:
{{queries.generateUpdateSQLQuery.isLoading || queries.updateRecords.isLoading || queries.getRecords.isLoading}}