Querying Data
Querying the ToolJet database is as easy as querying any other data source on ToolJet. You can use either the GUI or the SQL editor to interact with your data.
GUI Mode
- Go to the Query panel, and click on the +Add button to add a new query, and select ToolJet Database.

- Select the GUI mode from the toggle.
- Select the table you want to query and the operation from the dropdown, then enter the required parameters for the selected operation.
- Click on the Run button to execute the query.
The selected operation should adhere to the column constraints of the selected table.
List Rows
This operation returns all the records from the table.
Optional Parameters
- Filter: Add a condition by choosing a column, an operation, and the value for filtering the records.
- Sort: Sort the query response by choosing a column and the order (ascending or descending).
- Limit: Limit the number of records to be returned by entering a number.
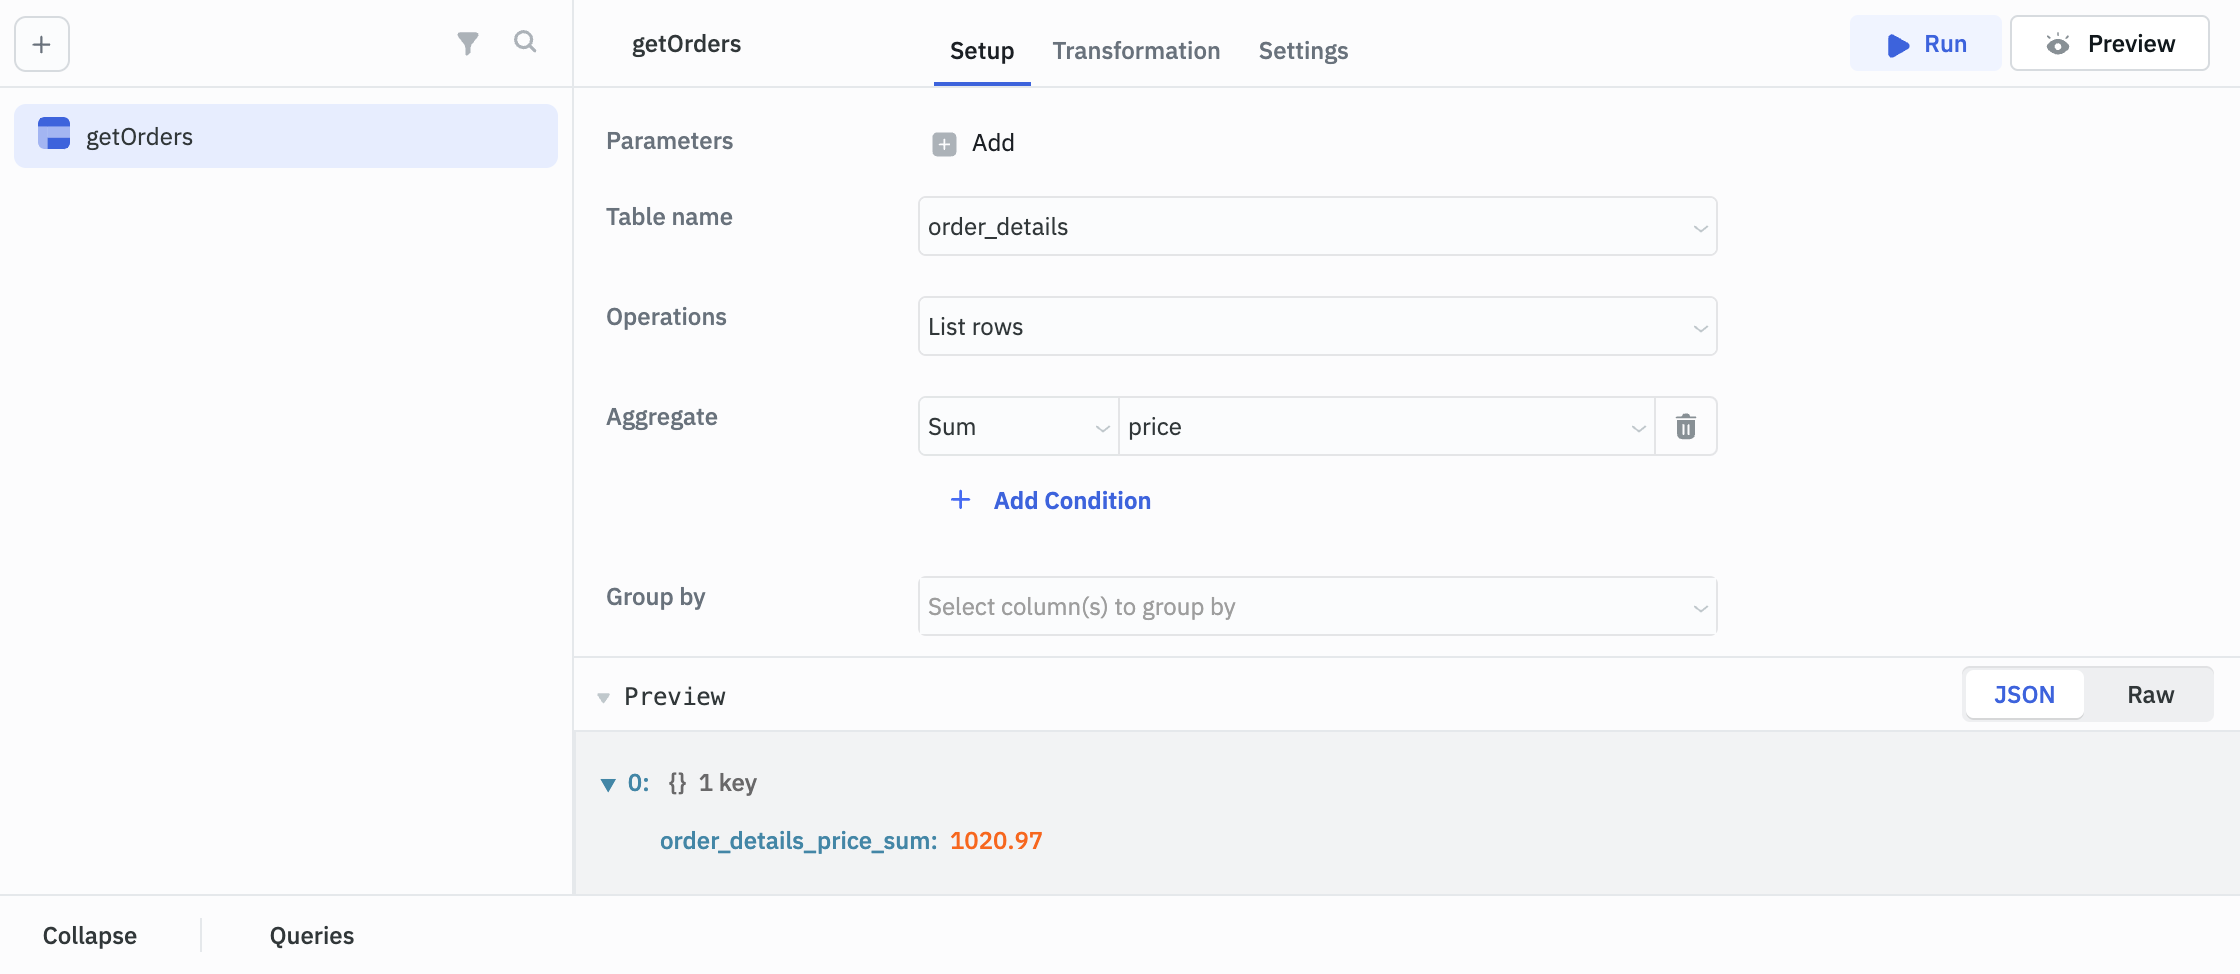
- Aggregate: Perform calculations on a set of values and return a single result.
- Available functions: Count, Sum
- Limitations:
- Sum only for numeric columns.
- Count only for non-null values.
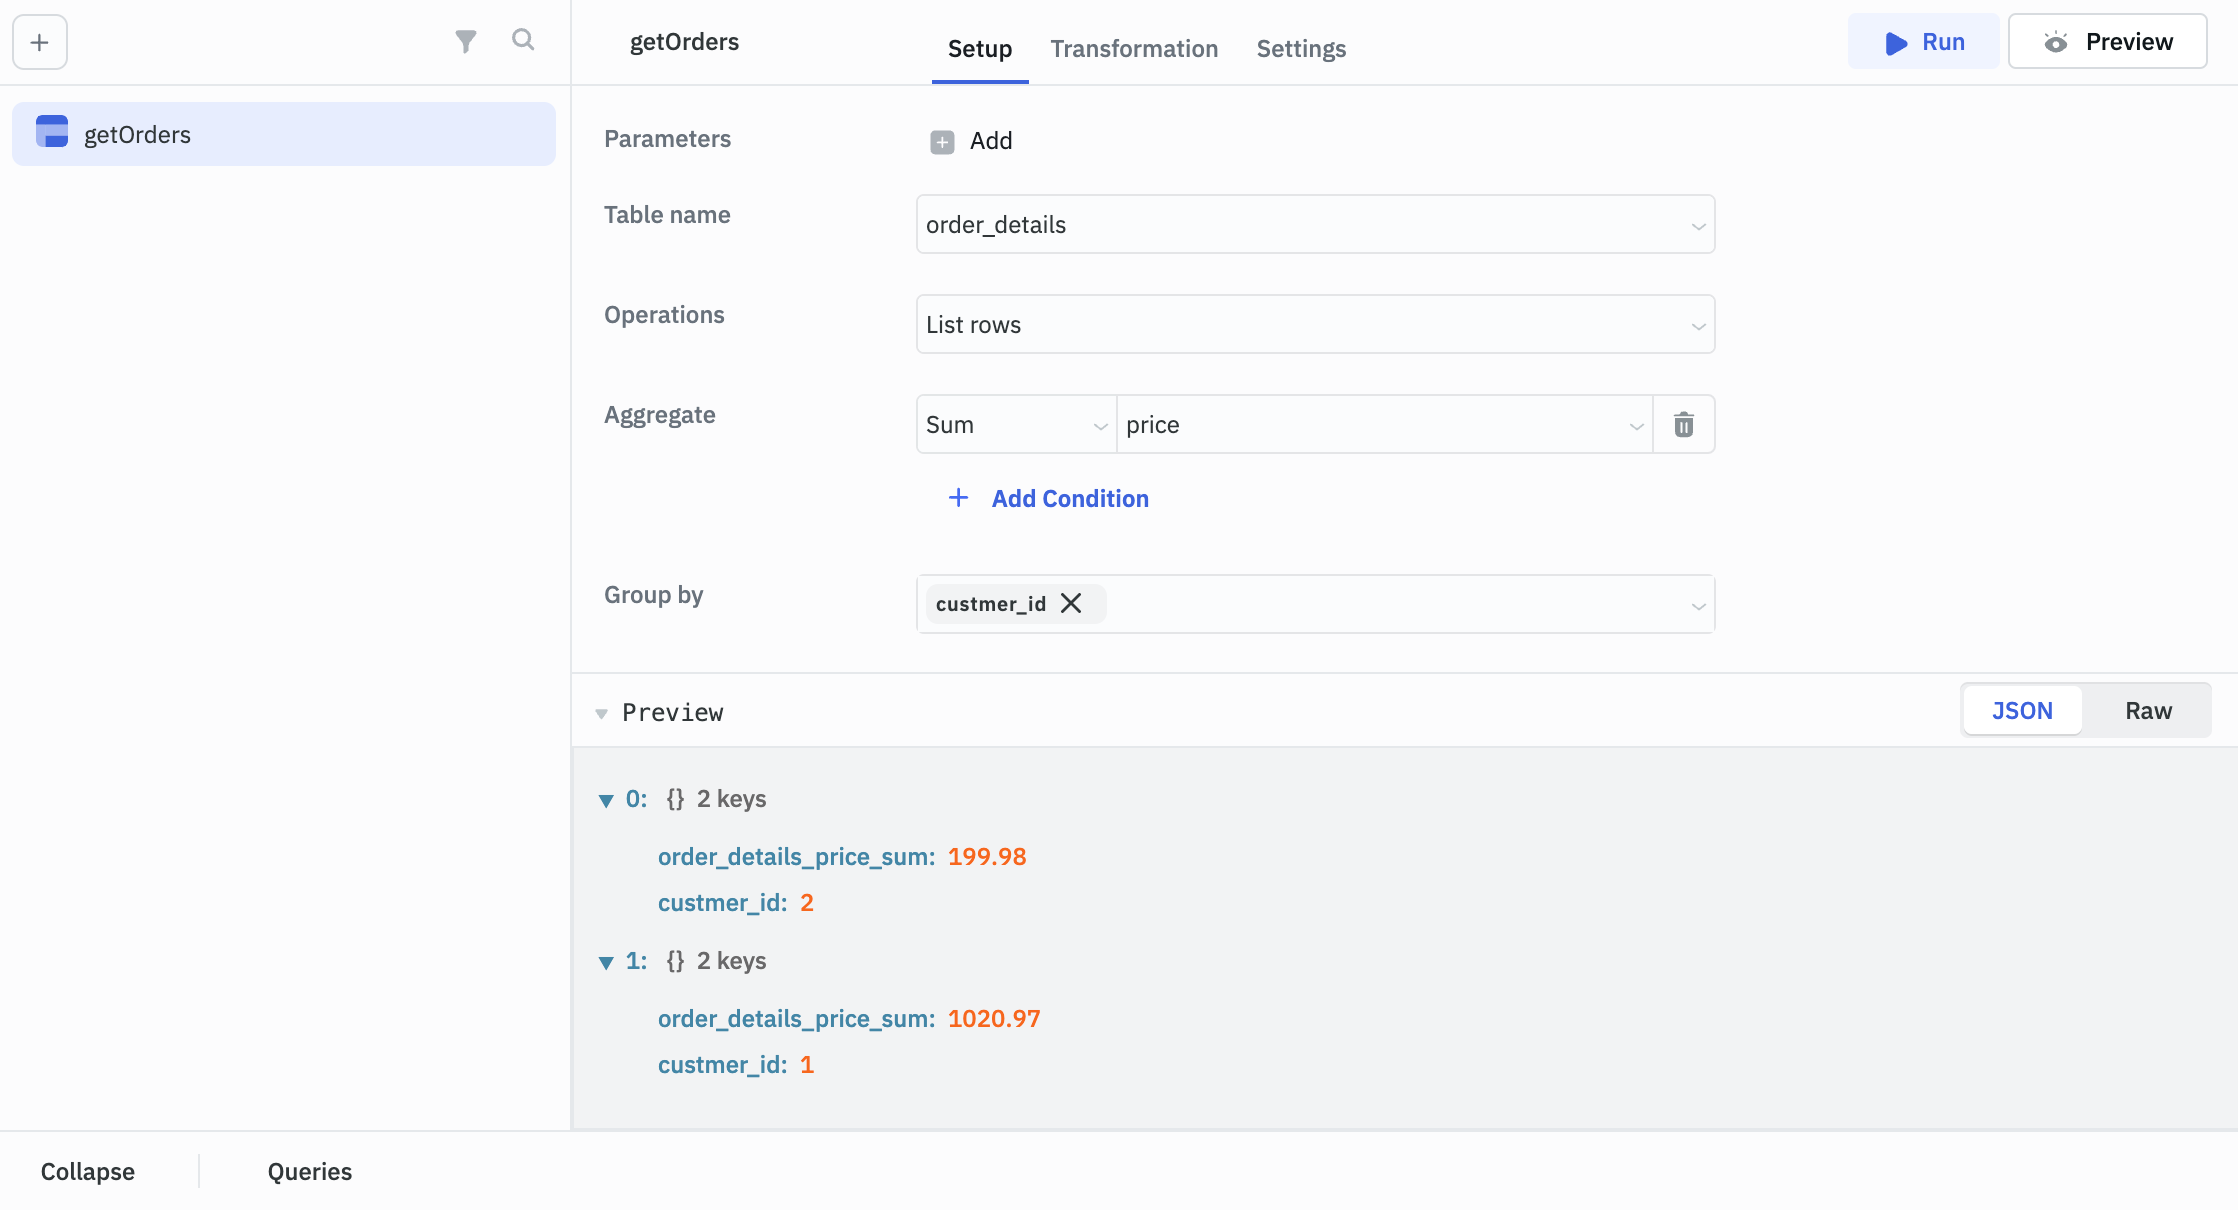
- Group By: Group rows with the same values in specified columns.
- Can only be used after adding at least one aggregate condition.
- Select one or more columns to group by.
- Results are grouped based on unique combinations of values in selected columns.
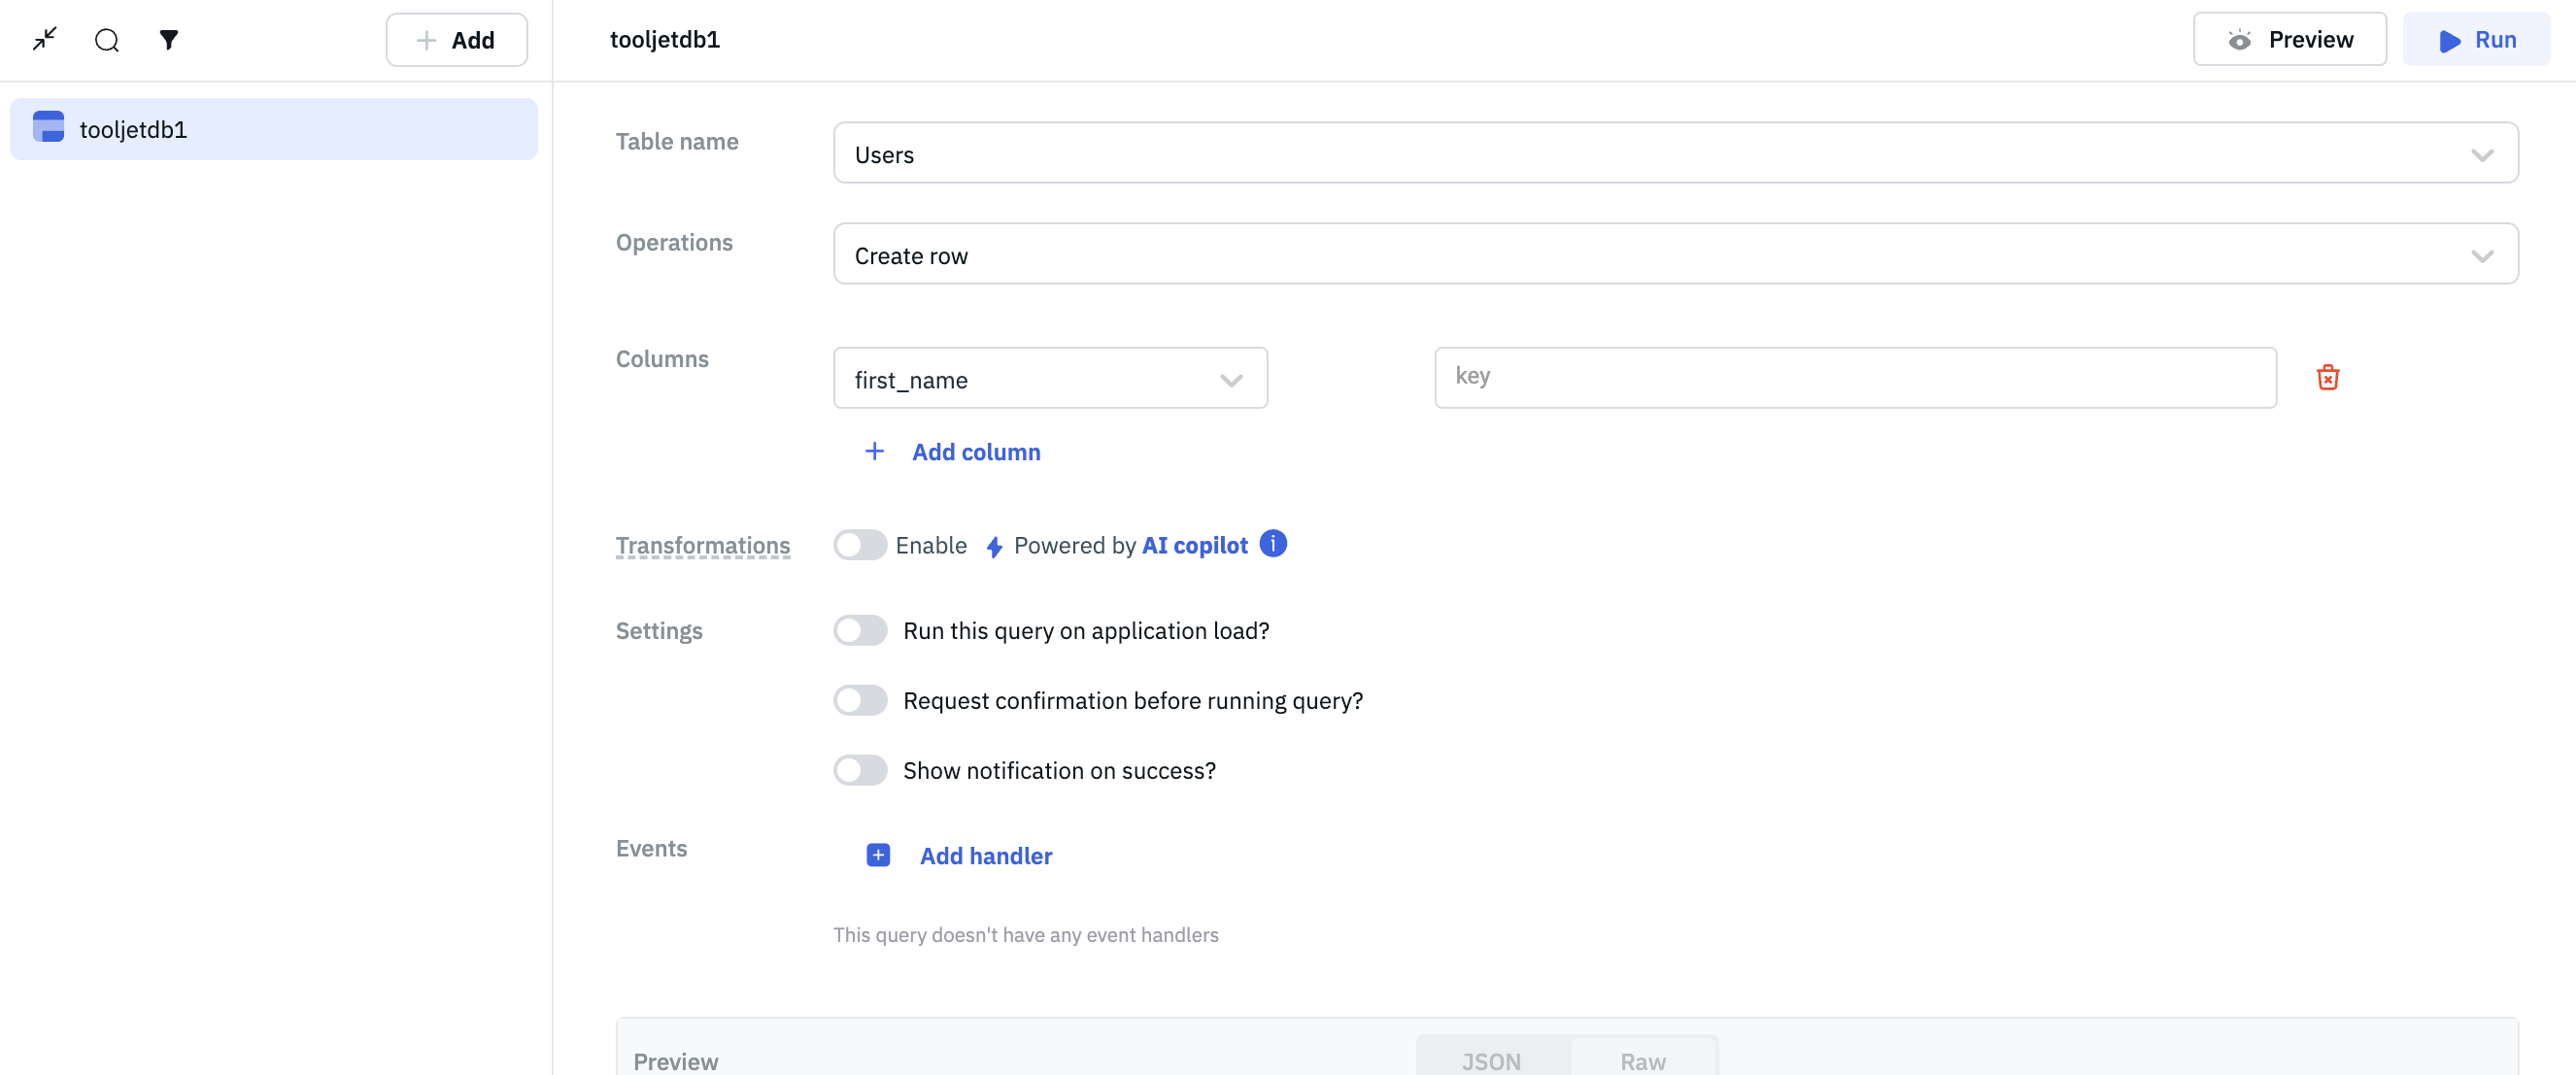
Create row
This operation creates a new record in the table. You can create a single record or multiple records at once.
Required Parameters
- Columns: Choose the columns, add values for the new record, and enter the values. You can also add a new column by clicking on the +Add column button.
Update Row
This operation updates a record in the table. You can update a single record or multiple records at once.
Required Parameter
- Filter: Add a condition by choosing a column, an operation, and the value for updating a particular record.
- Columns: Choose the columns, update the values for the selected record, and enter the values.
Delete Row
This operation deletes a record in the table. You can delete a single record or multiple records at once.
Required Parameters
- Filter: Add a condition by selecting a column, an operation, and the value to delete a specific record.
- Limit: Limit the number of records to be deleted by entering a number.
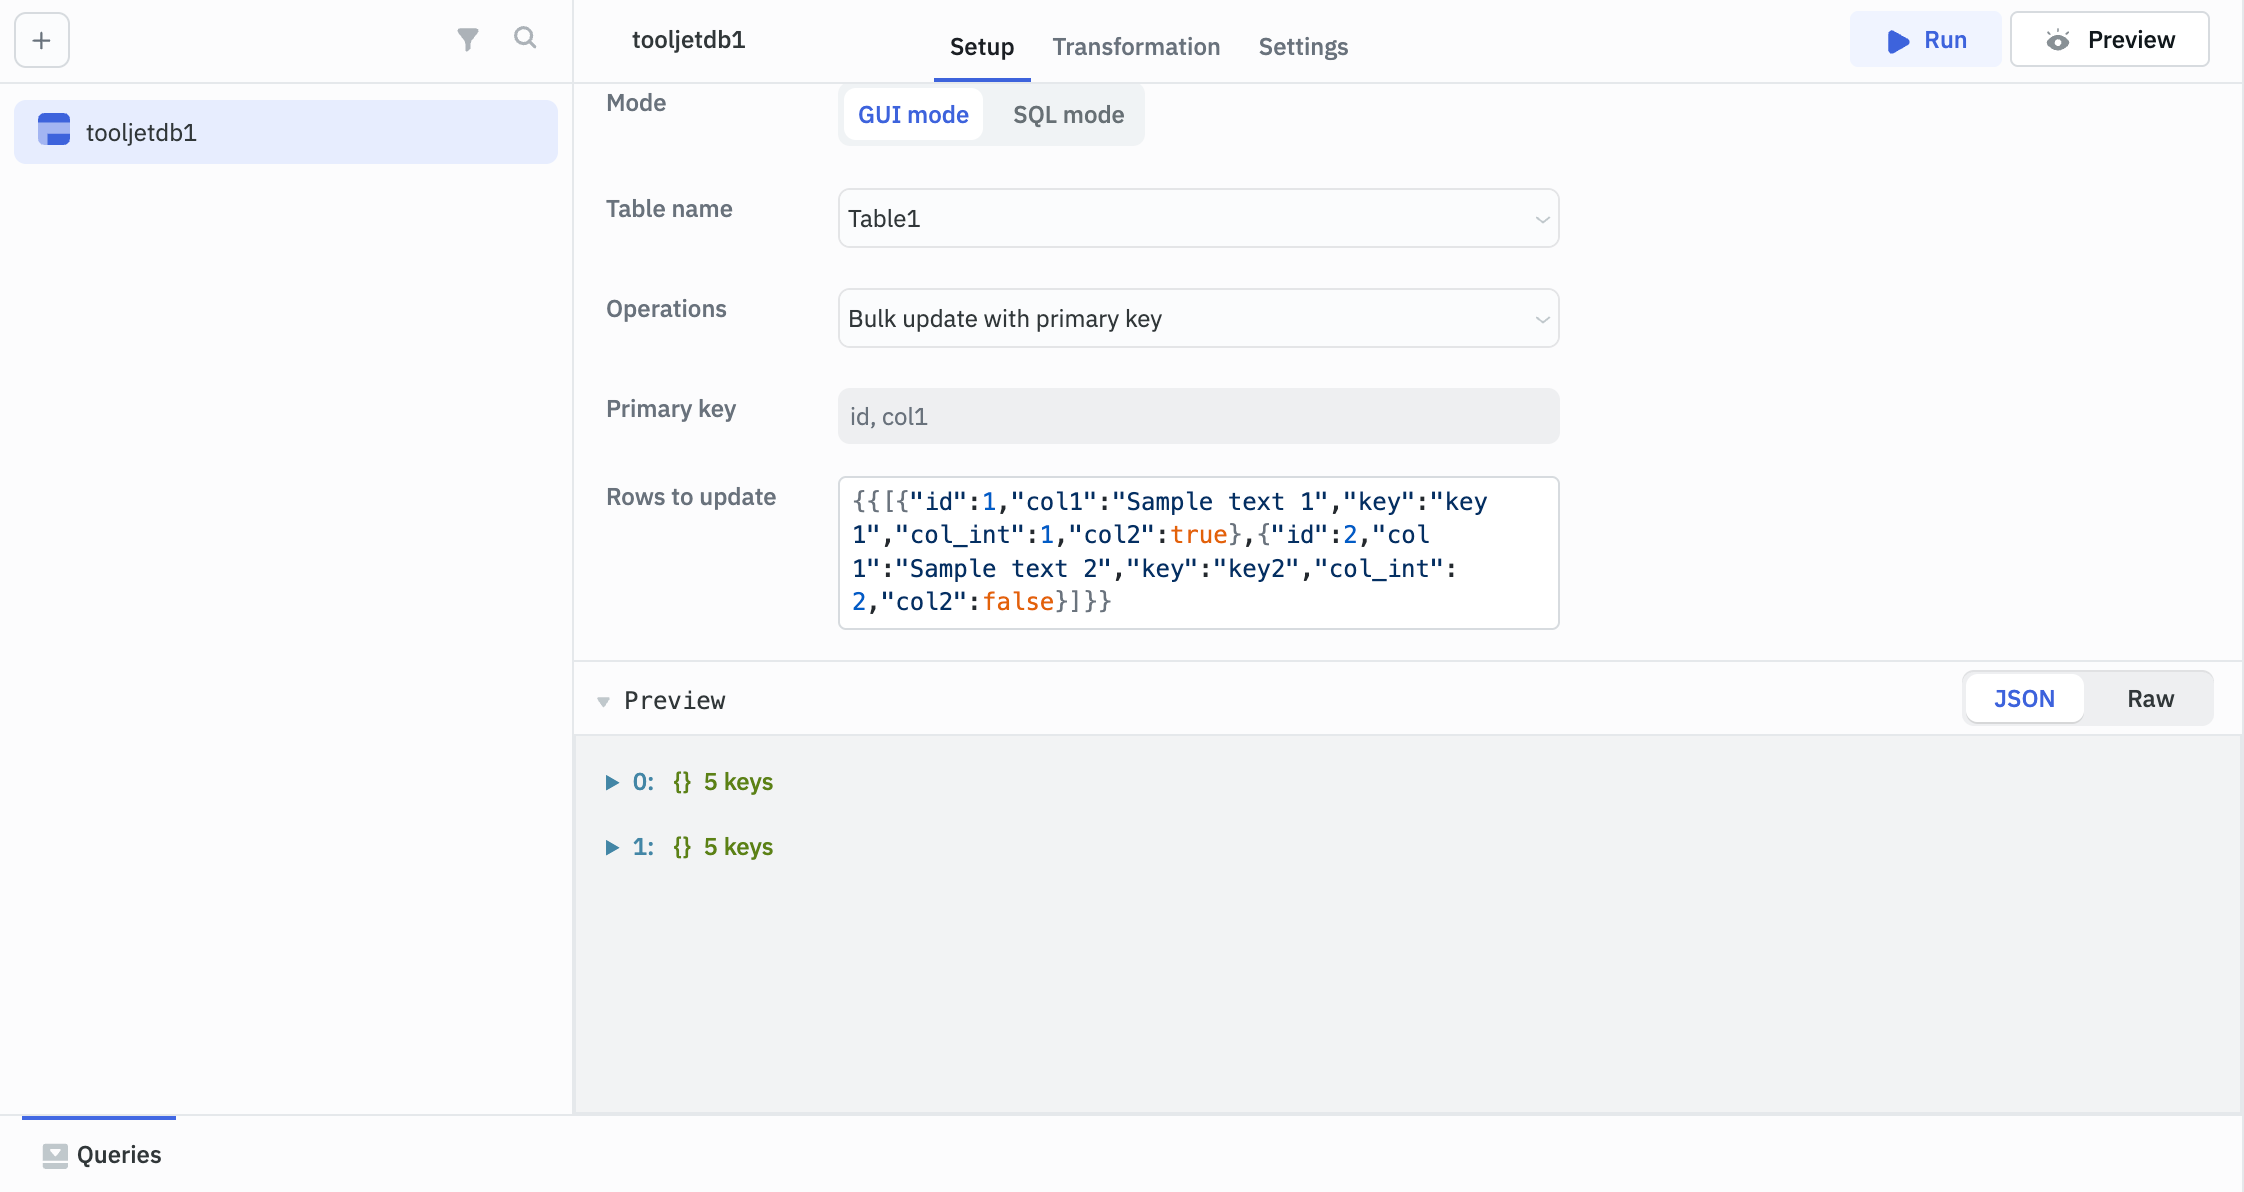
Bulk Update with Primary Key
This operation can be used to update multiple rows using the primary key. Primary key can be a singular primary key or a composite primary key.
Required Parameters
- Primary key: The primary key of the table is auto selected and cannot be edited.
- Rows to upsert: Array of objects of rows to be updated. Each object in the array need to specify primary key column(s) with their values.
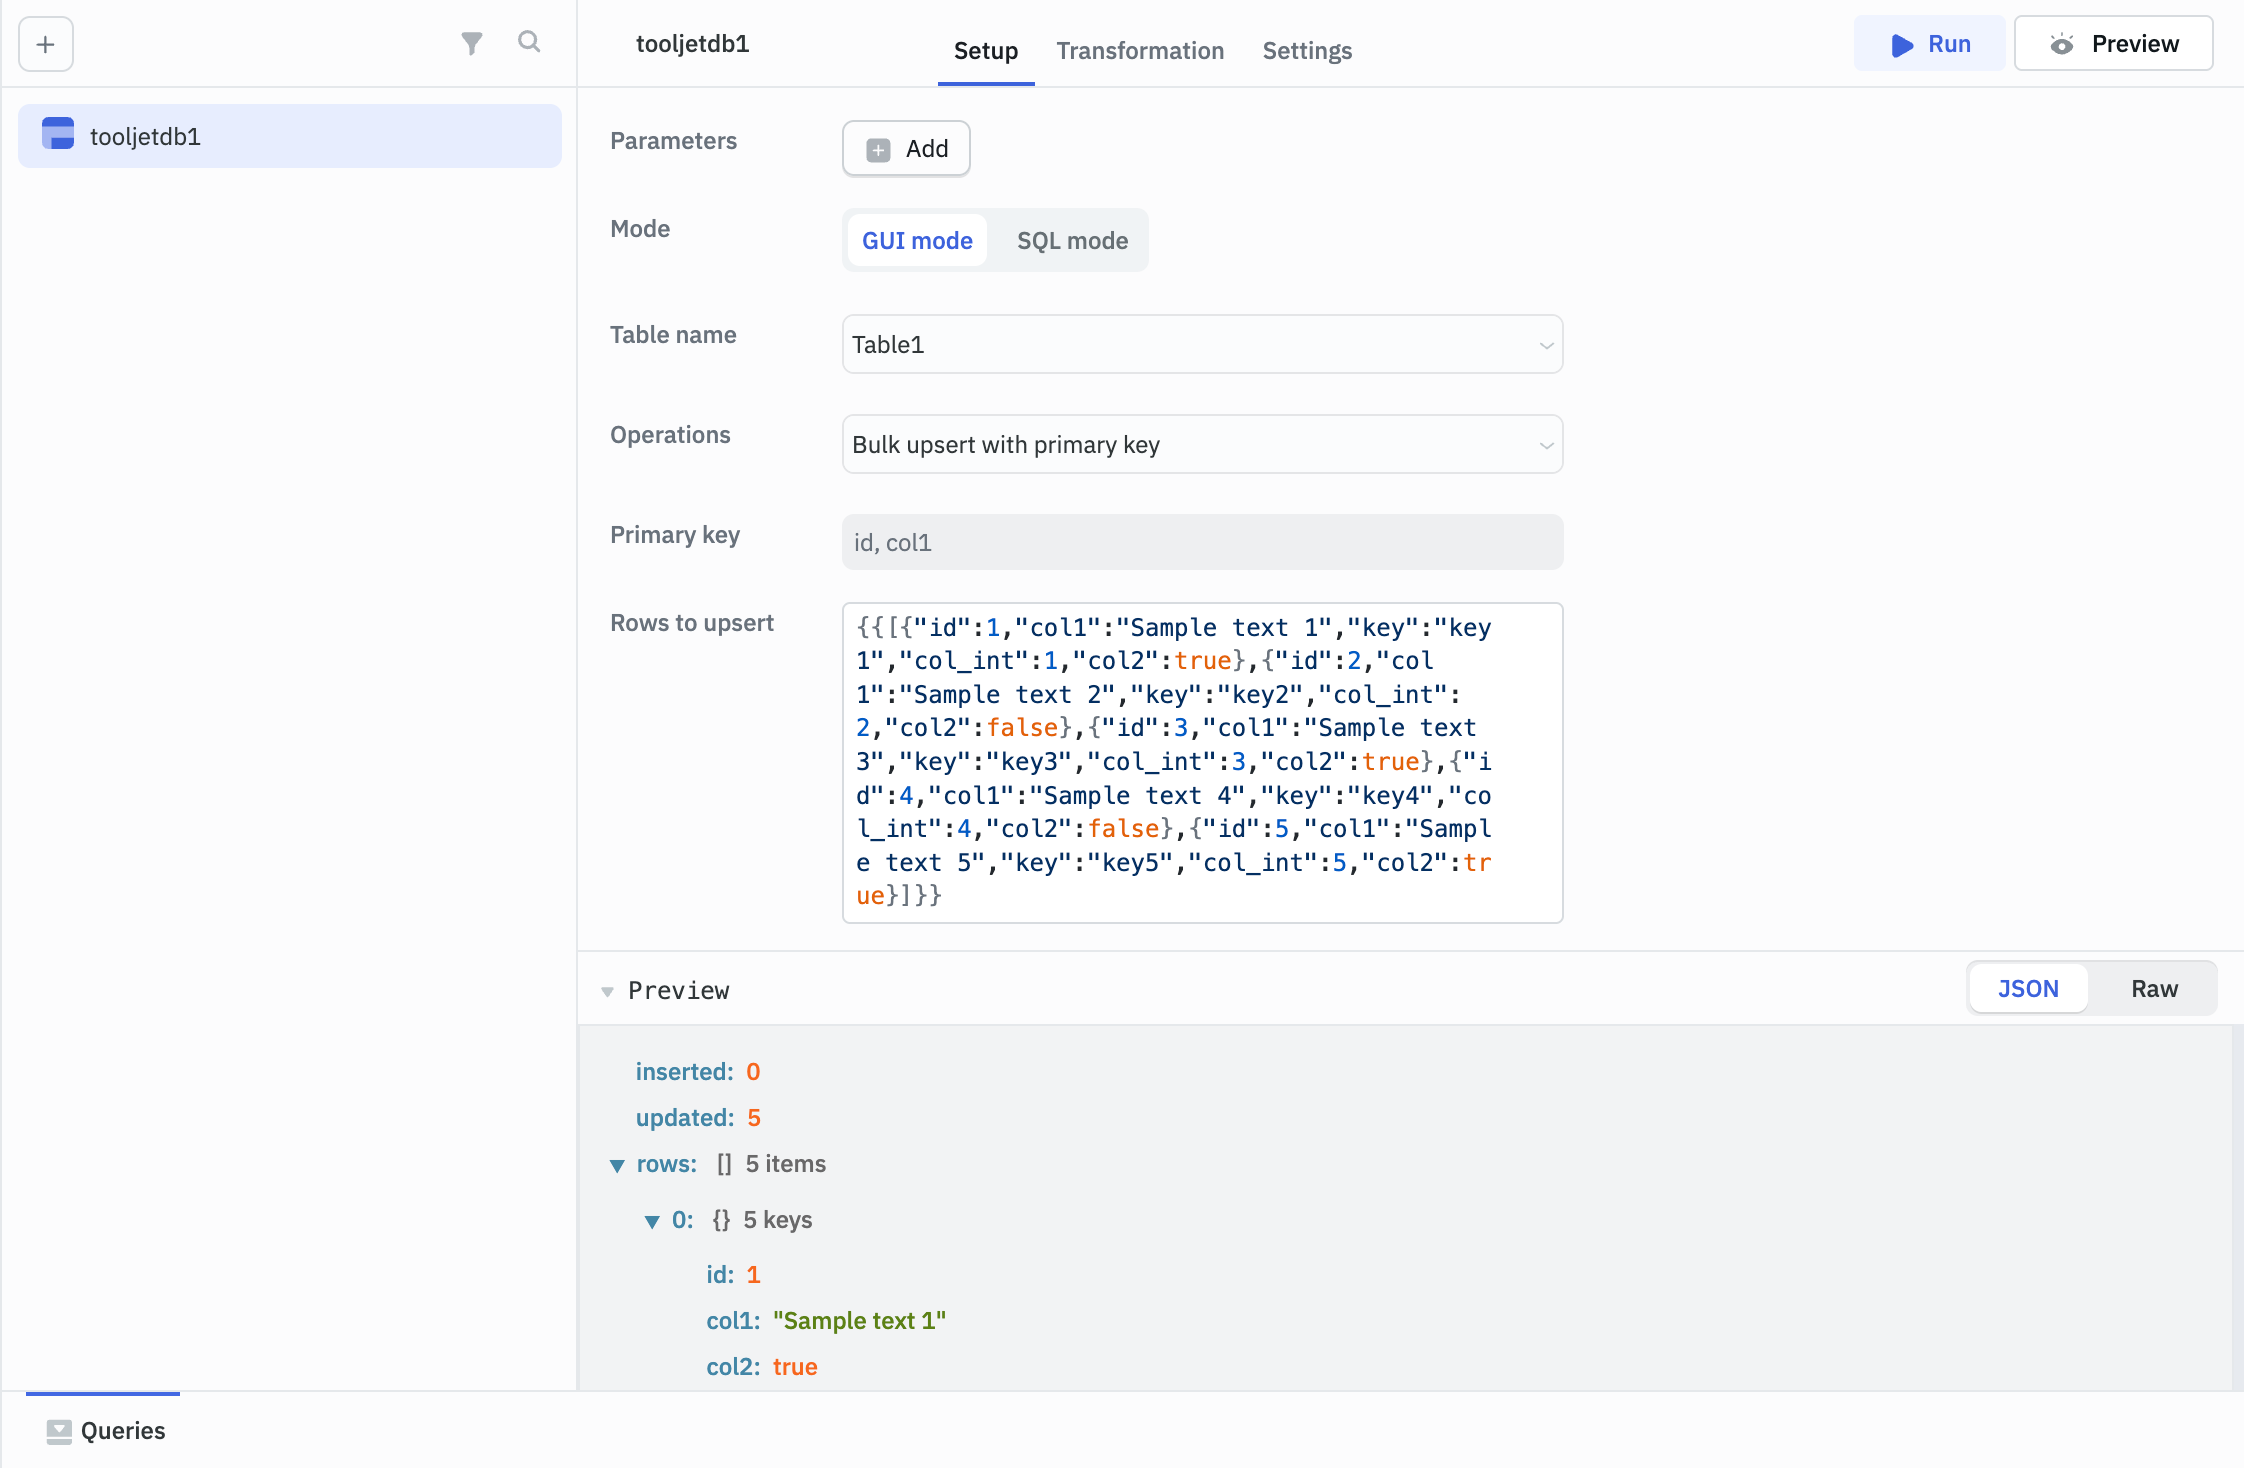
Bulk Upsert with Primary Key
This operation can be used to upsert multiple rows using the primary key. Primary key can be a singular primary key or a composite primary key. Using the upsert operation you can update an existing row or insert a new row if it doesn't exisit.
Required Parameters
- Primary key: The primary key of the table is auto selected and cannot be edited.
- Rows to upsert: Array of objects of rows to be updated. Each object in the array need to specify primary key column(s) with their values.
SQL Editor
The ToolJet SQL editor allows you to query the ToolJet Database by writing SQL queries, specifically supporting standard SQL syntax for Data Manipulation Language (DML) commands. This feature is only available on the Self-Hosted version of ToolJet.
Supported SQL Commands
-
DML Commands: You can use the following DML commands to manipulate data:
- SELECT: Retrieve data from the database.
- INSERT: Add new records to the database.
- UPDATE: Modify existing data.
- DELETE: Remove records from the database.
-
Restricted Commands:
- Data Definition Language (DDL) commands like CREATE, ALTER, TRUNCATE, DROP, and RENAME are not allowed.
- Data Control Language (DCL) commands like GRANT and REVOKE are also restricted.
SQL Editor Usage
- In the Query panel, click on the +Add button to add a new query, and select ToolJet Database.
- Select the SQL mode tab in the query editor.
- Write your SQL query in the editor.
- Click on the Run button to execute the query.
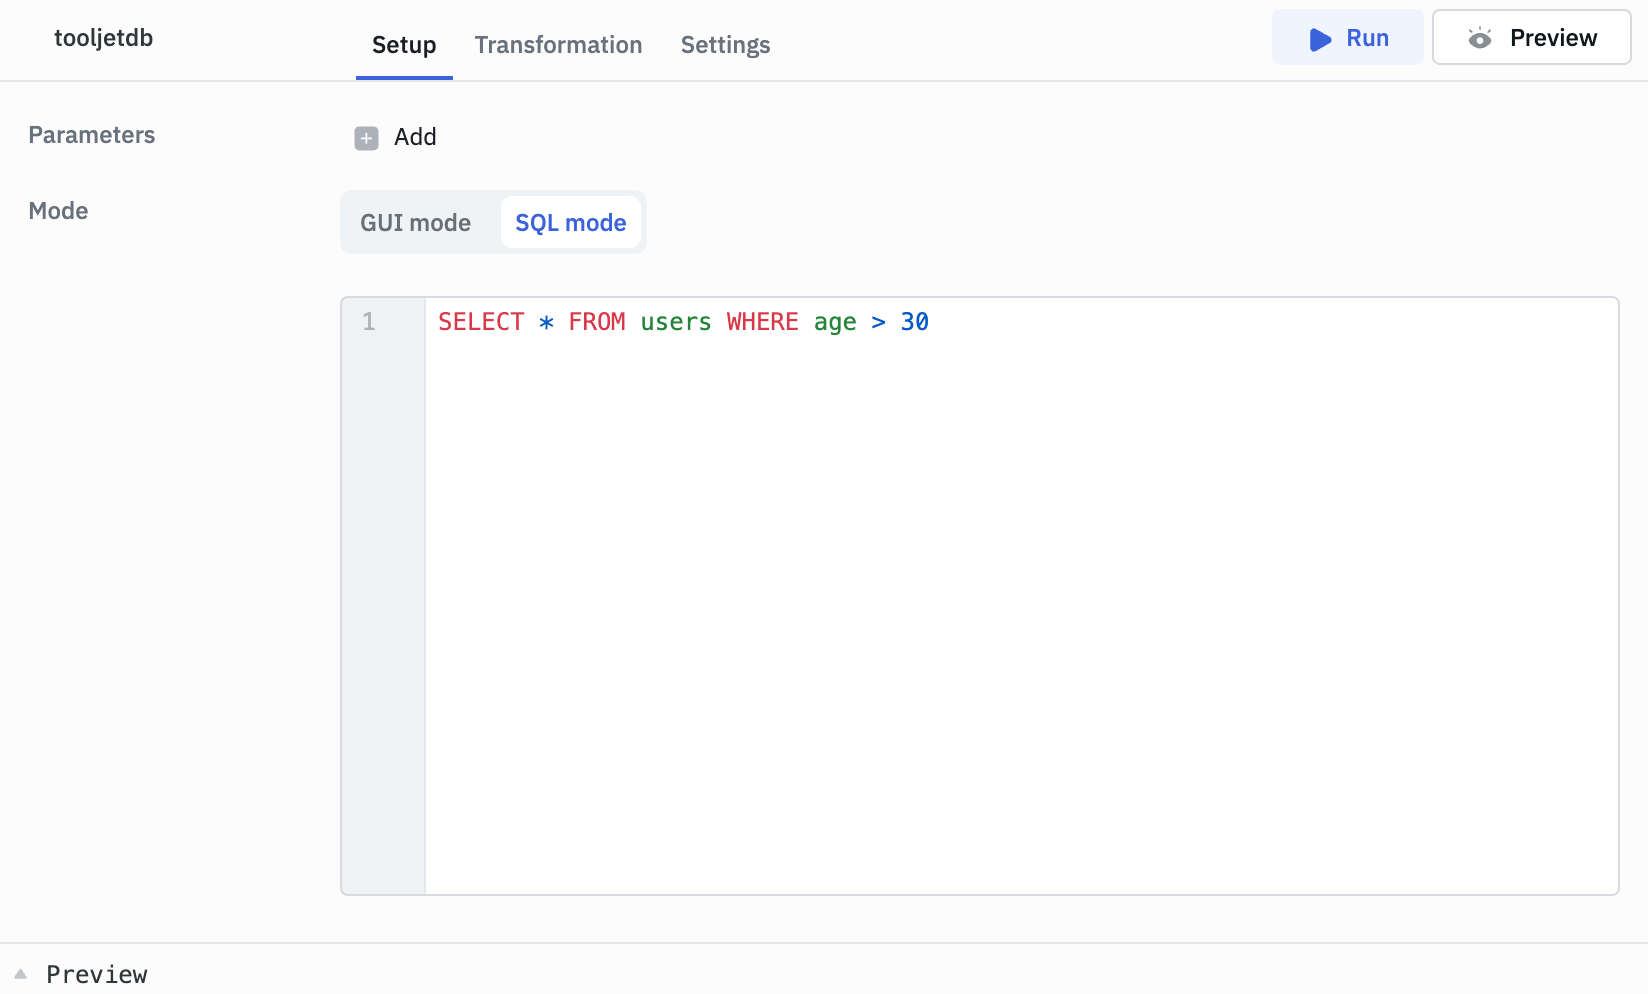
Example:
SELECT * FROM users WHERE age > 30
Modifying Tables with Foreign Key Constraints
When you are creating, updating, or deleting records in a table that has a foreign key constraint, you need to ensure that the foreign key constraint is not violated.
- If you are trying to create/update a new row in the source table, you need to ensure that the foreign key value exists in the target table. Otherwise, the operation will fail with an error message.
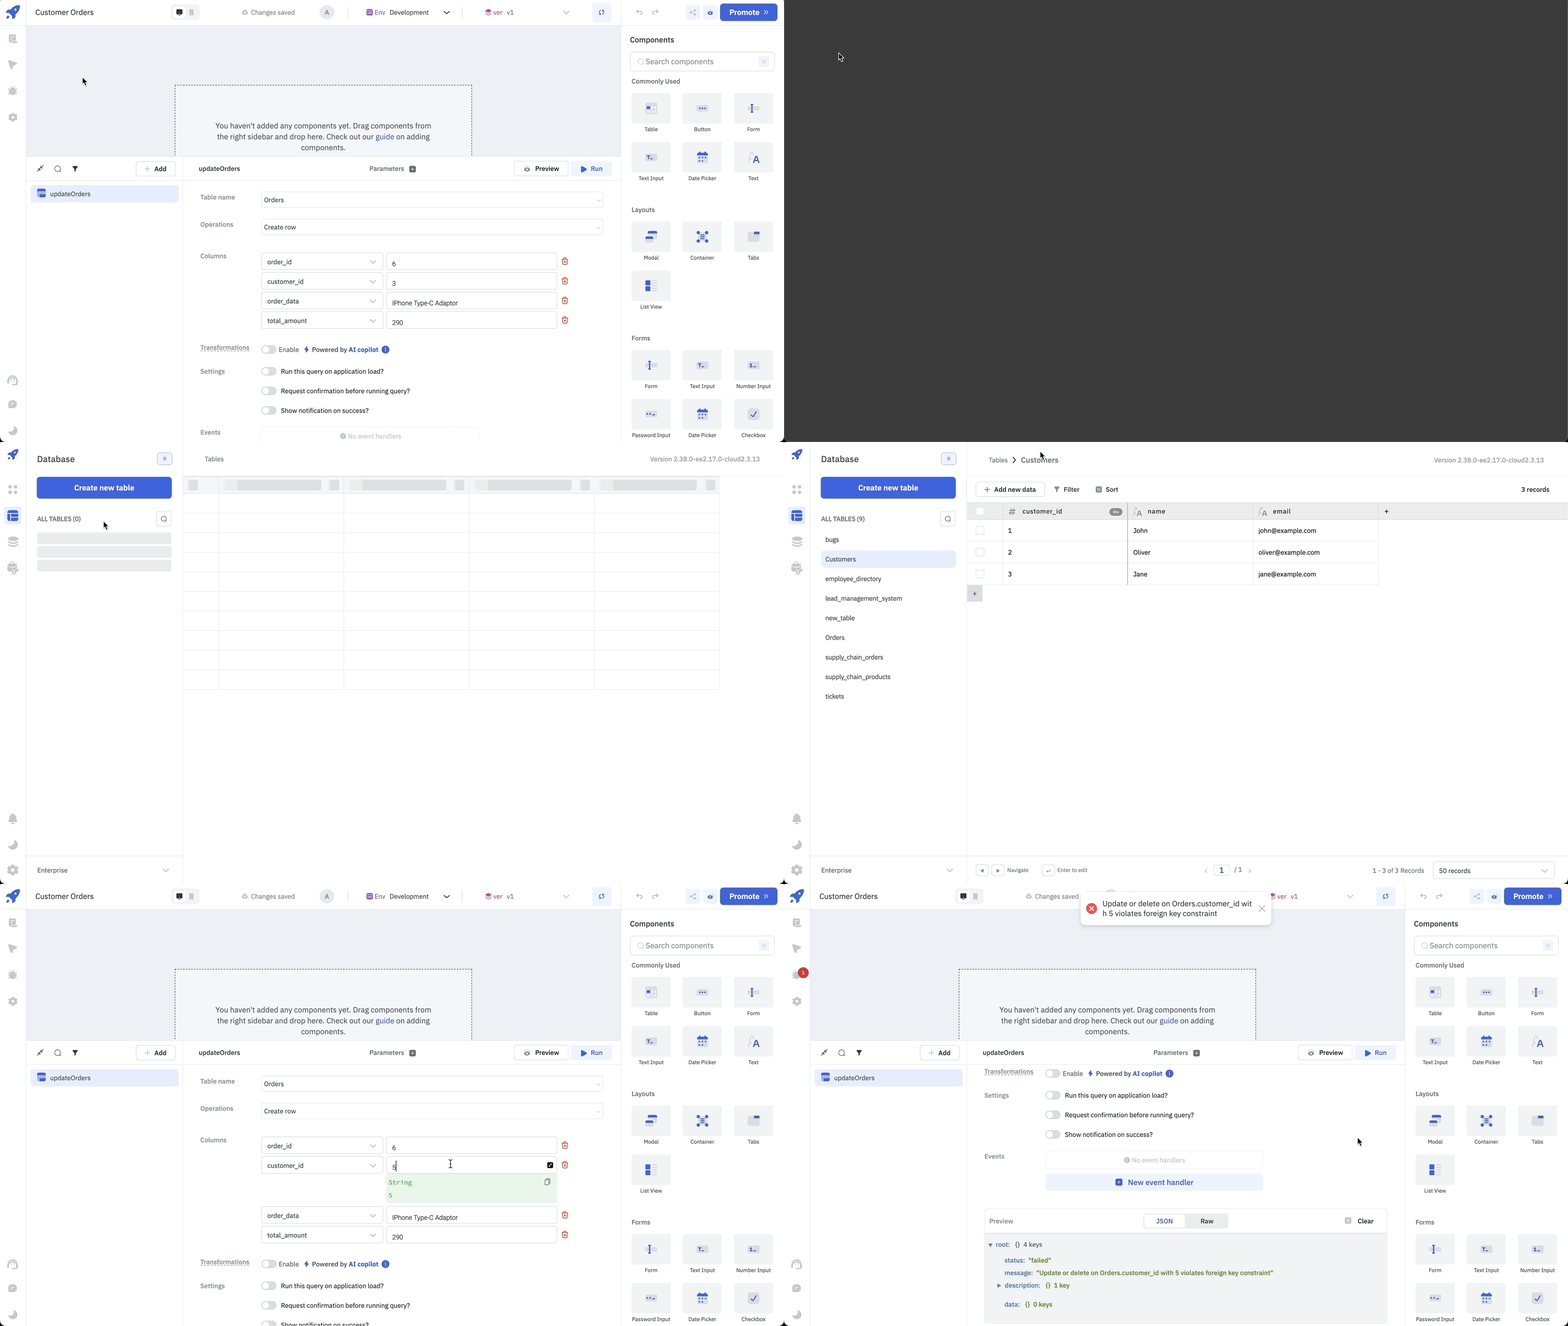
- Similarly, if you are trying to delete a row in the target table, you need to ensure that the foreign key value is not being referenced in the source table.
Join Tables
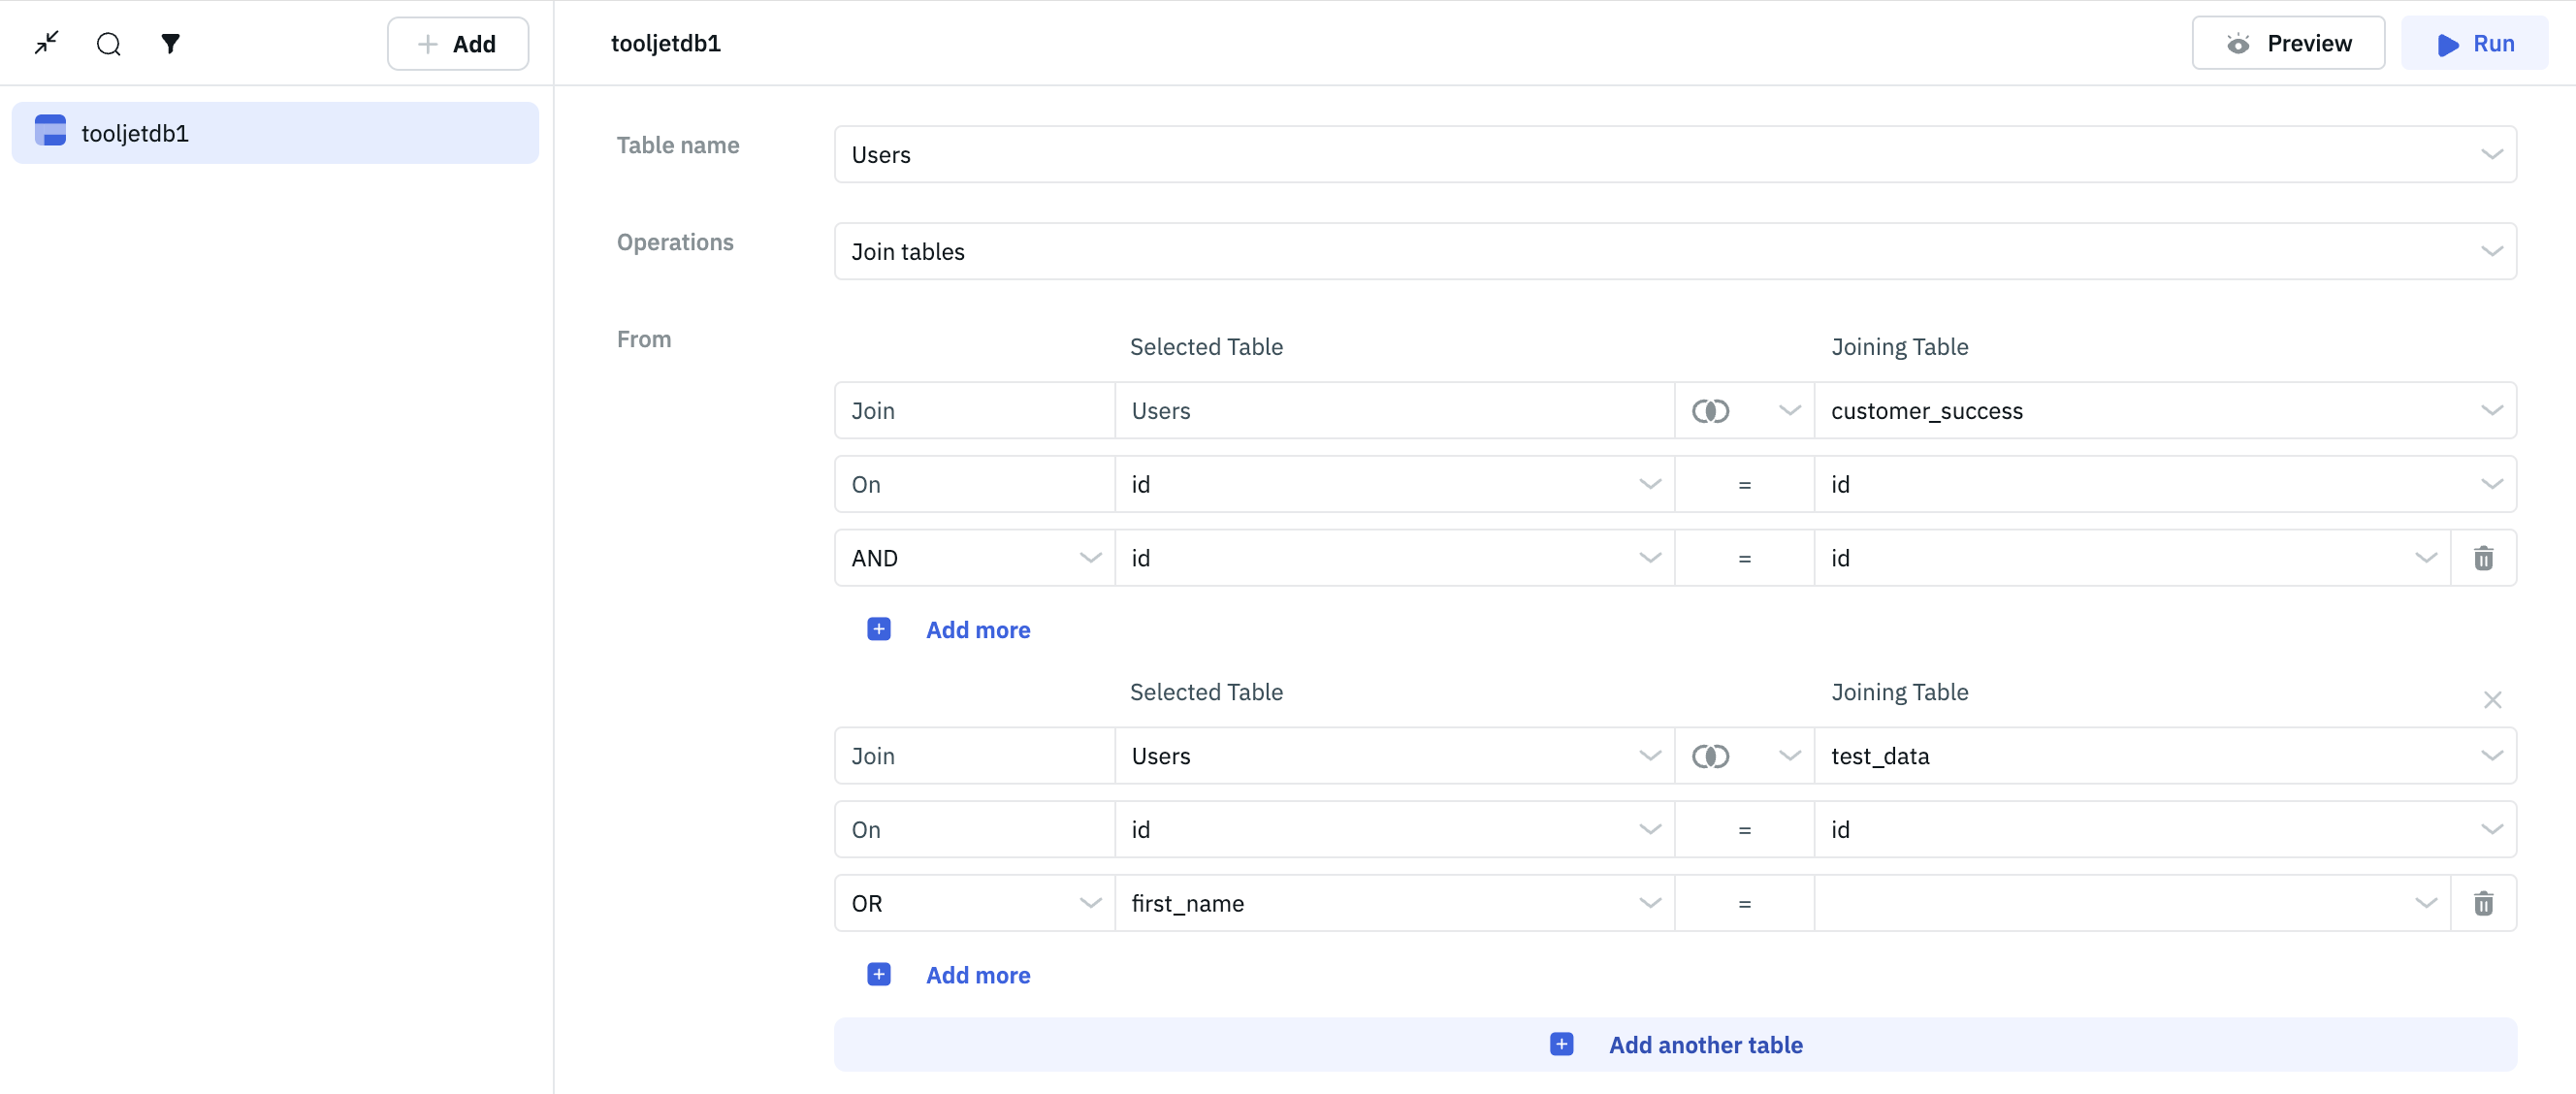
You can join two or more tables in the ToolJet database by using the Join operation.
Required Parameters
-
From: In the From section, the following parameters are available:
-
Selected Table: Select the table from which you want to join the other table.
-
Type of Join: Select the type of join you want to perform. The available options are:
Inner Join,Left Join,Right Join, andFull Outer Join. -
Joining Table: Select the table that you want to join with the selected table. If the selected table has a foreign key relationship(s) with other tables, those tables will be listed with a foreign key icon next to their name.
-
On: Select the column from the selected table and the joining table on which you want to join the tables. Currently, only
=operation is supported for joining tables. If the selected table and the joining table have a foreign key relationship, both the columns will be auto-populated in the On dropdown.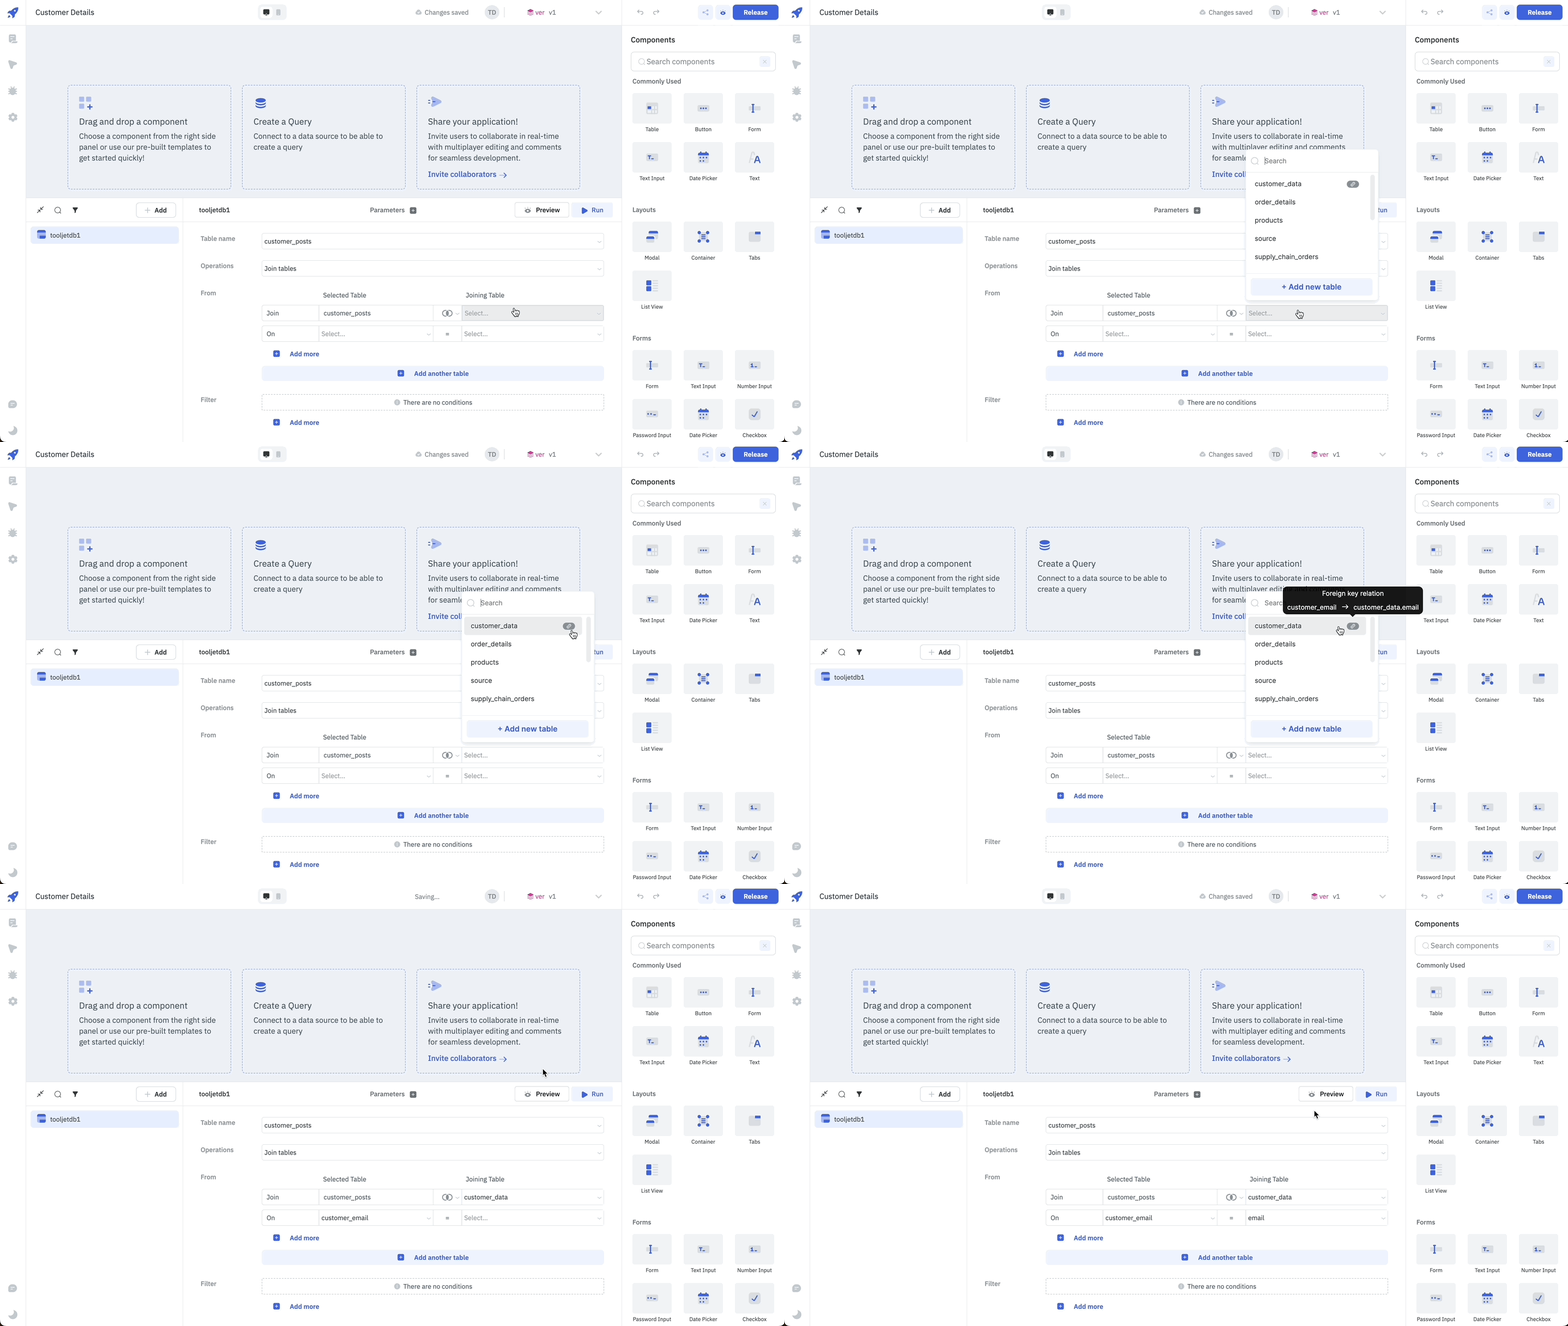
- AND or OR condition: You can add multiple conditions by clicking on the +Add more button below each join. The conditions can be joined by
ANDorORoperation.
- AND or OR condition: You can add multiple conditions by clicking on the +Add more button below each join. The conditions can be joined by
-
-
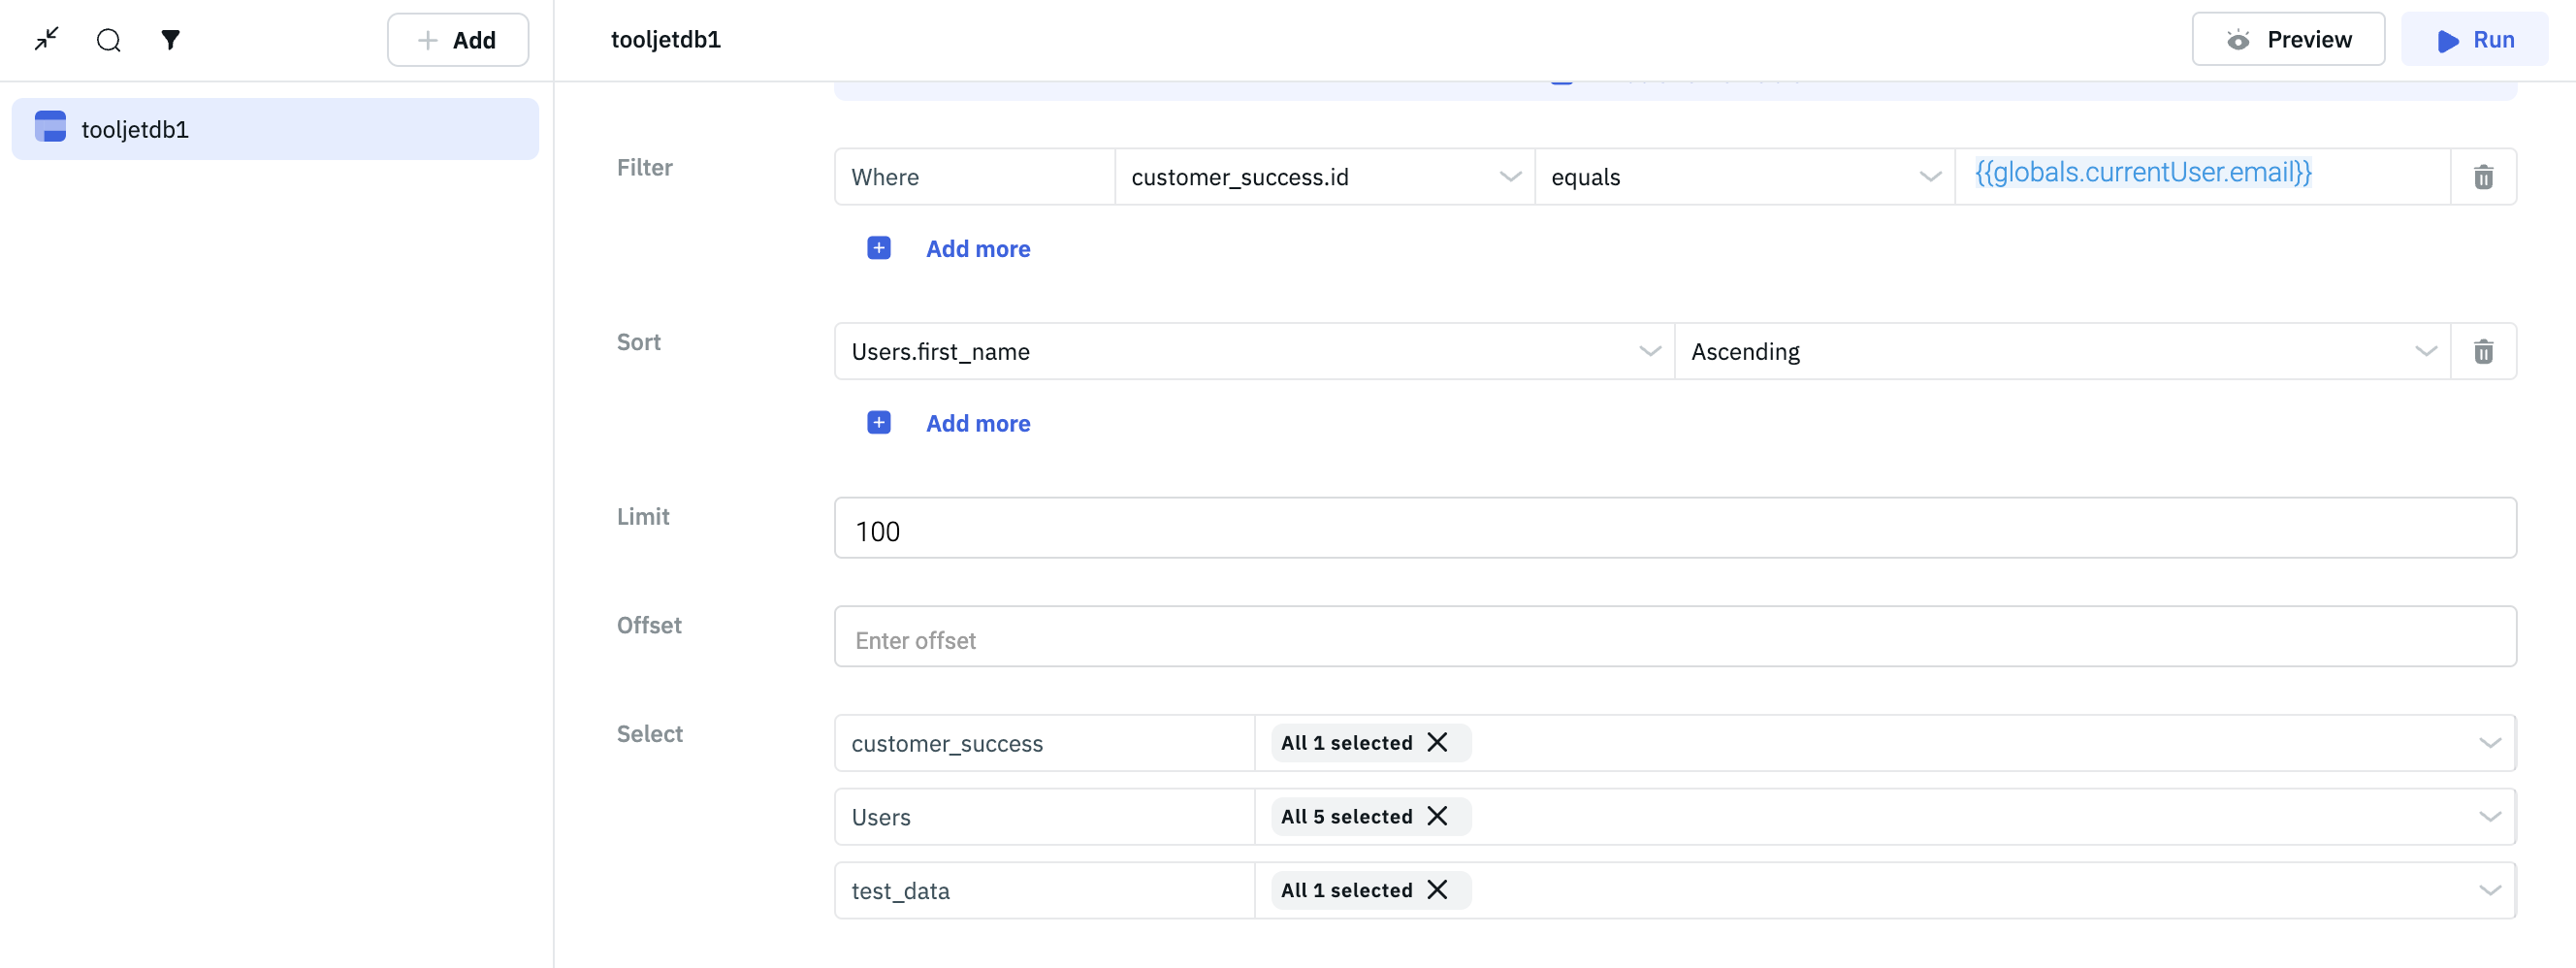
Filter: Add a condition by choosing a column, an operation, and the value for filtering the records. The operations supported are same as the filter operations for the List rows operation.
-
Sort: Sort the query response by choosing a column and the order (ascending or descending).
-
Limit: Limit the number of records to be returned by entering a number.
-
Offset: Offset the number of records to be returned by entering a number. This parameter is used for pagination.
-
Select: Select the columns that you want to return in the query response. By default, all the columns are selected.
Mapping Date with Time Column to Table Component
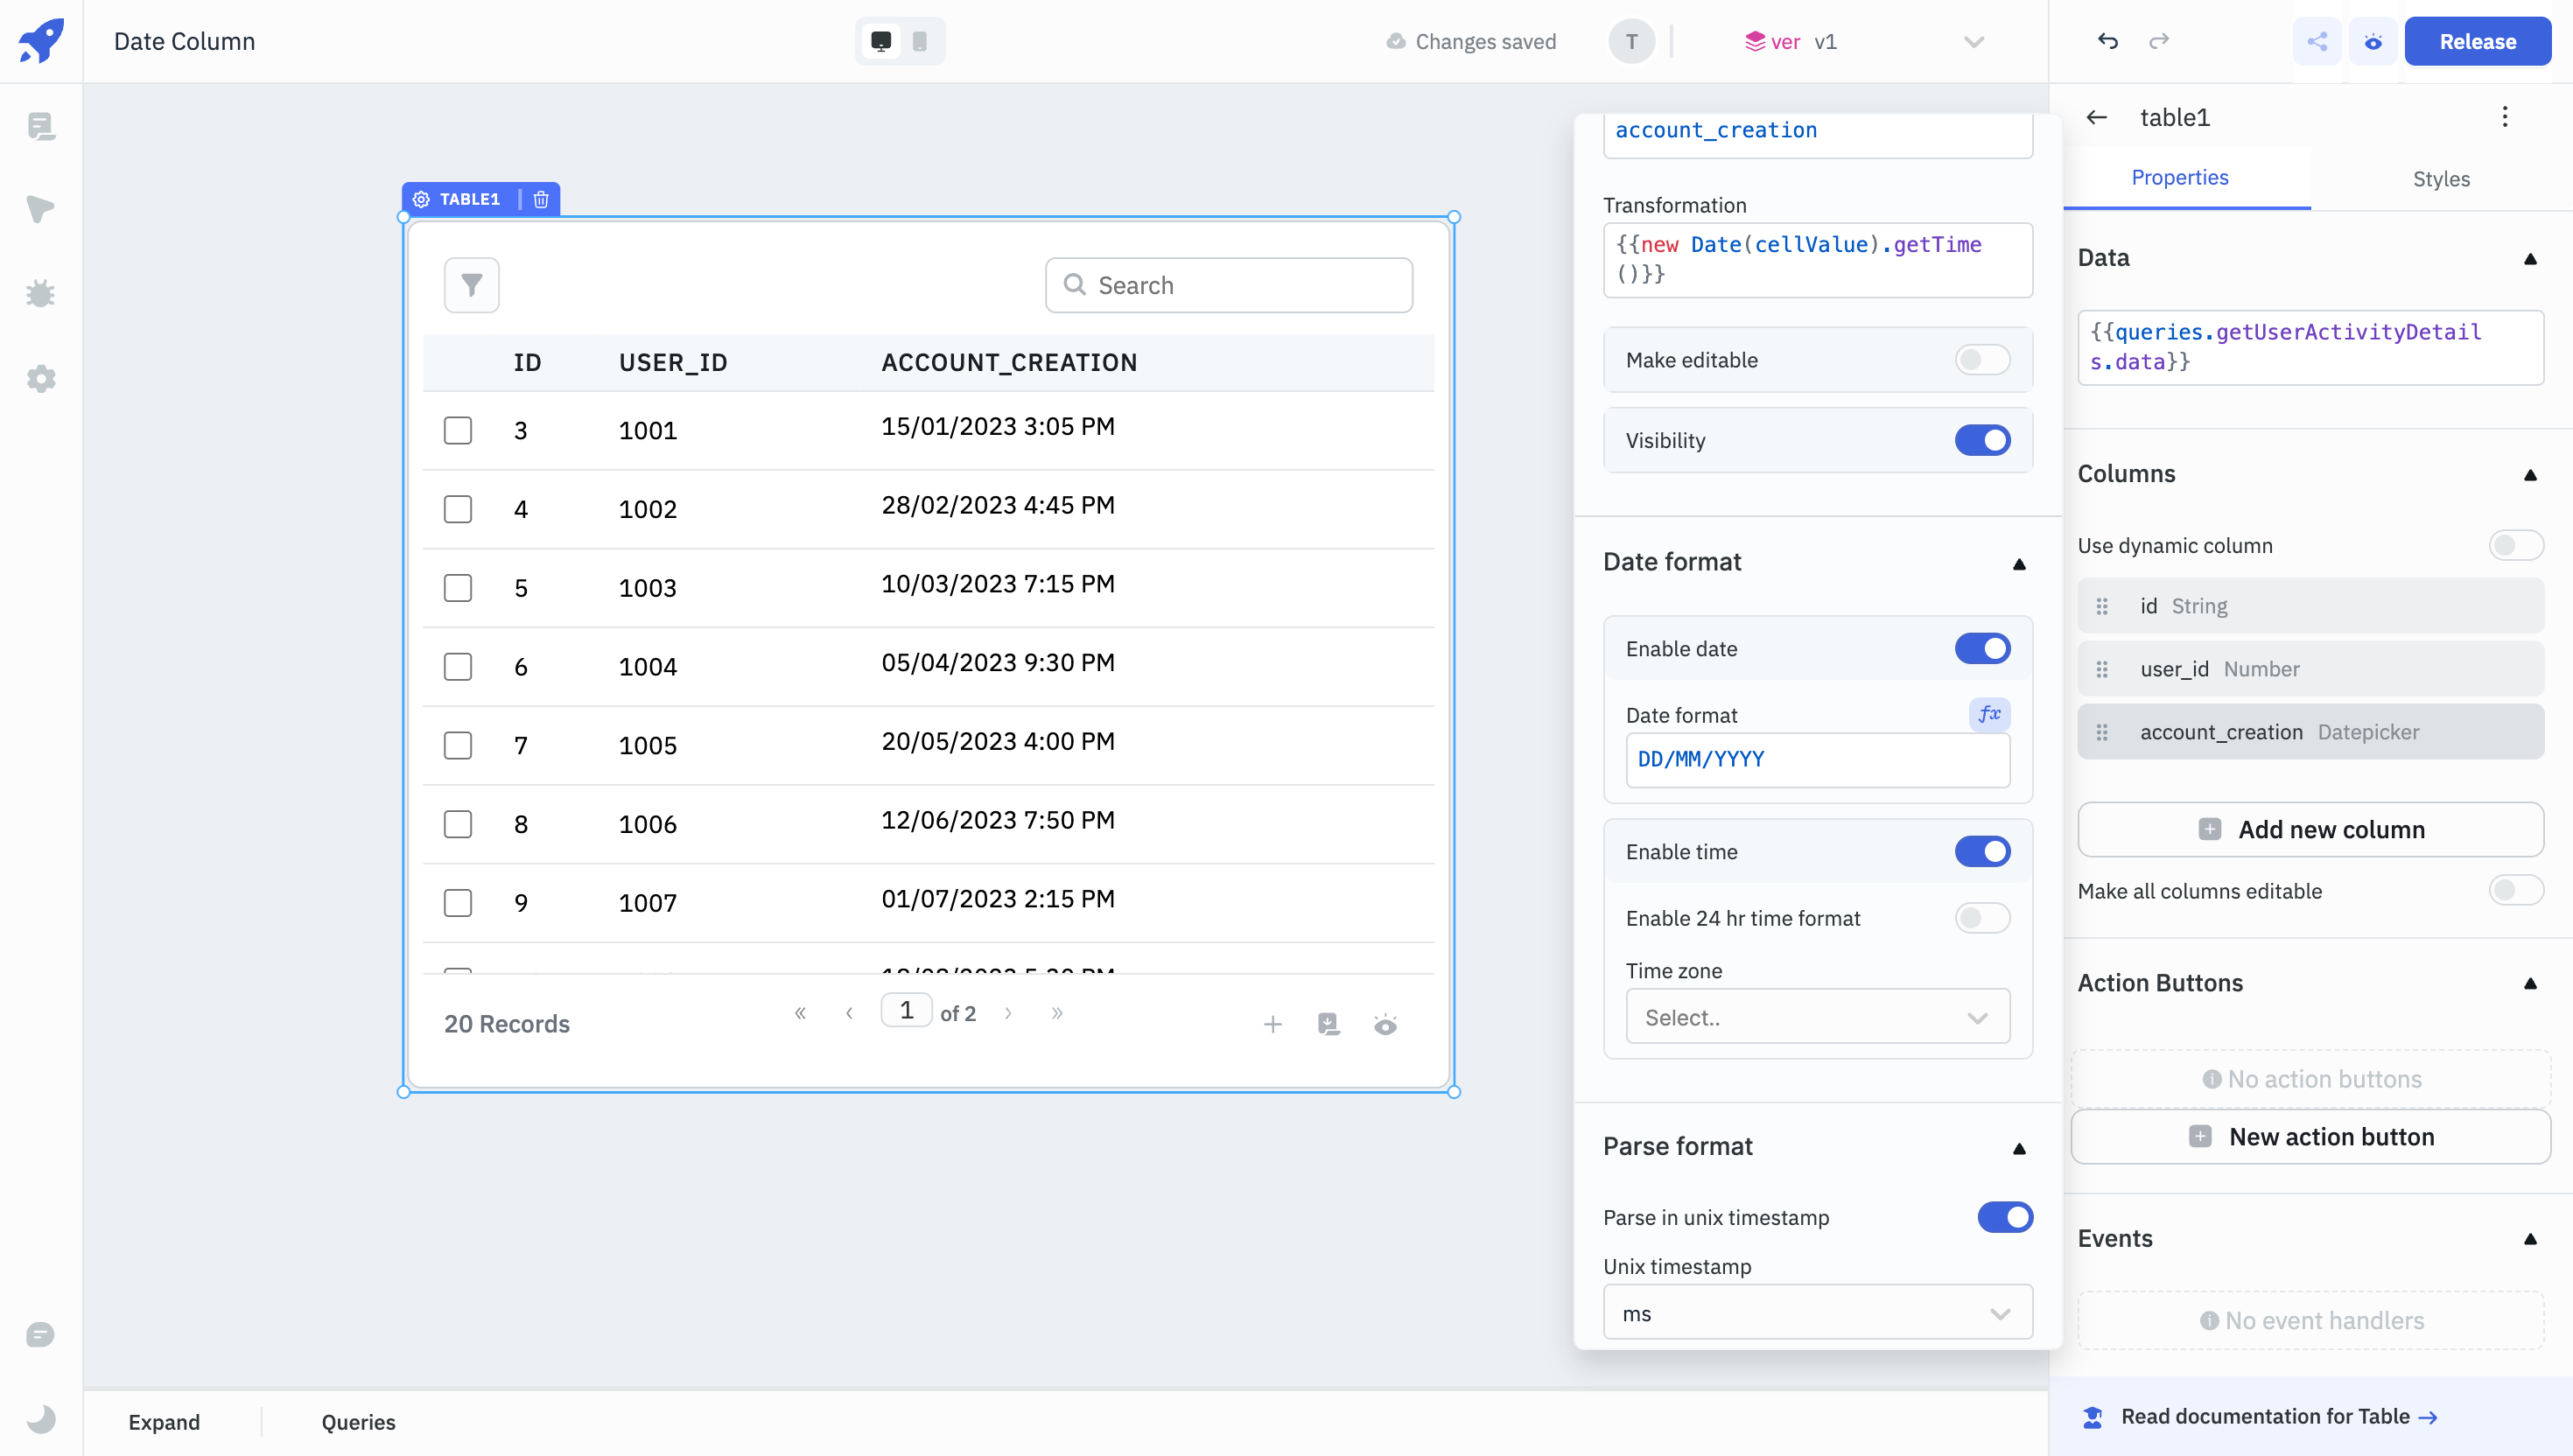
The date with time column stores data in the ISO 8601 format. When querying a table with a date with time column, the column is displayed in the ISO 8601 format by default. To display the date with time column in a more readable format in the Table Component, follow these steps:
- Connect the query to the Table Component and navigate to its properties panel.
- In the Columns section, select the column that stores the date with time.
- Change the column type from String to Date Picker.
- Under the date format section, toggle on the Enable date and Enable time options accordingly.
- In the transformation field, the
{{cellValue}}variable contains the ISO 8601 formatted date. Convert it to a Date object using{{new Date(cellValue)}}, then format the Date object to meet your requirements.
Querying JSON Data Type
In ToolJet Database, a column can be set to JSON Data Type. It can be used to store structured data like arrays or nested objects, making it useful for complex data structures such as configurations or logs. To query the JSON Data Type, follow the following steps:
Flat JSON Object
A flat JSON object is a JSON structure where all key-value pairs exist at a single level, without any nesting. Each key is unique within the object, and all values are direct data entries rather than other objects or arrays.
- Add ToolJet DB as the Data Source from the query panel.
- Select GUI mode (else you can select SQL mode as well).
- Select the Table name.
- Select the desired operation from the dropdown.
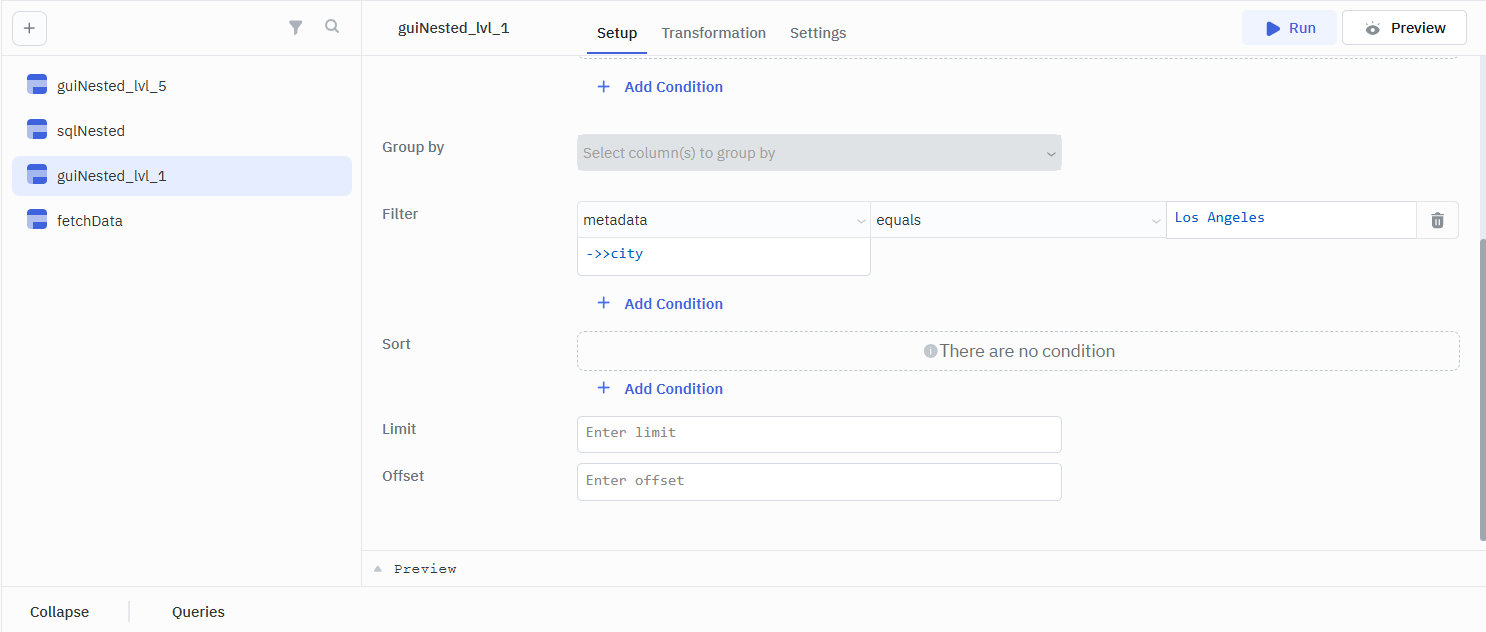
- Click on + Add Condition button in front of Filter.
- Choose column that consist JSON Data, choose the desired operation and enter the value.
- In the input box below the column name, enter the desired key by adding
->>before the key, example->>city.
Response Example
[
  {
    "id": 1,
    "json": {
      "id": 101,
      "age": 30,
      "city": "Los Angeles",
      "name": "Alice Johnson",
      "email": "[email protected]",
      "country": "USA"
    }
  }
]
Nested JSON Object
A nested JSON object is a JSON structure that contains key-value pairs, where some values are themselves JSON objects or arrays. This creates a hierarchical, multi-level structure with nested layers, which can represent complex relationships between data elements.
- Add ToolJet DB as the Data Source from the query panel.
- Select GUI mode (else you can select SQL mode as well).
- Select the Table name.
- Select the desired operation from the dropdown.
- Click on + Add Condition button in front of Filter.
- Choose column that consist JSON Data, choose the desired operation and enter the value.
- In the input box below the column name, enter the desired JSON path by adding
->before each key, example->user->preferences->settings->notifications->sms->alerts->appointments->cancellations.
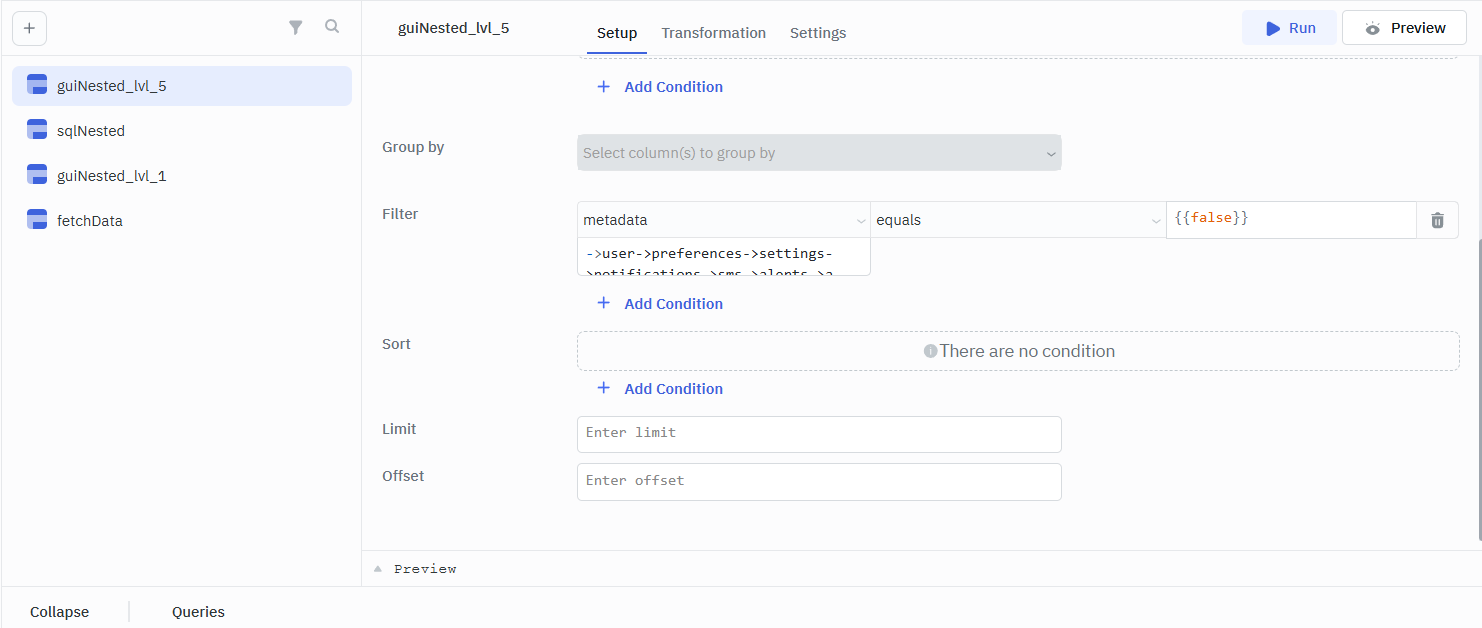
Note: You can use -> to access nested JSON fields and use ->> to access the text.
Response Example
[
  {
    "id": 102,
    "name": "Michael Brown",
    "age": 25,
    "email": "[email protected]",
    "user": {
      "preference": {
        "settings": {
          "notification": {
            "sms": {
              "alert": false
            }
          }
        }
      }
    }
  },
  {
    "id": 104,
    "name": "David Miller",
    "age": 35,
    "email": "[email protected]",
    "user": {
      "preference": {
        "settings": {
          "notification": {
            "sms": {
              "alert": false
            }
          }
        }
      }
    }
  }
]
If you have any other questions or feedback about ToolJet Database, please reach us out at [email protected] or join our Slack Community