Print Data from Multiple Tabs
This guide walks you through creating a comprehensive PDF report that combines content from all tabs in your ToolJet application. This is particularly valuable when building applications like Invoice Generators, Employee Records, Multi-section Reports etc.
Prerequisites
Before starting, make sure you have:
- A ToolJet application with a Tabs component containing multiple tabs
- Data loaded and displaying in your tabs (from a database query, API, or other data source)
- Basic familiarity with:
- Creating buttons and adding event handlers
- Writing simple JavaScript queries in ToolJet
- Using variables to store temporary data
Application Setup
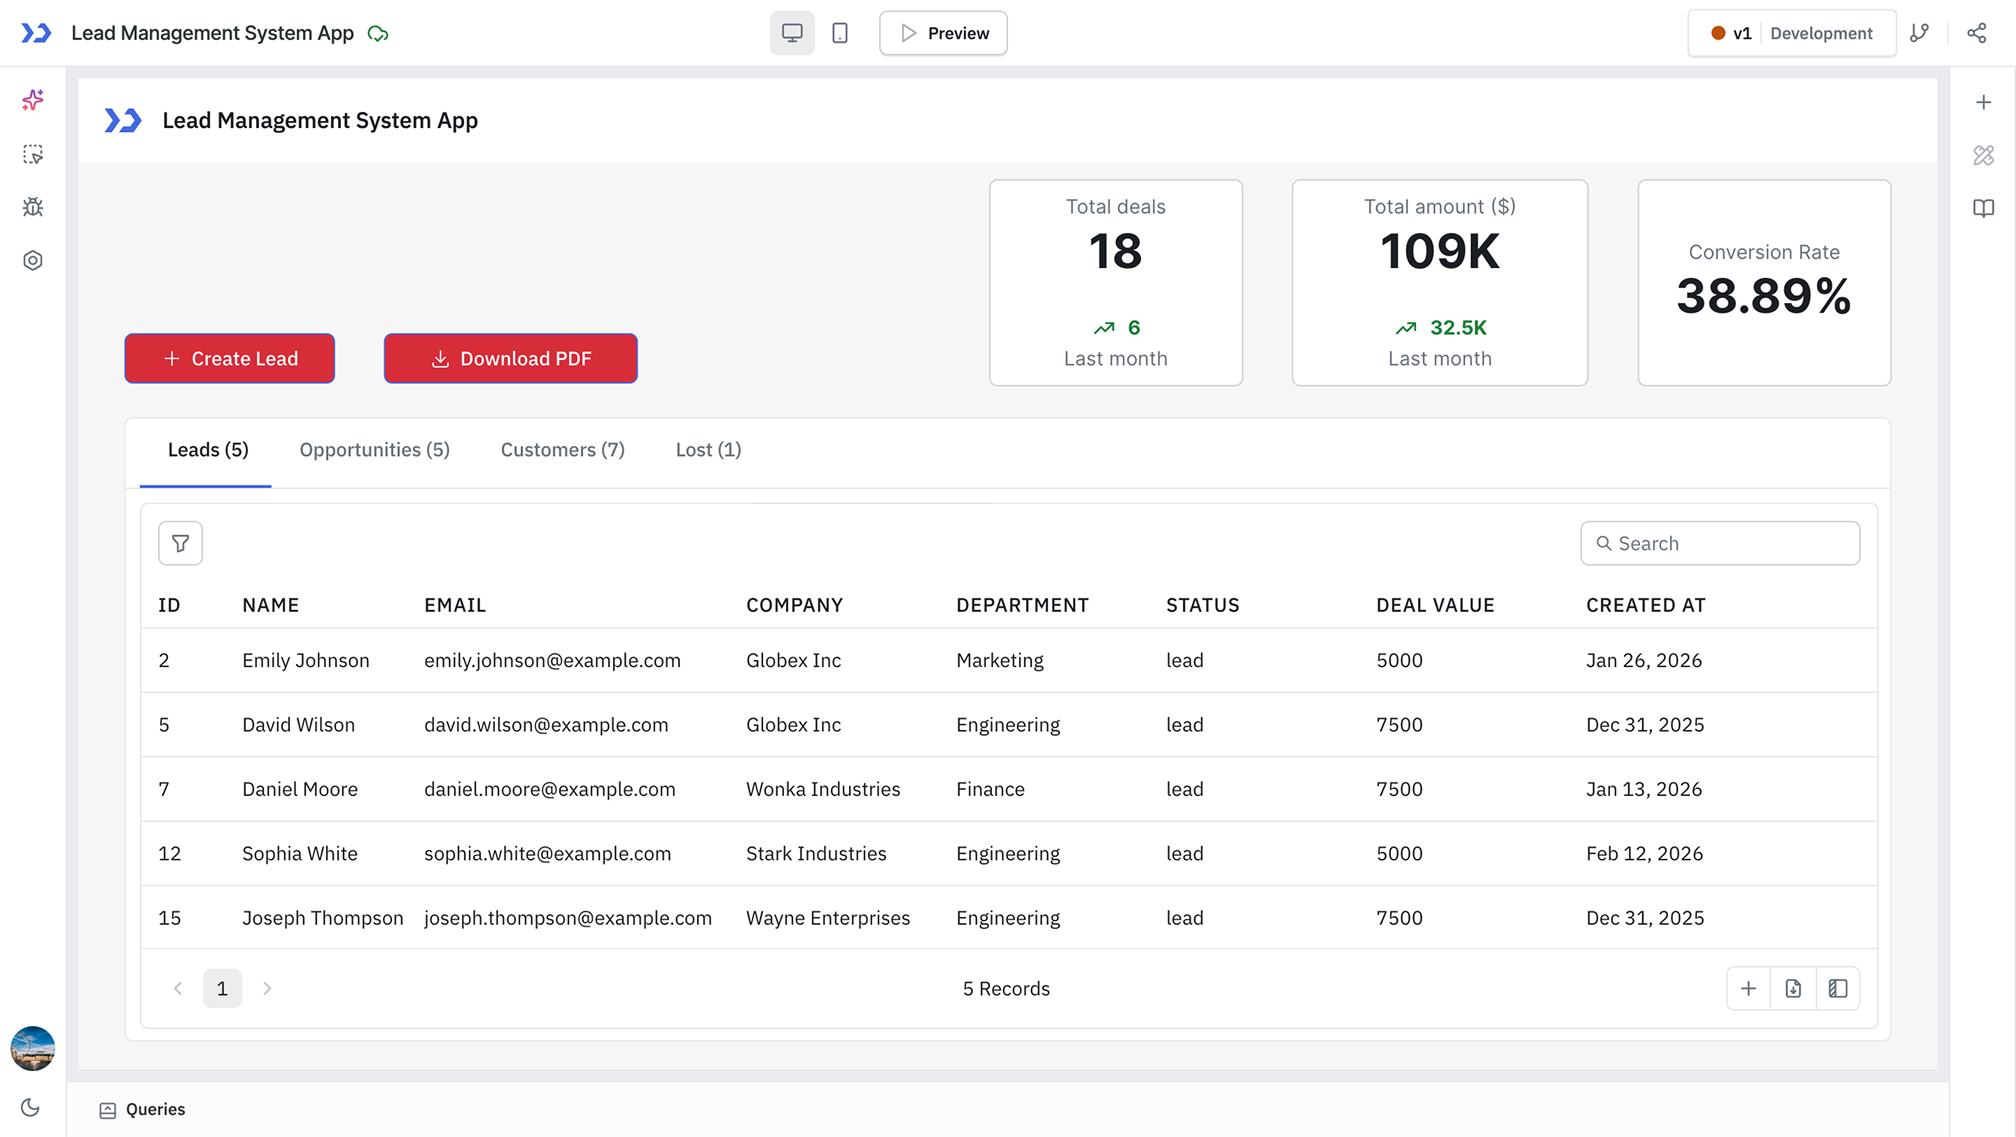
For this guide, we'll use a Lead Management System as our example. The application has a Tabs component with 4 tabs.
Each tab displays data from the leads database table using a query called fetchData.
You can adapt this approach to any application with tabs. Just adjust the tab count in the queries to match your setup.
Step 1: Add the Download PDF Button
First, add a button that will trigger the entire print workflow. You can place this button anywhere in your application, typically near the top of your tabs or in a toolbar.
After adding the button, configure two event handlers:
Event 1: Store the Current Tab
Add an On click event with Set variable action. Set the key as lastSelectedTab and value as {{components.tabs.currentTab}}. This saves the user's current tab selection so we can return them to it after printing.
Event 2: Start the Print Process
Add another On click event with Run query action and select the viewTabs query. This kicks off the tab iteration process. We'll create this query in the next step.
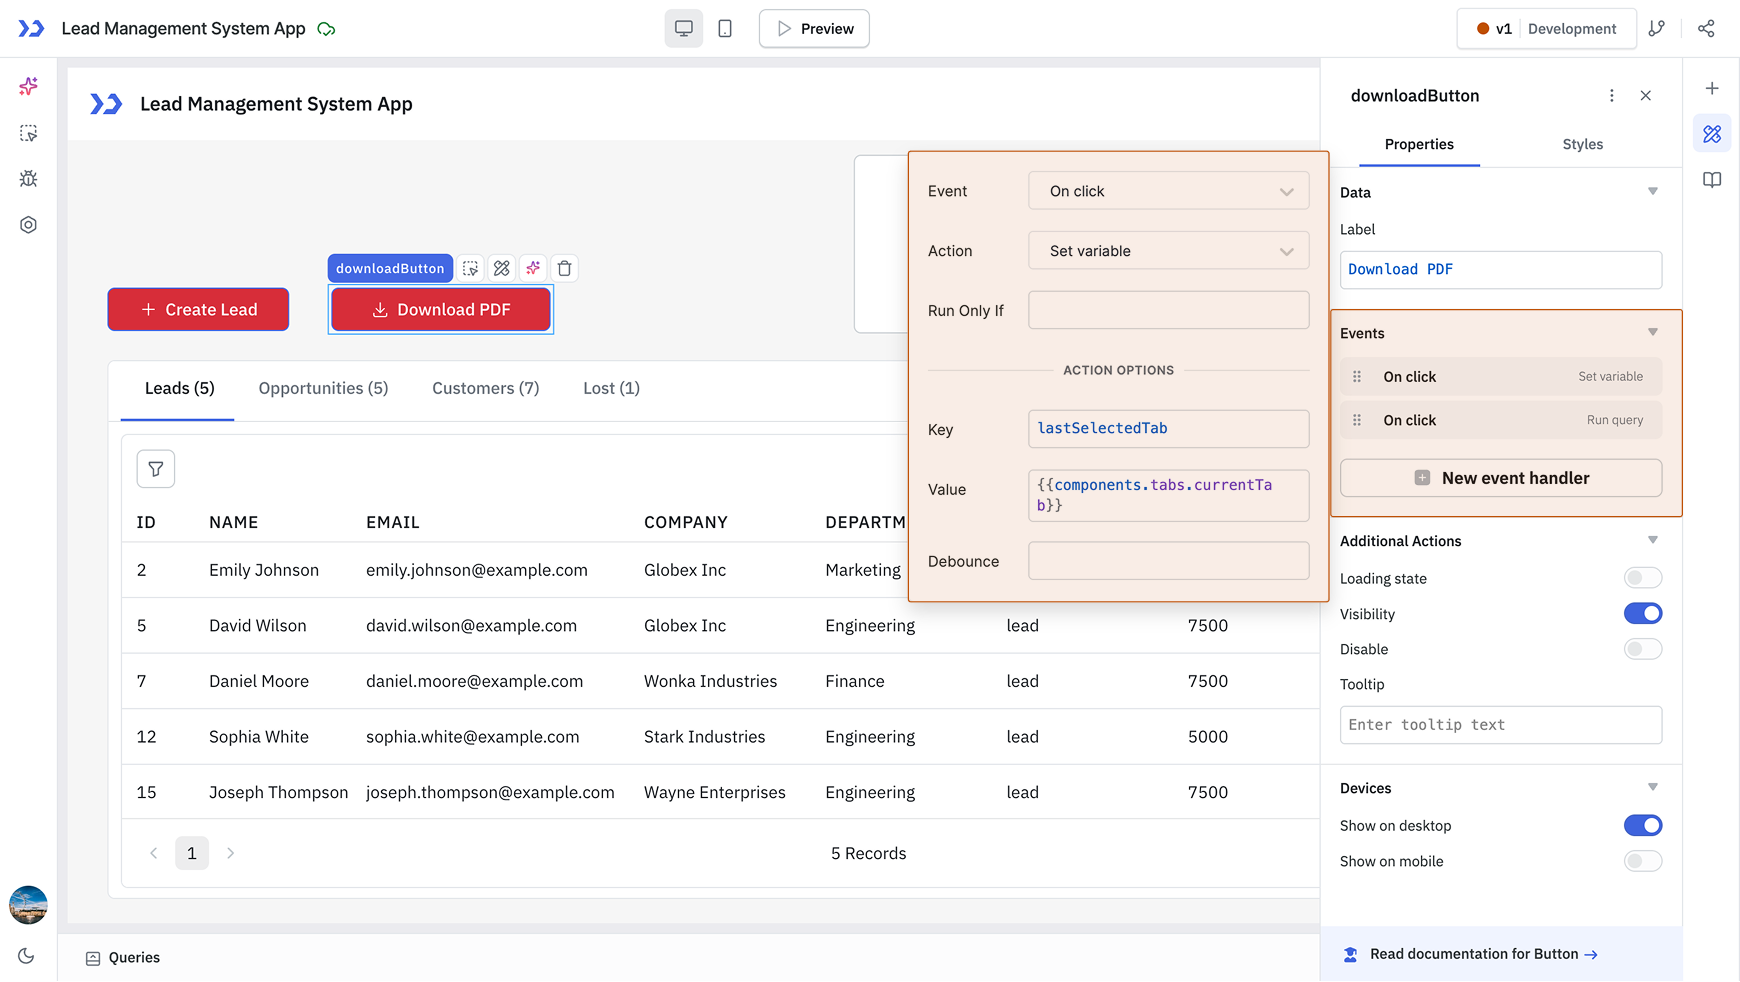
Note: You'll need to create the viewTabs query first (see next step) before you can select it in this event handler.
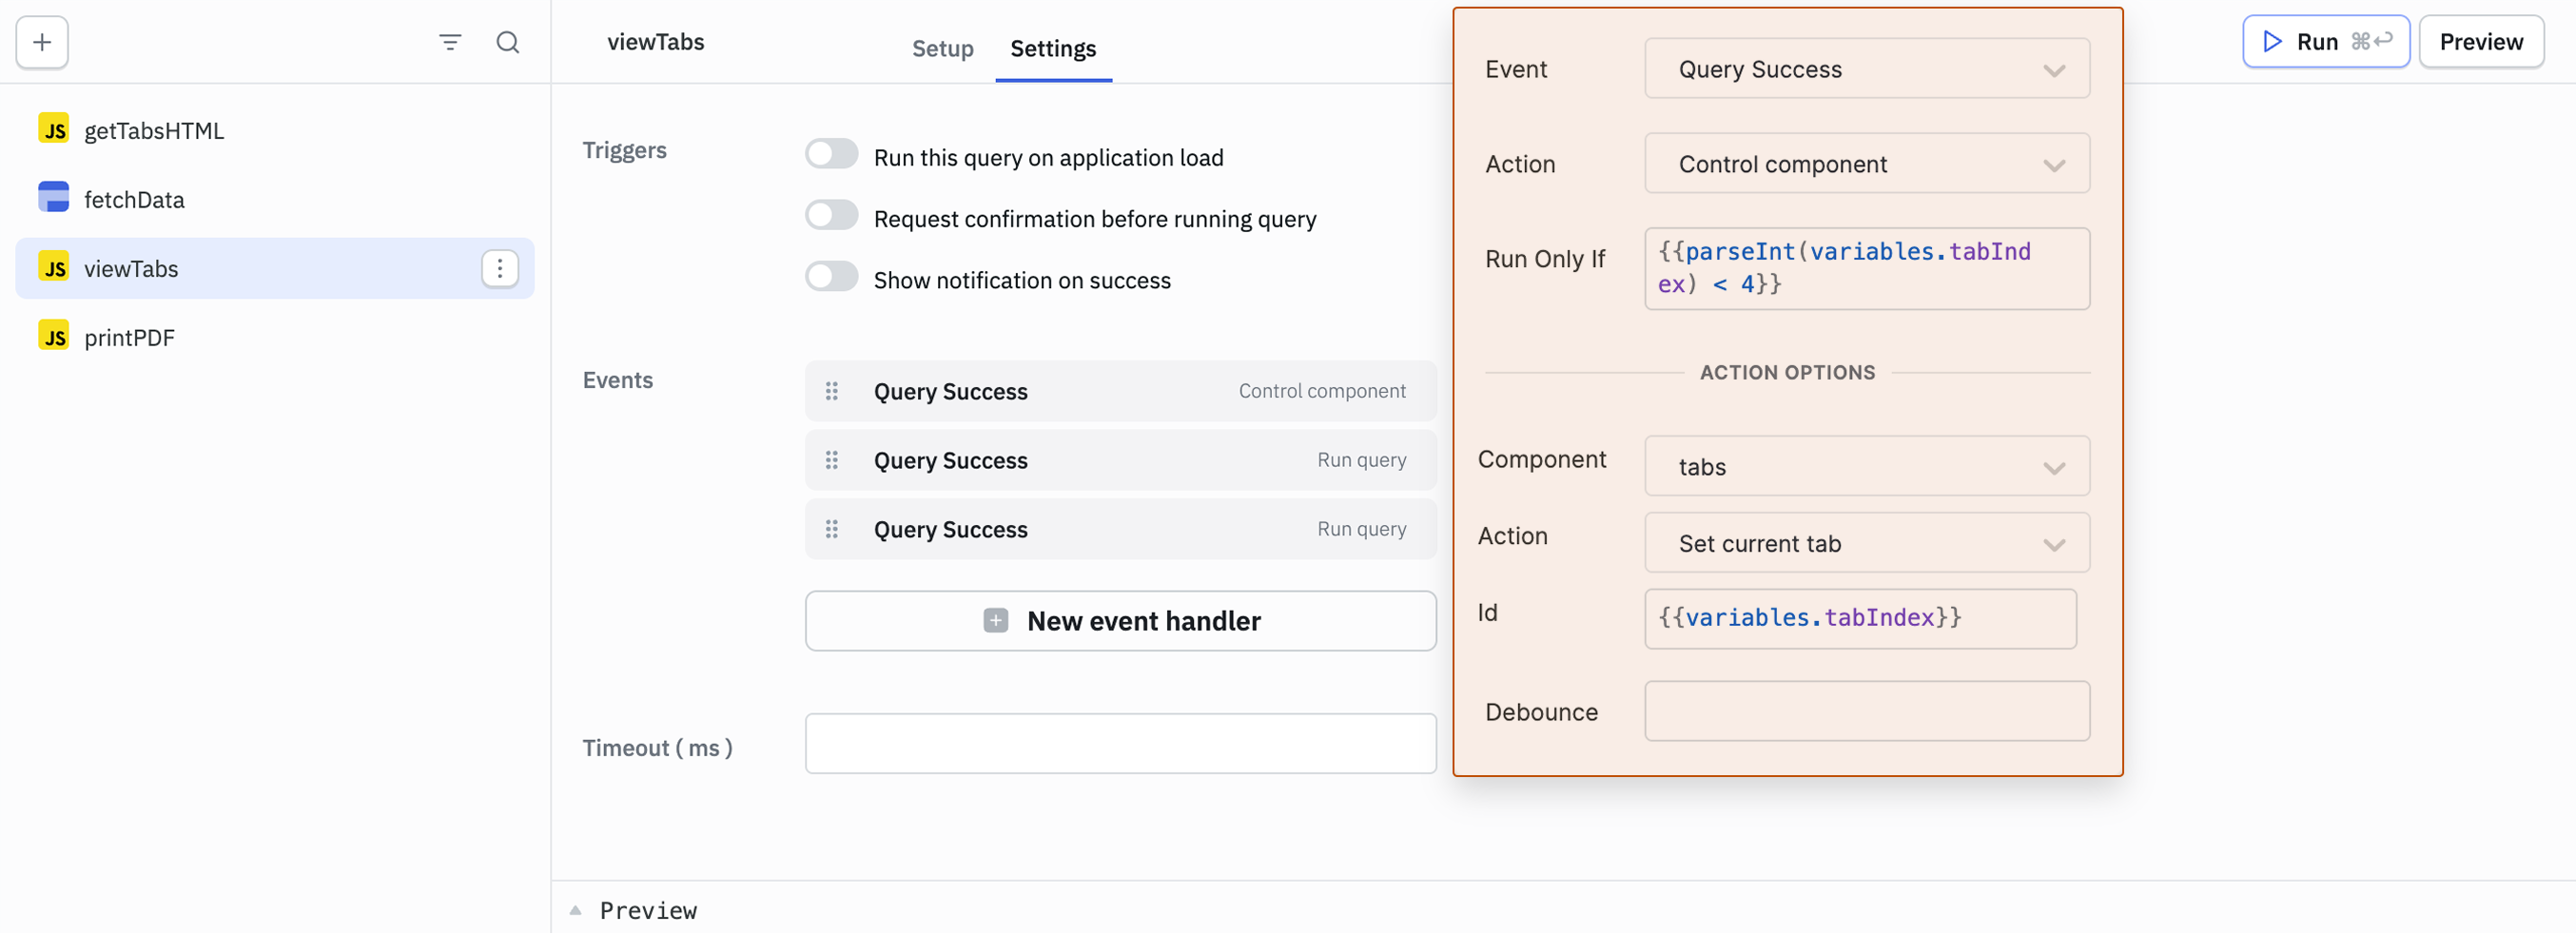
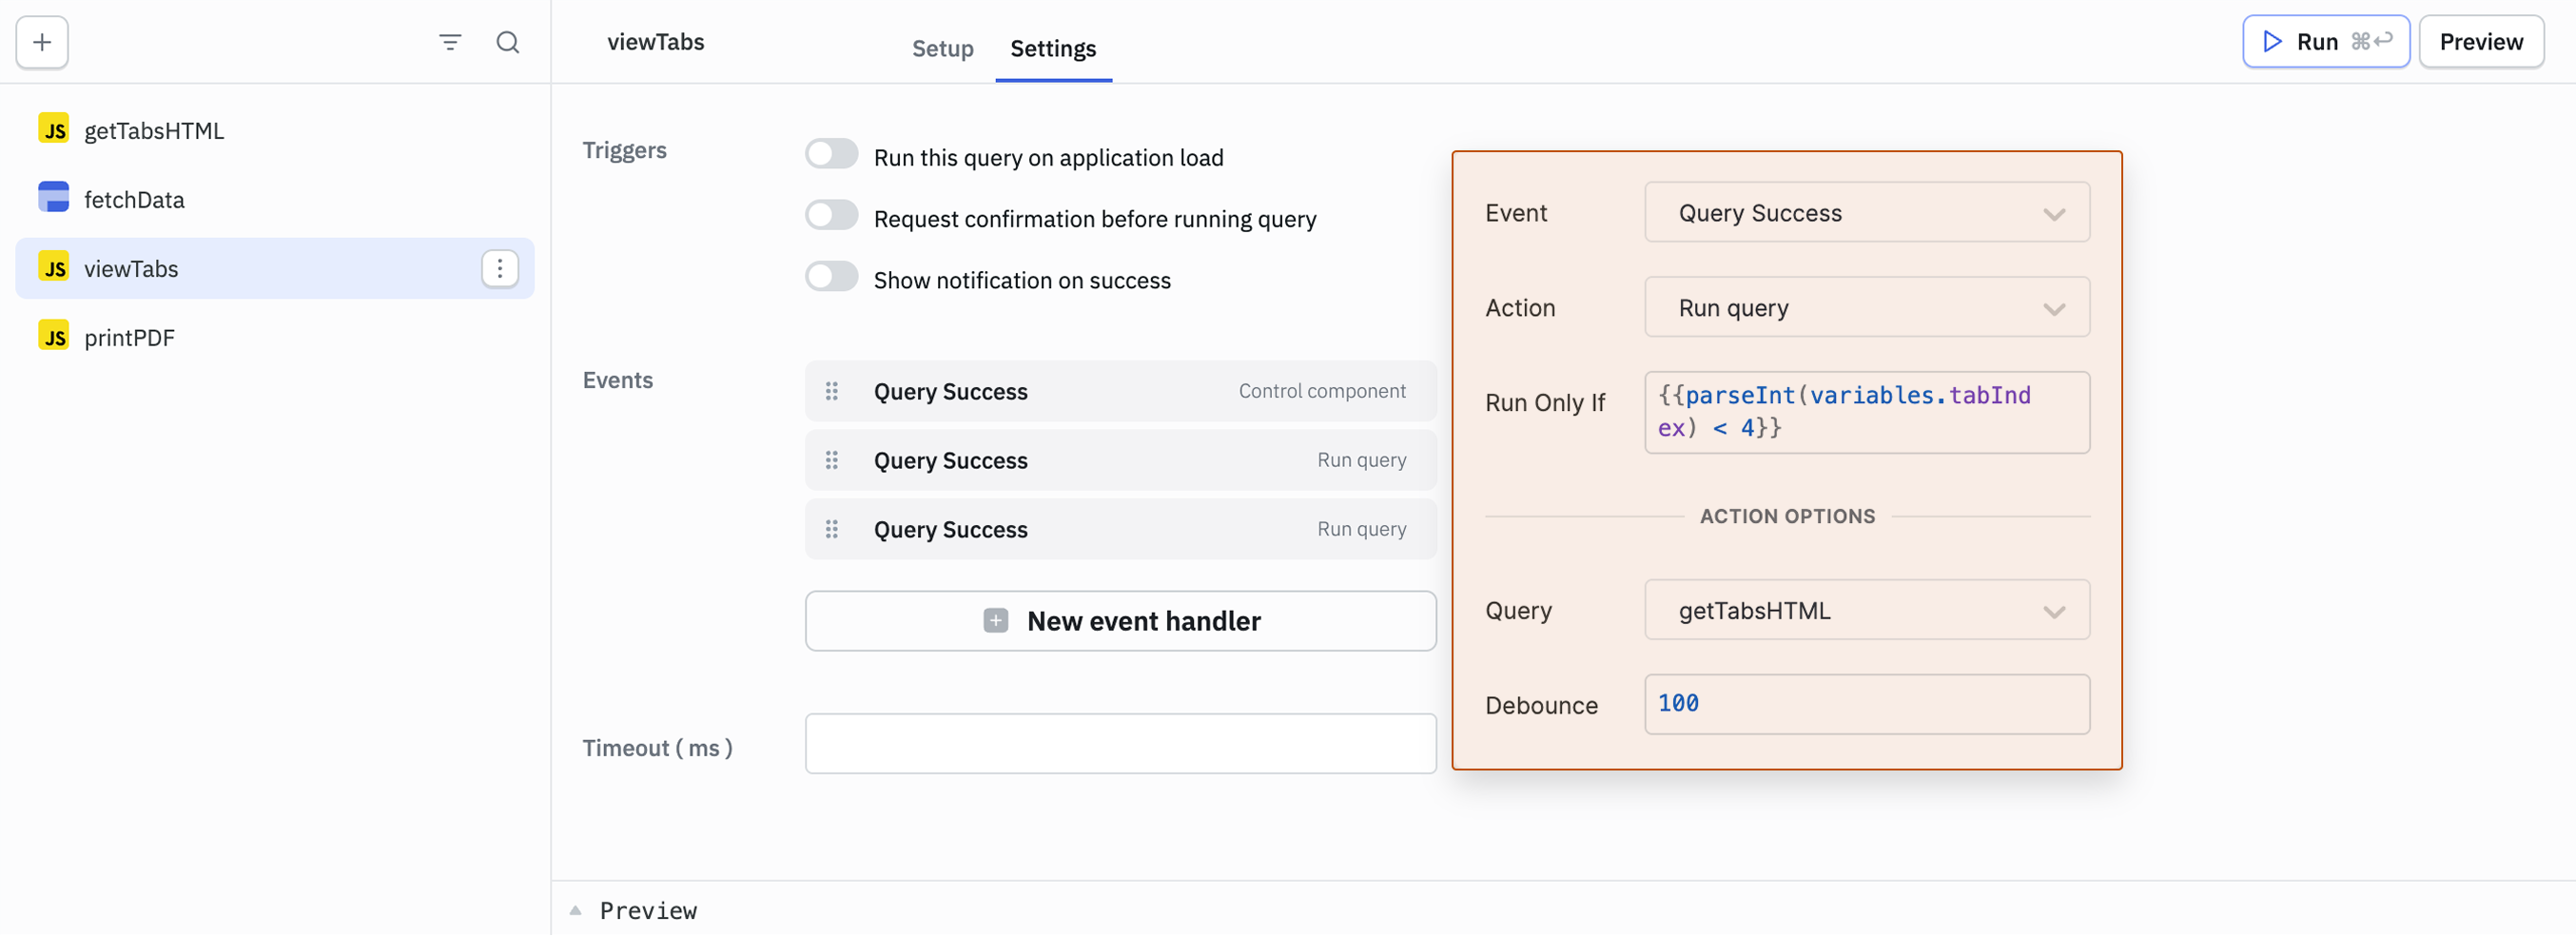
Step 2: Create the Tab Iterator Query
The viewTabs query manages the iteration process that cycles through each tab. It uses a variable called tabIndex to track which tab we're currently processing.
Create a new JavaScript (RunJS) query named viewTabs with this code:
if ((variables?.tabIndex ?? undefined) == undefined) {
  await actions.setVariable("tabIndex", "0");
} else if (parseInt(variables.tabIndex) < 4){
  await actions.setVariable("tabIndex", (parseInt(variables.tabIndex) + 1).toString());
}
How this works:
- The first time it runs,
tabIndexdoesn't exist, so we initialize it to "0" (the first tab) - On subsequent runs, we increment
tabIndexby 1 - The iteration continues while
tabIndexis less than 4 (the total number of tabs) - The event handlers we'll add next will recursively call this query to process each tab
Replace 4 with the actual number of tabs in your application.
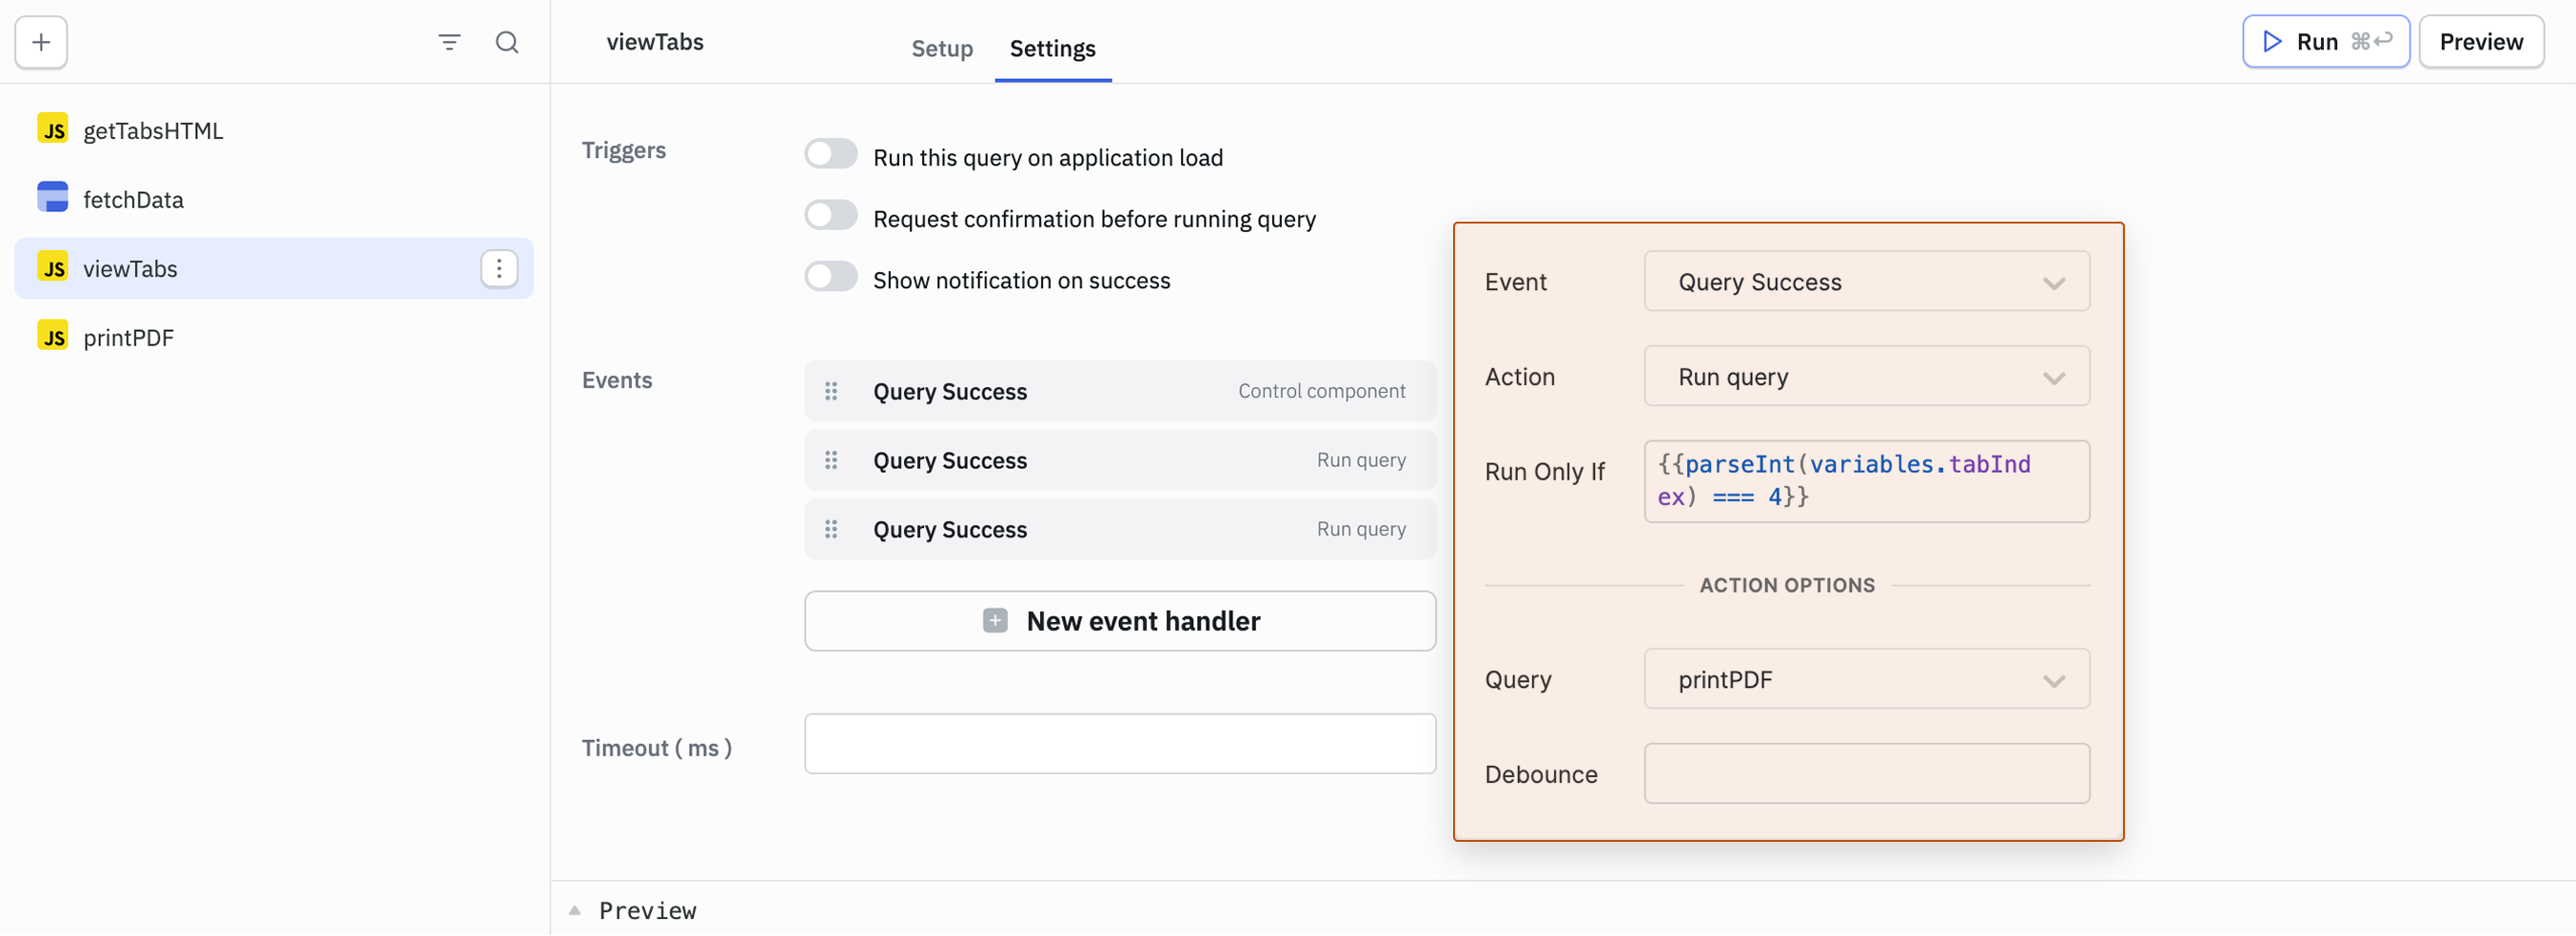
Now, add three event handlers to this query to control what happens after it runs successfully:
Event Handler 1: Switch to the Current Tab
Add a Query Success event with Control component action. Select the tabs component, choose Set current tab action, and set the Id to {{variables.tabIndex}}. In the Run only if field, enter {{parseInt(variables.tabIndex) < 4}}. This event switches the visible tab to match the tabIndex we just set, and the condition ensures we only switch tabs while we're still within the tab range.
Event Handler 2: Capture the Tab's HTML
Add another Query Success event with Run query action. Select the getTabsHTML query, set Debounce to 100 milliseconds, and in the Run only if field, enter {{parseInt(variables.tabIndex) < 4}}. After switching to the tab, we need to give it a moment to render before capturing its content. The 100ms debounce ensures the tab is fully rendered. We'll create the getTabsHTML query in Step 3.
Event Handler 3: Generate the PDF
Add a third Query Success event with Run query action. Select the printPDF query and in the Run only if field, enter {{parseInt(variables.tabIndex) === 4}}. This only runs after we've finished iterating through all tabs (when tabIndex equals 4), triggering the PDF generation. We'll create the printPDF query in Step 4.
Step 3: Create the HTML Capture Query
The getTabsHTML query captures the HTML content of the currently visible tab and stores it in an array. Each time it runs, it adds another tab's content to the collection.
Create a new JavaScript (RunJS) query named getTabsHTML with this code:
actions.setVariable( // set tabsHtml variable
  "tabsHtml",
  [...(variables?.tabsHtml ?? [])].concat([  // add html of the current tab to the tabsHtml variable
    ((variables?.tabIndex ?? -1) > 0
      ? `<div style="top: ${ // add a div with height of 100vh to the html of the current tab
          variables?.tabIndex ?? -1
        }00vh; position: absolute;">` // this will help to print data from all the tabs in one go
      : "") +
      document.getElementsByClassName("widget-" + components.tabs.id)[0] // get the html of the current tab
        .innerHTML +
      "</div>", // add the html of the current tab to the tabsHtml variable
  ])
);
How this works:
- Gets the existing
tabsHtmlarray (or creates an empty array if it doesn't exist) - Finds the Tabs component in the DOM using its widget class
- Extracts the innerHTML of the current tab
- Wraps each tab (except the first) in a positioned div to ensure proper page breaks in the PDF
- Adds this HTML to the
tabsHtmlarray
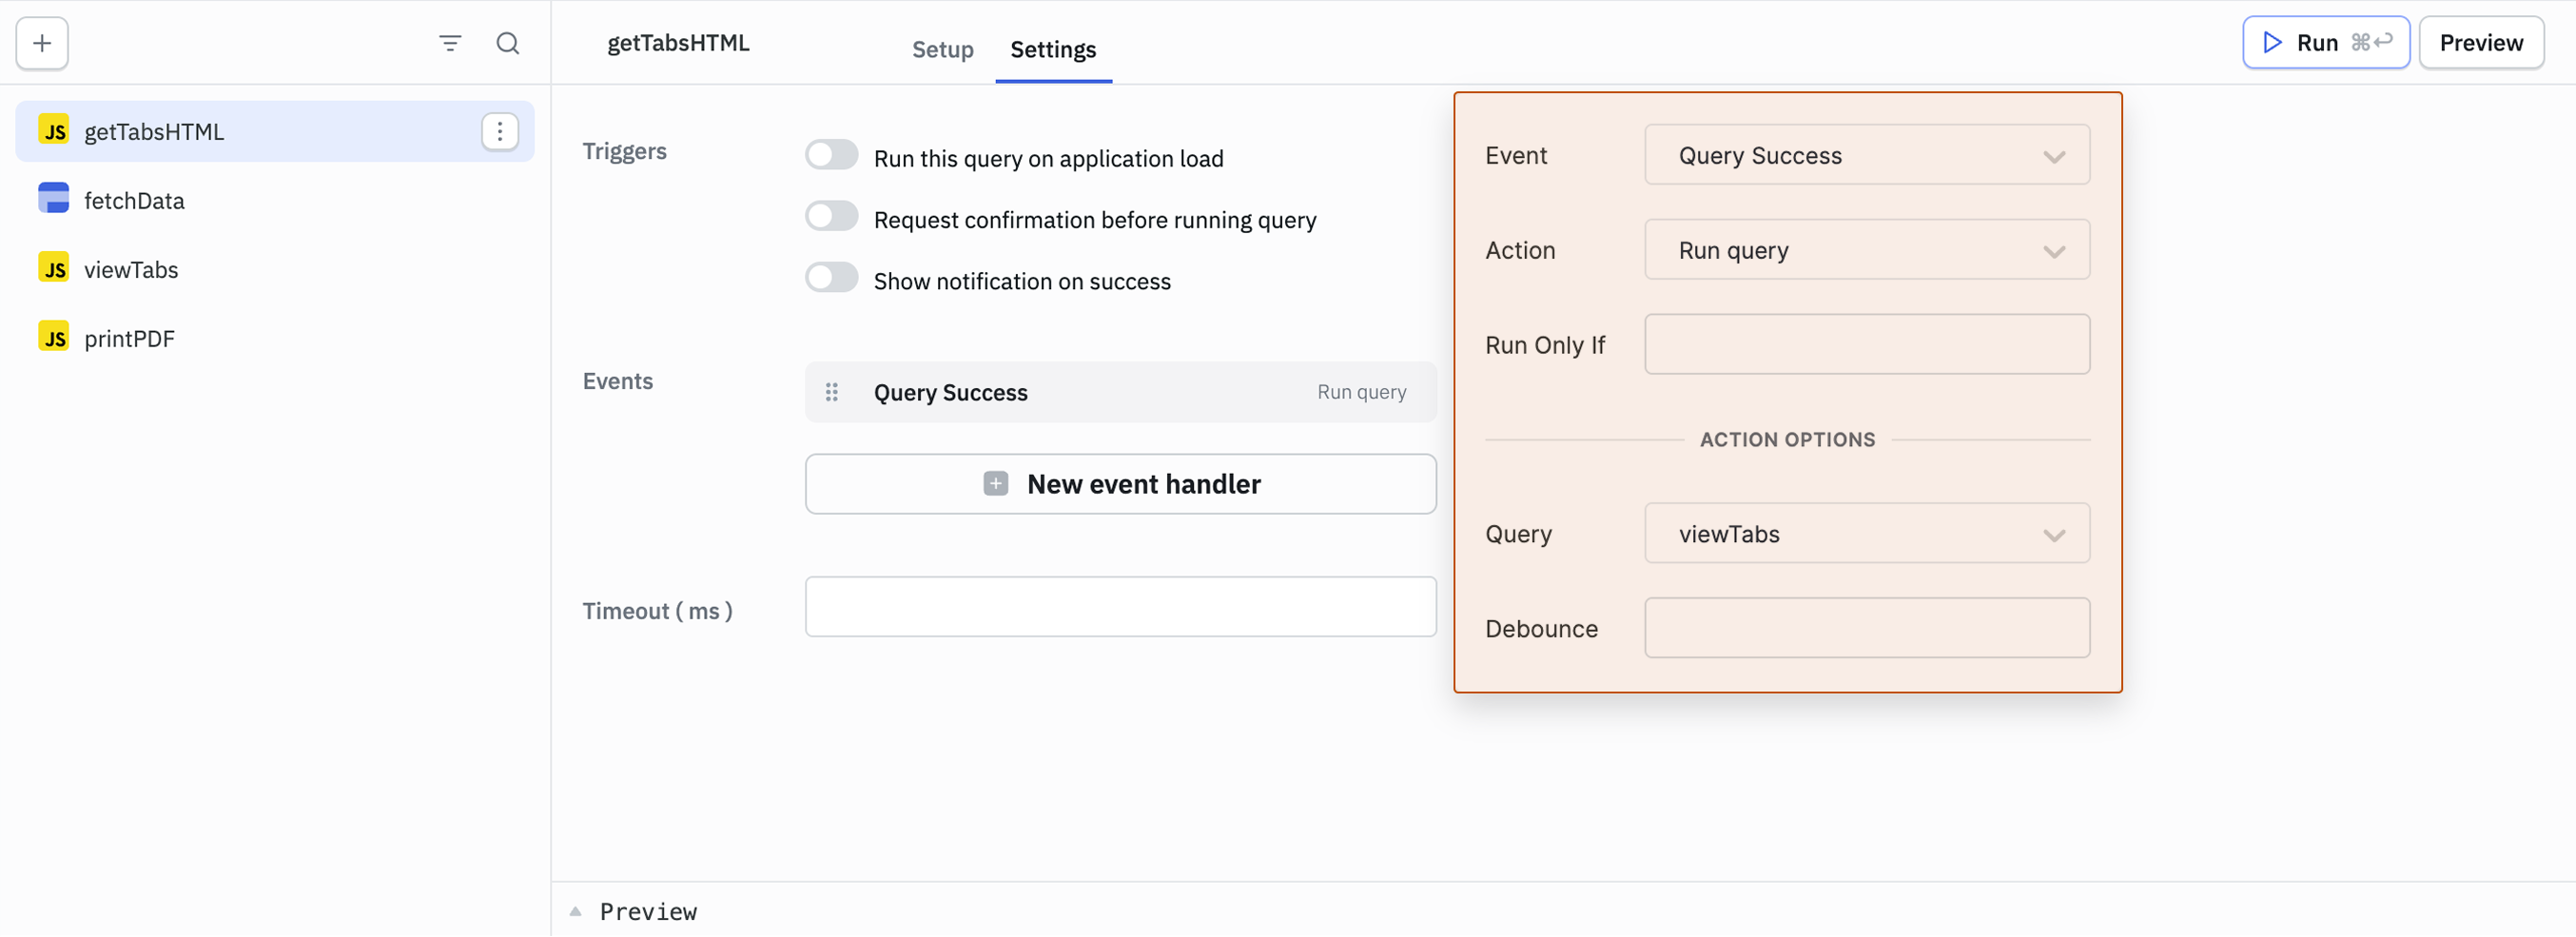
Now add one event handler to continue the loop:
Event Handler: Continue to Next Tab
Add a Query Success event with Run query action and select the viewTabs query. After capturing the current tab's HTML, this triggers viewTabs again to increment the index and process the next tab.
Step 4: Create the PDF Generation Query
The printPDF query takes all the captured HTML from the tabsHtml array and generates a printable document. It opens a new browser window, injects the combined HTML along with all the application's styles, and triggers the print dialog.
Create a new JavaScript (RunJS) query named printPDF with this code:
var printContents = variables.tabsHtml; // get the html of all the tabs from the tabsHtml variable

var winPrint = window.open("", "", "width=900,height=650"); // Open a New Window for Printing

var styles = document.querySelectorAll('link, style');
var stylesHtml = "";
for (var i = 0; i < styles.length; i++) {
  stylesHtml += styles[i].outerHTML;
}                                       // gather styles from the current page

stylesHtml += '<style>@page { size: landscape; }</style>'; // add landscape orientation to the page

winPrint.document.write(
  "<html><head>" +
    stylesHtml +
    "</head><body>"
); // add styles to the page

for (var j = 0; j < printContents.length; j++) {
  winPrint.document.write(printContents[j]);
} // add html of all the tabs to the page

winPrint.document.write("</body></html>"); // Document Finalization and Printing
winPrint.document.close();
winPrint.focus();
winPrint.print();
How this works:
This query opens a new browser window for the print preview and copies all CSS styles from your application to ensure the PDF looks correct. It sets the page orientation to landscape (you can change this to portrait if needed), writes all the captured tab HTML into the new window, and triggers the browser's print dialog.
Now add three event handlers to clean up after printing:
Event Handler 1: Clear the Tab Index Variable
Add a Query Success event with Unset variable action and set the Key as tabIndex.
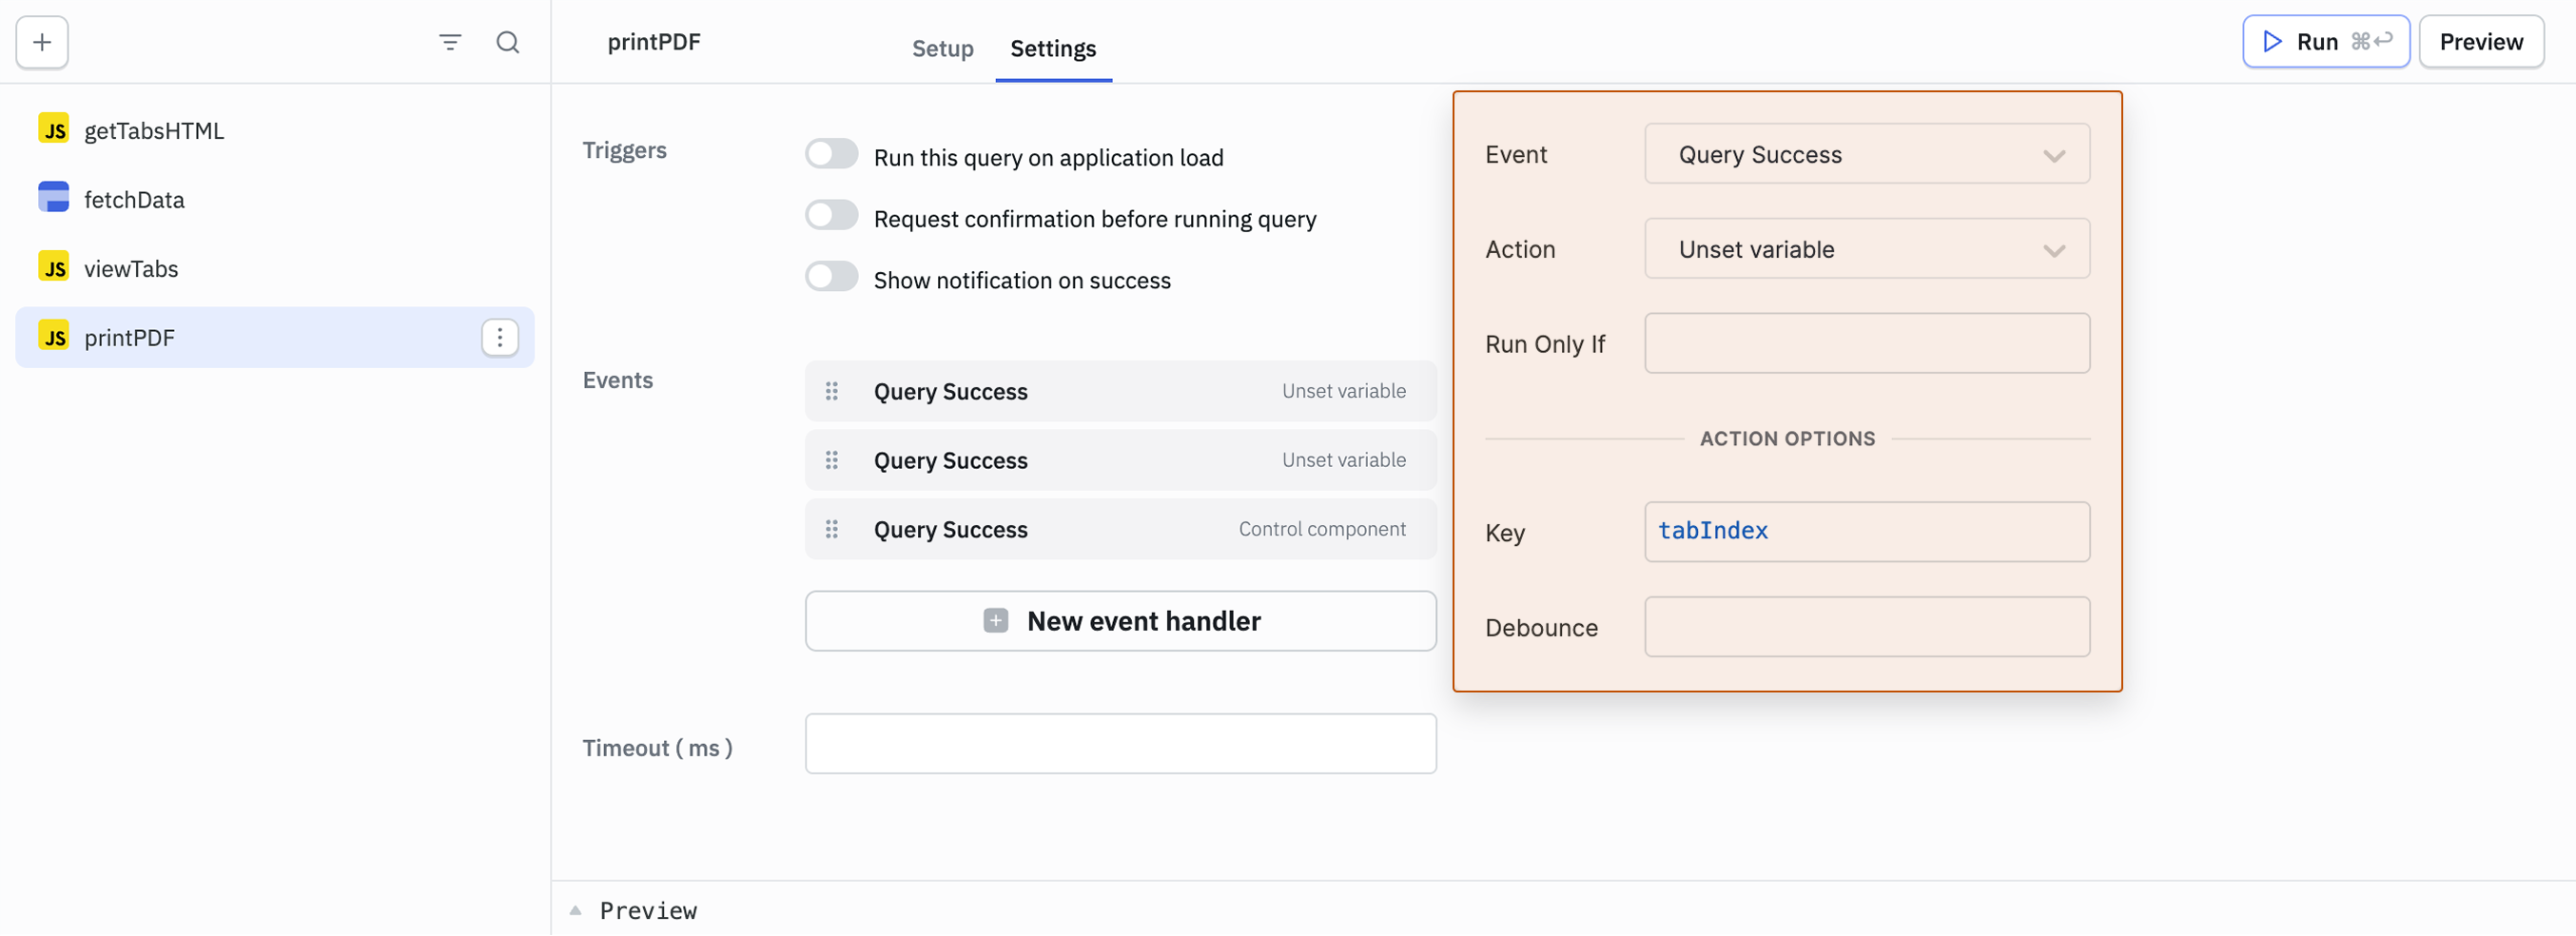
Event Handler 2: Clear the HTML Storage
Add another Query Success event with Unset variable action and set the key as tabsHtml.
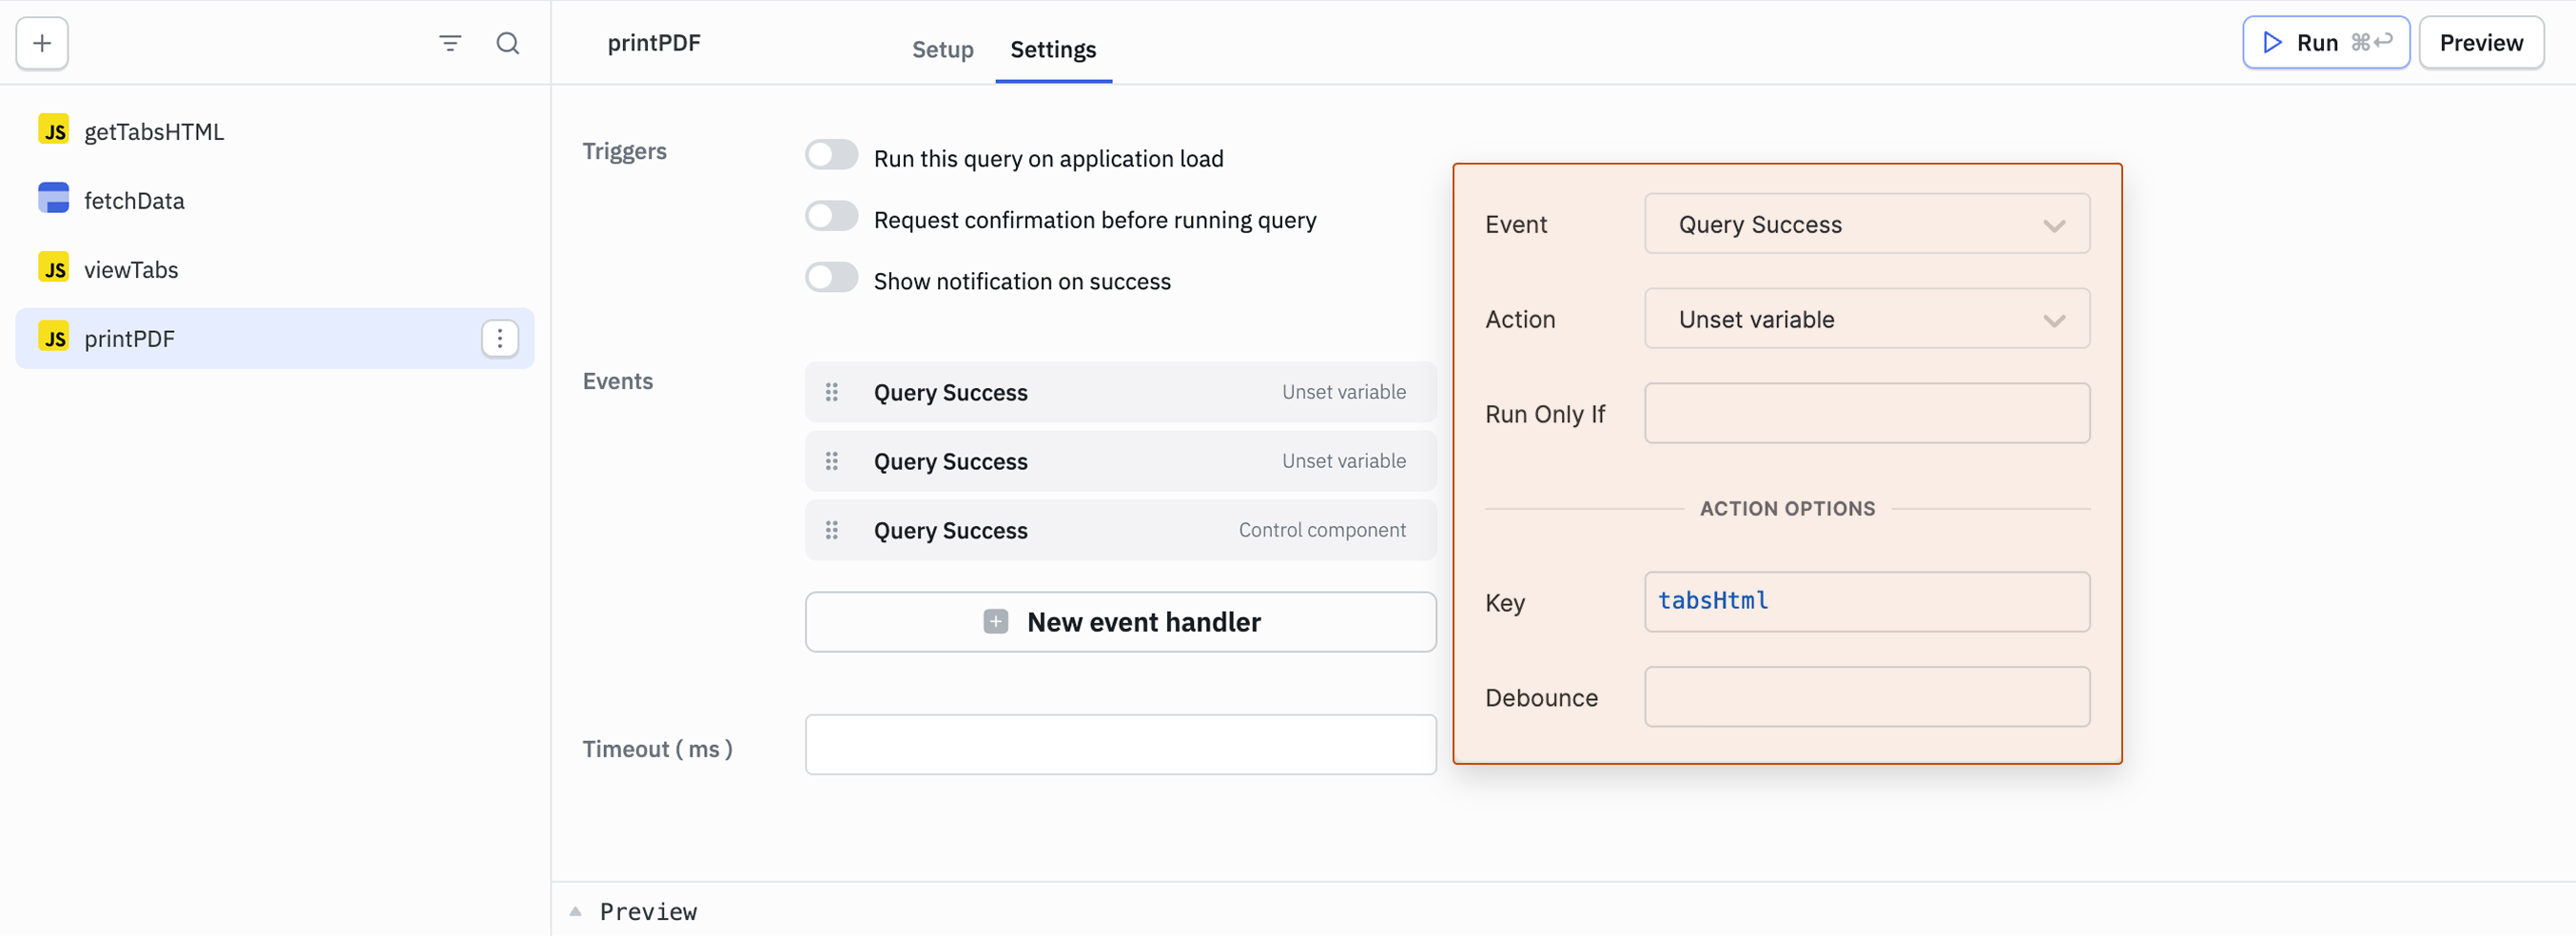
Event Handler 3: Restore the Original Tab
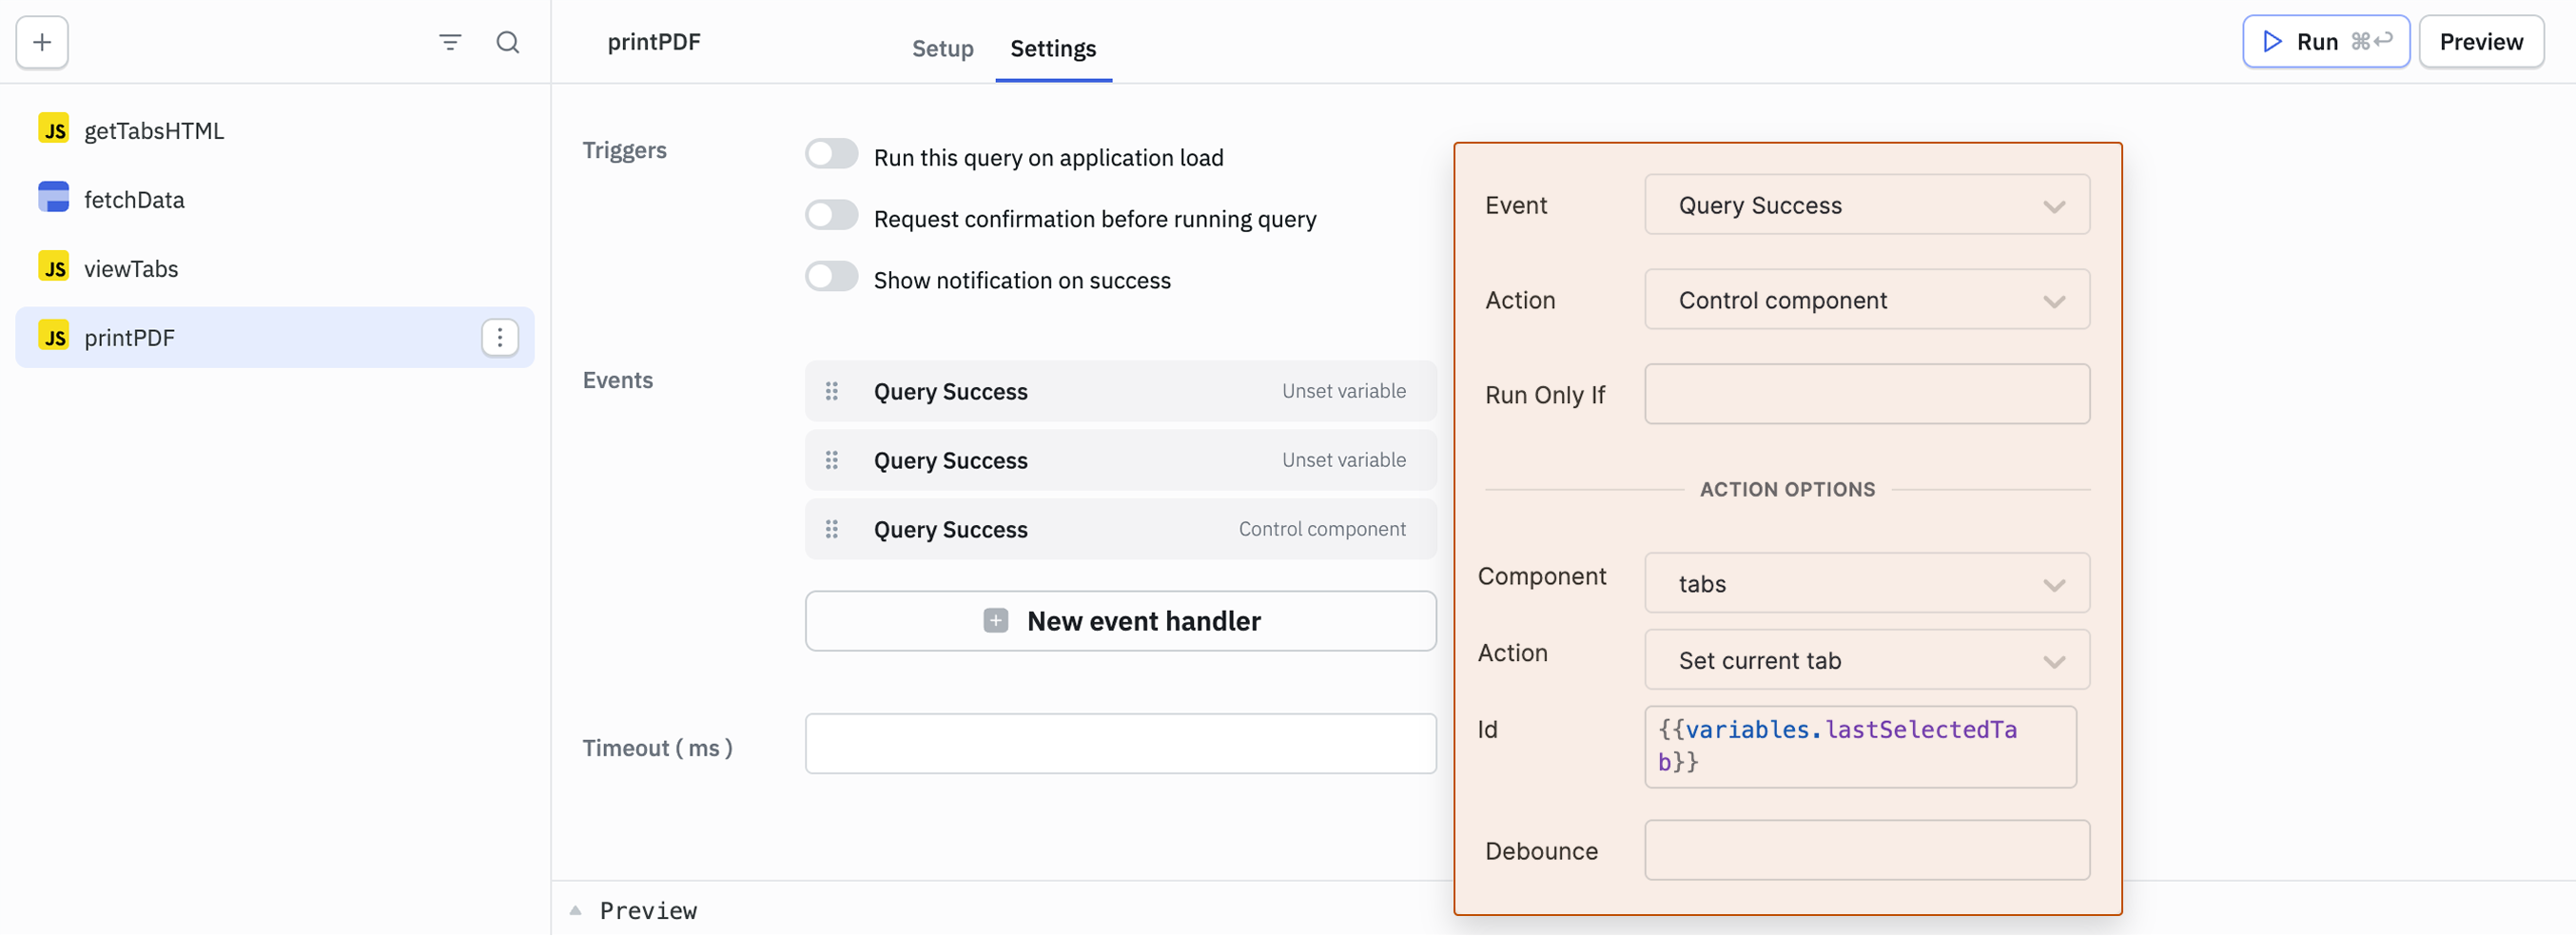
Add a third Query Success event with Control component action. Select the tabs1 component, choose Set current tab action, and set the Id to {{variables.lastSelectedTab}}. This returns the user to whichever tab they were viewing before clicking the print button.
You've successfully implemented a multi-tab PDF printing feature. Users can now generate comprehensive reports that include all tab content with a single click.