Marketplace: Creating plugins
What are plugins
ToolJet’s development has centered on extensibility, allowing developers to utilize plugins that expand their capabilities. Currently, these plugins are limited to connectors, including data source connectors like PostgreSQL, MySQL, Twilio, Stripe, and more. Using JavaScript/TypeScript, developers can develop plugins to enhance ToolJet's functionality and publish these plugins on the ToolJet Marketplace.
This guide will provide step-by-step instructions for creating ToolJet plugins using the tooljet CLI.
The tooljet CLI is a user-friendly command-line tool designed to simplify the plugin building process. As part of this guide, we will create a basic plugin for GitHub.
Step 1: Creating a New Plugin - GitHub Plugin
The first step is to bootstrap a new plugin for the ToolJet marketplace. The plugin will authenticate users with a GitHub Personal Access Token and include fundamental operations such as fetching user details, repositories, issues, and pull requests.
If you have completed the Setup guide, you can begin developing the plugin using the tooljet CLI. To initiate plugin development, enter the following command in the terminal:
# create a new plugin
tooljet plugin create github
When prompted, enter the plugin name and select the plugin type, which is api in this case. Additionally, select yes when prompted to create a new plugin for the marketplace.
If your plugin is hosted on GitHub, please provide the repository URL when prompted. Otherwise, leave it blank.
When a plugin is created using the ToolJet CLI, an object is added to the plugins.json file in the ToolJet/server/src/assets/marketplace/ directory. This object includes metadata about the plugin, such as its name, description, version, author, and other relevant details.
The plugins.json file serves as a registry of all available plugins for use in ToolJet. When the ToolJet server starts up, it reads the plugins.json file and loads all plugins that are listed in it.
It is important to note that the plugins.json file should not be manually edited, as it is automatically generated by the ToolJet CLI. Making changes to this file can result in issues with the proper functioning of the plugins in the system.
All marketplace plugins are stored in the /marketplace directory of the ToolJet repository. You can find the GitHub plugin here.
The structure of a typical ToolJet plugin directory appears as follows:
github/
  package.json
  lib/
    icon.svg
    index.ts
    operations.json
    manifest.json
In this structure, the file manifest.json contains information about the plugin's name, description, and other details. The file operations.json contains metadata about all the operations that the plugin supports. The main file, index.ts, creates a QueryService for the plugin, which handles queries, connection testing, caching, and more. The icon.svg file serves as the plugin's icon, while package.json is automatically generated by the CLI.
Why do we need a manifest.json file or a operations.json file?
The manifest.json file is used by a React component to create a dynamic UI for connection forms. It defines the schema of an API or data source, including its name, type, and any exposed variables, as well as options for authentication and other customizable properties. The properties section specifies the required fields and their types for connecting to the API or data source. By reading the manifest.json file, the React component generates the necessary UI components based on the schema, such as text inputs, dropdowns, checkboxes, and other elements.
On the other hand, the operations.json file contains a schema definition for a specific data source, like Github. It describes the available operations and their parameters that can be used to query the data source. A React component uses this schema to create queries in ToolJet applications, generating a UI that allows users to select the desired operation and provide the required parameters. The component uses the properties defined in the operations.json file to create various UI elements, such as dropdowns and input fields, and handle user interactions to create the final query. Once the user fills in the required parameters, the component uses them to generate a query that can be executed against the data source and return the results to the user.
Overall, manifest.json and operations.json files are essential for creating dynamic UI components in ToolJet applications. They define the schema for data sources and available operations, which React components then use to generate user-friendly UI elements. By utilizing these files, ToolJet enables users to easily connect to various APIs and data sources, perform queries, and retrieve data in an intuitive and efficient manner.
Step 2: Defining the manifest.json file
To construct the connection form, it's important to include the necessary options in the manifest.json file. Here's an example of how to do it:
  "properties": {
    "credentials": {
      "label": "Authentication",
      "key": "auth_type",
      "type": "dropdown-component-flip",
      "description": "A single select dropdown to choose credentials",
      "list": [
        {
          "value": "personal_access_token",
          "name": "Use Personal Access Token"
        }
      ]
    },
    "personal_access_token": {
      "token": {
        "label": "Token",
        "key": "personal_token",
        "type": "password",
        "description": "Enter your personal access token",
        "hint": "You can generate a personal access token from your Github account settings."
      }
    }
  }
This manifest.json file includes information about authentication options, specifically a dropdown to choose a type of credentials and a field to enter a personal access token. The label, key, type, description, and hint properties are used to define the specific fields and their types required for connecting to the API or data source.
In this particular code, there are two main properties defined: credentials and personal_access_token.
The credentials property specifies the authentication method to be used. It contains several keys:
label: a user-friendly label for the authentication method, set to "Authentication"key: a unique identifier for the authentication method, set to "auth_type"type: the type of the authentication method, set to "dropdown-component-flip"description: a description of the authentication method, set to "A single select dropdown to choose credentials"list: an array of objects representing the different authentication methods available. In this case, there is only one method available: a personal access token. Thevaluekey in the object is set to "personal_access_token" and thenamekey is set to "Use Personal Access Token".
The personal_access_token property specifies the details of the personal access token authentication method. It contains a token key, which specifies the actual personal access token to be used. The token key contains several keys:
label: a user-friendly label for the personal access token, set to "Token"key: a unique identifier for the personal access token, set to "personal_token"type: the type of the personal access token, set to "password"description: a description of the personal access token, set to "Enter your personal access token"hint: a hint for the personal access token, set to "You can generate a personal access token from your Github account settings."
The available type options are:
However, based on the code you provided, the available type options are:
password: used to input a secret value, such as a password or an access token.dropdown-component-flip: used to create a dropdown menu that flips its position relative to the component that triggers it.text: used to input a single line of text.textarea: used to input multiple lines of text.toggle: used to create a simple on/off switch.react-component-headers: used to display headers for React components.codehinter: is a specialized input field used for entering code and has additional functionality, such as resolving JavaScript code within double curly braces{{}}.
The manifest.json file is utilized by the connection modal component, which appears to prompt users to enter their datasource credentials. Meanwhile, the operations.json file is used by the query manager when users generate a specific query for a connected datasource. Both files utilize a similar schema.
Step 3: Defining the operations.json file
  "properties": {
    "operation": {
      "label": "Operation",
      "key": "operation",
      "type": "dropdown-component-flip",
      "description": "Single select dropdown for operation",
      "list": [
        {
          "value": "get_user_info",
          "name": "Get user info"
        },
        {
          "value": "get_repo",
          "name": "Get repository"
        },
        {
          "value": "get_repo_issues",
          "name": "Get repository issues"
        },
        {
          "value": "get_repo_pull_requests",
          "name": "Get repository pull requests"
        }
      ]
    },
    "get_user_info": {
      "username": {
        "label": "Username",
        "key": "username",
        "type": "codehinter",
        "lineNumbers": false,
        "description": "Enter username",
        "width": "320px",
        "height": "36px",
        "className": "codehinter-plugins",
        "placeholder": "Enter username"
      }
    },
    "get_repo": {
      "owner": {
        "label": "Owner",
        "key": "owner",
        "type": "codehinter",
        "lineNumbers": false,
        "description": "Enter owner name",
        "width": "320px",
        "height": "36px",
        "className": "codehinter-plugins",
        "placeholder": "developer"
      },
      "repo": {
        "label": "Repository",
        "key": "repo",
        "type": "codehinter",
        "lineNumbers": false,
        "description": "Enter repository name",
        "width": "320px",
        "height": "36px",
        "className": "codehinter-plugins",
        "placeholder": "tooljet"
      }
    },
    "get_repo_issues": {
      "owner": {
        "label": "Owner",
        "key": "owner",
        "type": "codehinter",
        "lineNumbers": false,
        "description": "Enter owner name",
        "width": "320px",
        "height": "36px",
        "className": "codehinter-plugins",
        "placeholder": "developer"
      },
      "repo": {
        "label": "Repository",
        "key": "repo",
        "type": "codehinter",
        "lineNumbers": false,
        "description": "Enter repository name",
        "width": "320px",
        "height": "36px",
        "className": "codehinter-plugins",
        "placeholder": "tooljet"
      },
      "state": {
        "label": "State",
        "key": "state",
        "className": "codehinter-plugins col-4",
        "type": "dropdown",
        "description": "Single select dropdown for choosing state",
        "list": [
          {
            "value": "open",
            "name": "Open"
          },
          {
            "value": "closed",
            "name": "Closed"
          },
          {
            "value": "all",
            "name": "All"
          }
        ]
      }
    },
    "get_repo_pull_requests": {
      "owner": {
        "label": "Owner",
        "key": "owner",
        "type": "codehinter",
        "lineNumbers": false,
        "description": "Enter owner name",
        "width": "320px",
        "height": "36px",
        "className": "codehinter-plugins",
        "placeholder": "developer"
      },
      "repo": {
        "label": "Repository",
        "key": "repo",
        "type": "codehinter",
        "lineNumbers": false,
        "description": "Enter repository name",
        "width": "320px",
        "height": "36px",
        "className": "codehinter-plugins",
        "placeholder": "tooljet"
      },
      "state": {
        "label": "State",
        "key": "state",
        "type": "dropdown",
        "className": "codehinter-plugins col-4",
        "description": "Single select dropdown for choosing state",
        "list": [
          {
            "value": "open",
            "name": "Open"
          },
          {
            "value": "closed",
            "name": "Closed"
          },
          {
            "value": "all",
            "name": "All"
          }
        ]
      }
    }
  }
The operations.json file specifies the available operations that can be executed on the data source. It provides details about the operation type, required fields to execute the operation, and the data type of each field. The label, key, type, description, and hint properties are used to define the specific fields and their types required to establish a connection with the API or data source.
Step 4: Add the npm package of GitHub to the plugin dependencies
-
Change directory to the plugin directory where the npm package needs to be installed and then install the package
# change directory to the plugin directory and install the npm package
npm i octokit --workspace=@tooljet-marketplace/githubinfoSteps to install npm package to a plugin
npm i <npm-package-name> --workspace=<plugin-name-in-package-json>The command
npm i <npm-package-name> --workspace=<plugin-name-in-package-json>is used to install a specific npm package into a particular workspace of a multi-package repository.The --workspace flag is used to specify the workspace where the package should be installed. In this case, we are installing the package in the @tooljet-marketplace/github workspace.
Step 5: Implement the query execution logic in index.ts
In index.ts, the query execution logic needs to be implemented for the Github plugin's QueryService. The QueryService is responsible for handling the process of running queries and receives information about the data source, including credentials, configurations, and query parameters.
For the Github data source, the sourceOptions will contain the necessary authentication credentials, like the personal access token, while the queryOptions will include the configurations and parameters specific to the query, like obtaining a list of repositories for a particular user.
Using this information, the QueryService will create and execute API requests against the Github API. The resulting data will be returned to the caller for further processing as needed.
Create a new file query_operations.ts in the plugins/github/src directory and add the following code to it.
import { Octokit } from 'octokit'
import { QueryOptions } from './types'


export async function getUserInfo(octokit: Octokit, options: QueryOptions): Promise<object> {
  const { data } = await octokit.request(
    'GET /users/{username}',
    {
      username: options.username
    }
  );
  return data;
}

export async function getRepo(octokit: Octokit, options: QueryOptions): Promise<object> {
    const { data } = await octokit.request(
        'GET /repos/{owner}/{repo}',
        {
            owner: options.owner,
            repo: options.repo
        }
    );
    return data;
}

export async function getRepoIssues(octokit: Octokit, options: QueryOptions): Promise<object> {
    const { data } = await octokit.request(
        'GET /repos/{owner}/{repo}/issues',
        {
            owner: options.owner,
            repo: options.repo,
            state: options.state || 'all'

        }
    );
    return data;
}

export async function getRepoPullRequests(octokit: Octokit, options: QueryOptions): Promise<object> {
    const { data } = await octokit.request(
        'GET /repos/{owner}/{repo}/pulls',
        {
            owner: options.owner,
            repo: options.repo,
            state: options.state || 'all'
        }
    );
    return data;
}
The query_operations.ts file comprises functions that will execute the queries and will be called by the QueryService in index.ts.
The GitHub class has three methods:
-
run: This method executes a query and is invoked by passing sourceOptions and queryOptions as input, representing the source metadata and query configuration, respectively. The run method utilizes the octokit library to send API requests to the GitHub API and returns the query result in a QueryResult object.
-
testConnection: When adding a new data source to a ToolJet application, the connection can be tested. The testConnection method is used to test the connection, and it takes in sourceOptions as input, which represents the source metadata. The method tests the connection by trying to fetch the authenticated user and returns a ConnectionTestResult object indicating whether the connection was successful.
noteNot all data sources may support testing connections. If it's not applicable for your data source, you can disable the test connection feature by adding "customTesting": true to your plugin's manifest.json.
-
getConnection: This method is a helper function that returns an authenticated octokit client, which is utilized to send requests to the GitHub API. It takes in sourceOptions as input, representing the source metadata, and returns an authenticated octokit client.
Step 6: Add Error Handling
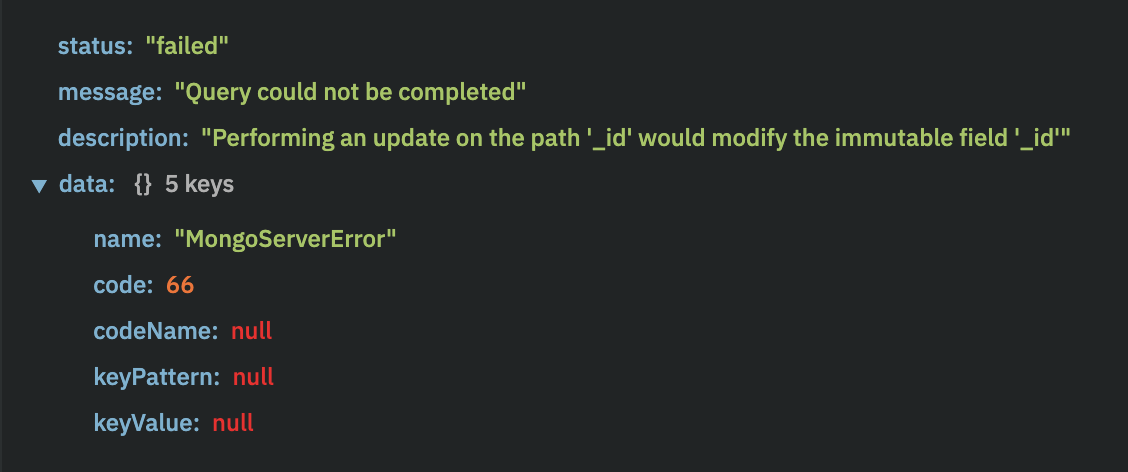
In case of an error, it is necessary to return the error message received from the Plugin SDK. To achieve this, include the errorDetails in the run method within the index.ts file. The specific parameters of the error may vary depending on the plugin.
Additionally, the data field in the Plugin SDK corresponds to errorDetails in the code, and the dynamically generated errorMessage maps to the description field in the error preview.
Example
Consider the case of MongoDB. If an error occurs, such as the following:
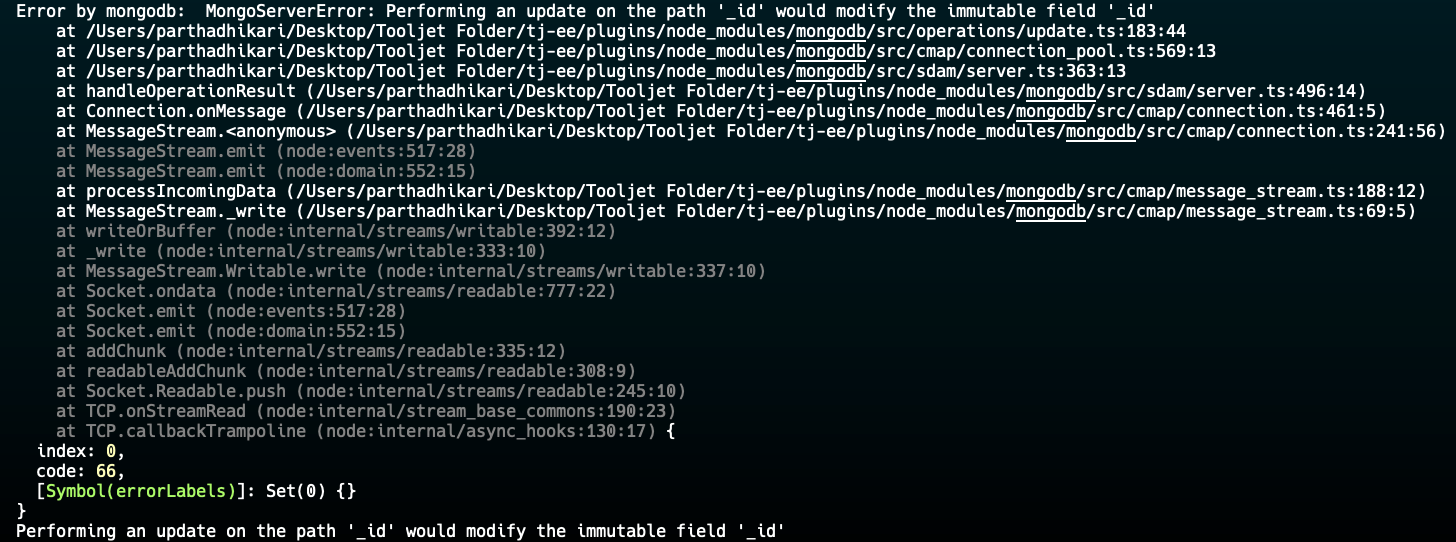
You can implement error handling using the following code:
catch (error) {
      let errorMessage = 'An unknown error occurred';
      let errorDetails = {};

      if (error instanceof Error) {
        errorMessage = error.message || errorMessage;
        errorDetails = {
          name: error.name,
          code: (error as any).code || null,
          codeName: (error as any).codeName || null,
          keyPattern: (error as any).keyPattern || null,
          keyValue: (error as any).keyValue || null,
        };
      }

      throw new QueryError('Query could not be completed', errorMessage, errorDetails);
}
This code ensures that error messages and details are properly returned to the Plugin SDK, enabling meaningful error previews for the user.
Delete a plugin
To delete a plugin, enter the following command:
tooljet plugin delete PLUGIN_NAME
The CLI will prompt users to verify if the plugin to be deleted is a marketplace plugin before proceeding with the deletion.
Publish a plugin
To release a plugin, submit a pull request on ToolJet's GitHub Repository after creating it. The ToolJet team will review the pull request, and if approved, the plugin will be included and published in the next release.