Database Editor
You can manage the ToolJet Database directly from the Database Editor. ToolJet Database organizes the data into tables that can have different structures. All the tables will be listed lexicographically on the left. Click on any of the tables to view the table data.

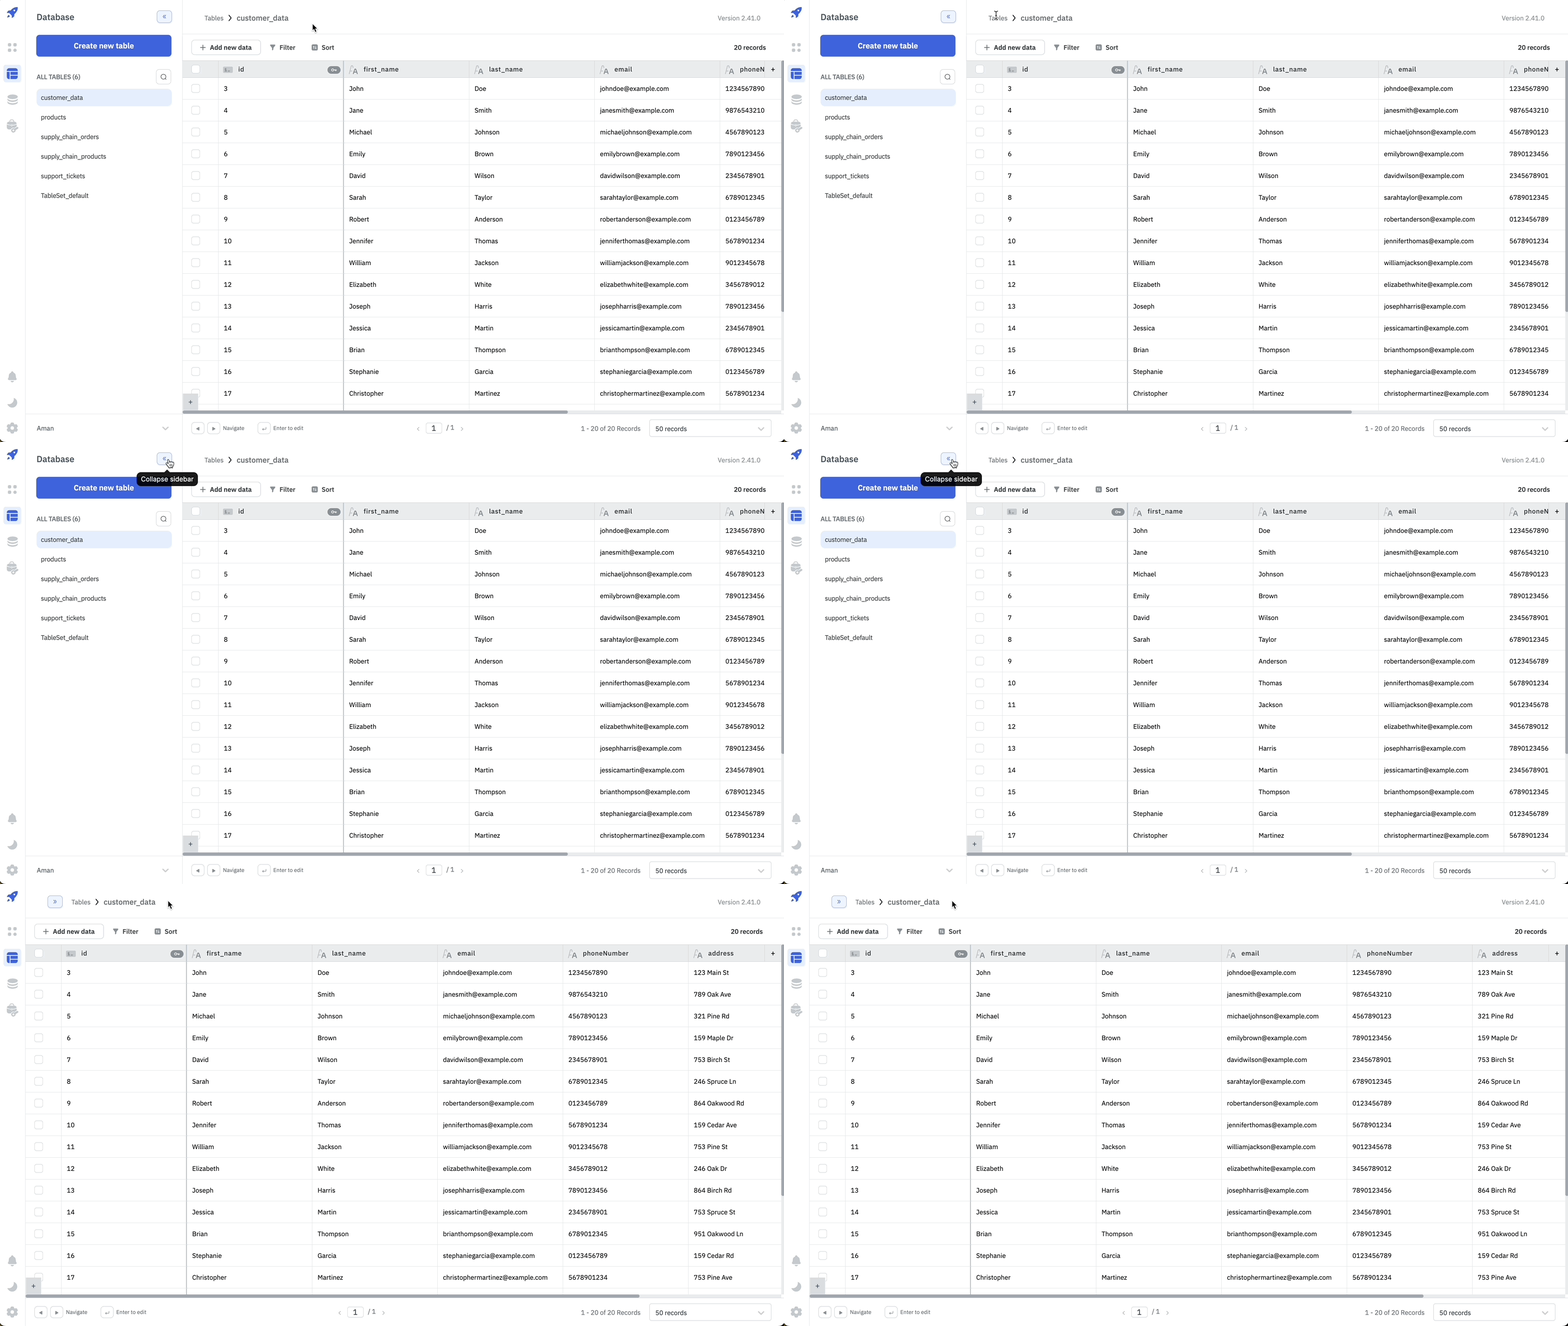
The sidebar on the left can also be collapsed to give more space to the database editor.
Create New Table
To create a new table in the ToolJet Database:
- Click on the Create New Table button on the top left corner of the Database editor.
- A drawer will open from the right. Enter the details of your new table.
To create a new table, you'll need to:
- Enter a Table name.
- By default, an id column with serial data type is automatically created as the primary key of the table. You can change the primary key to any other column.
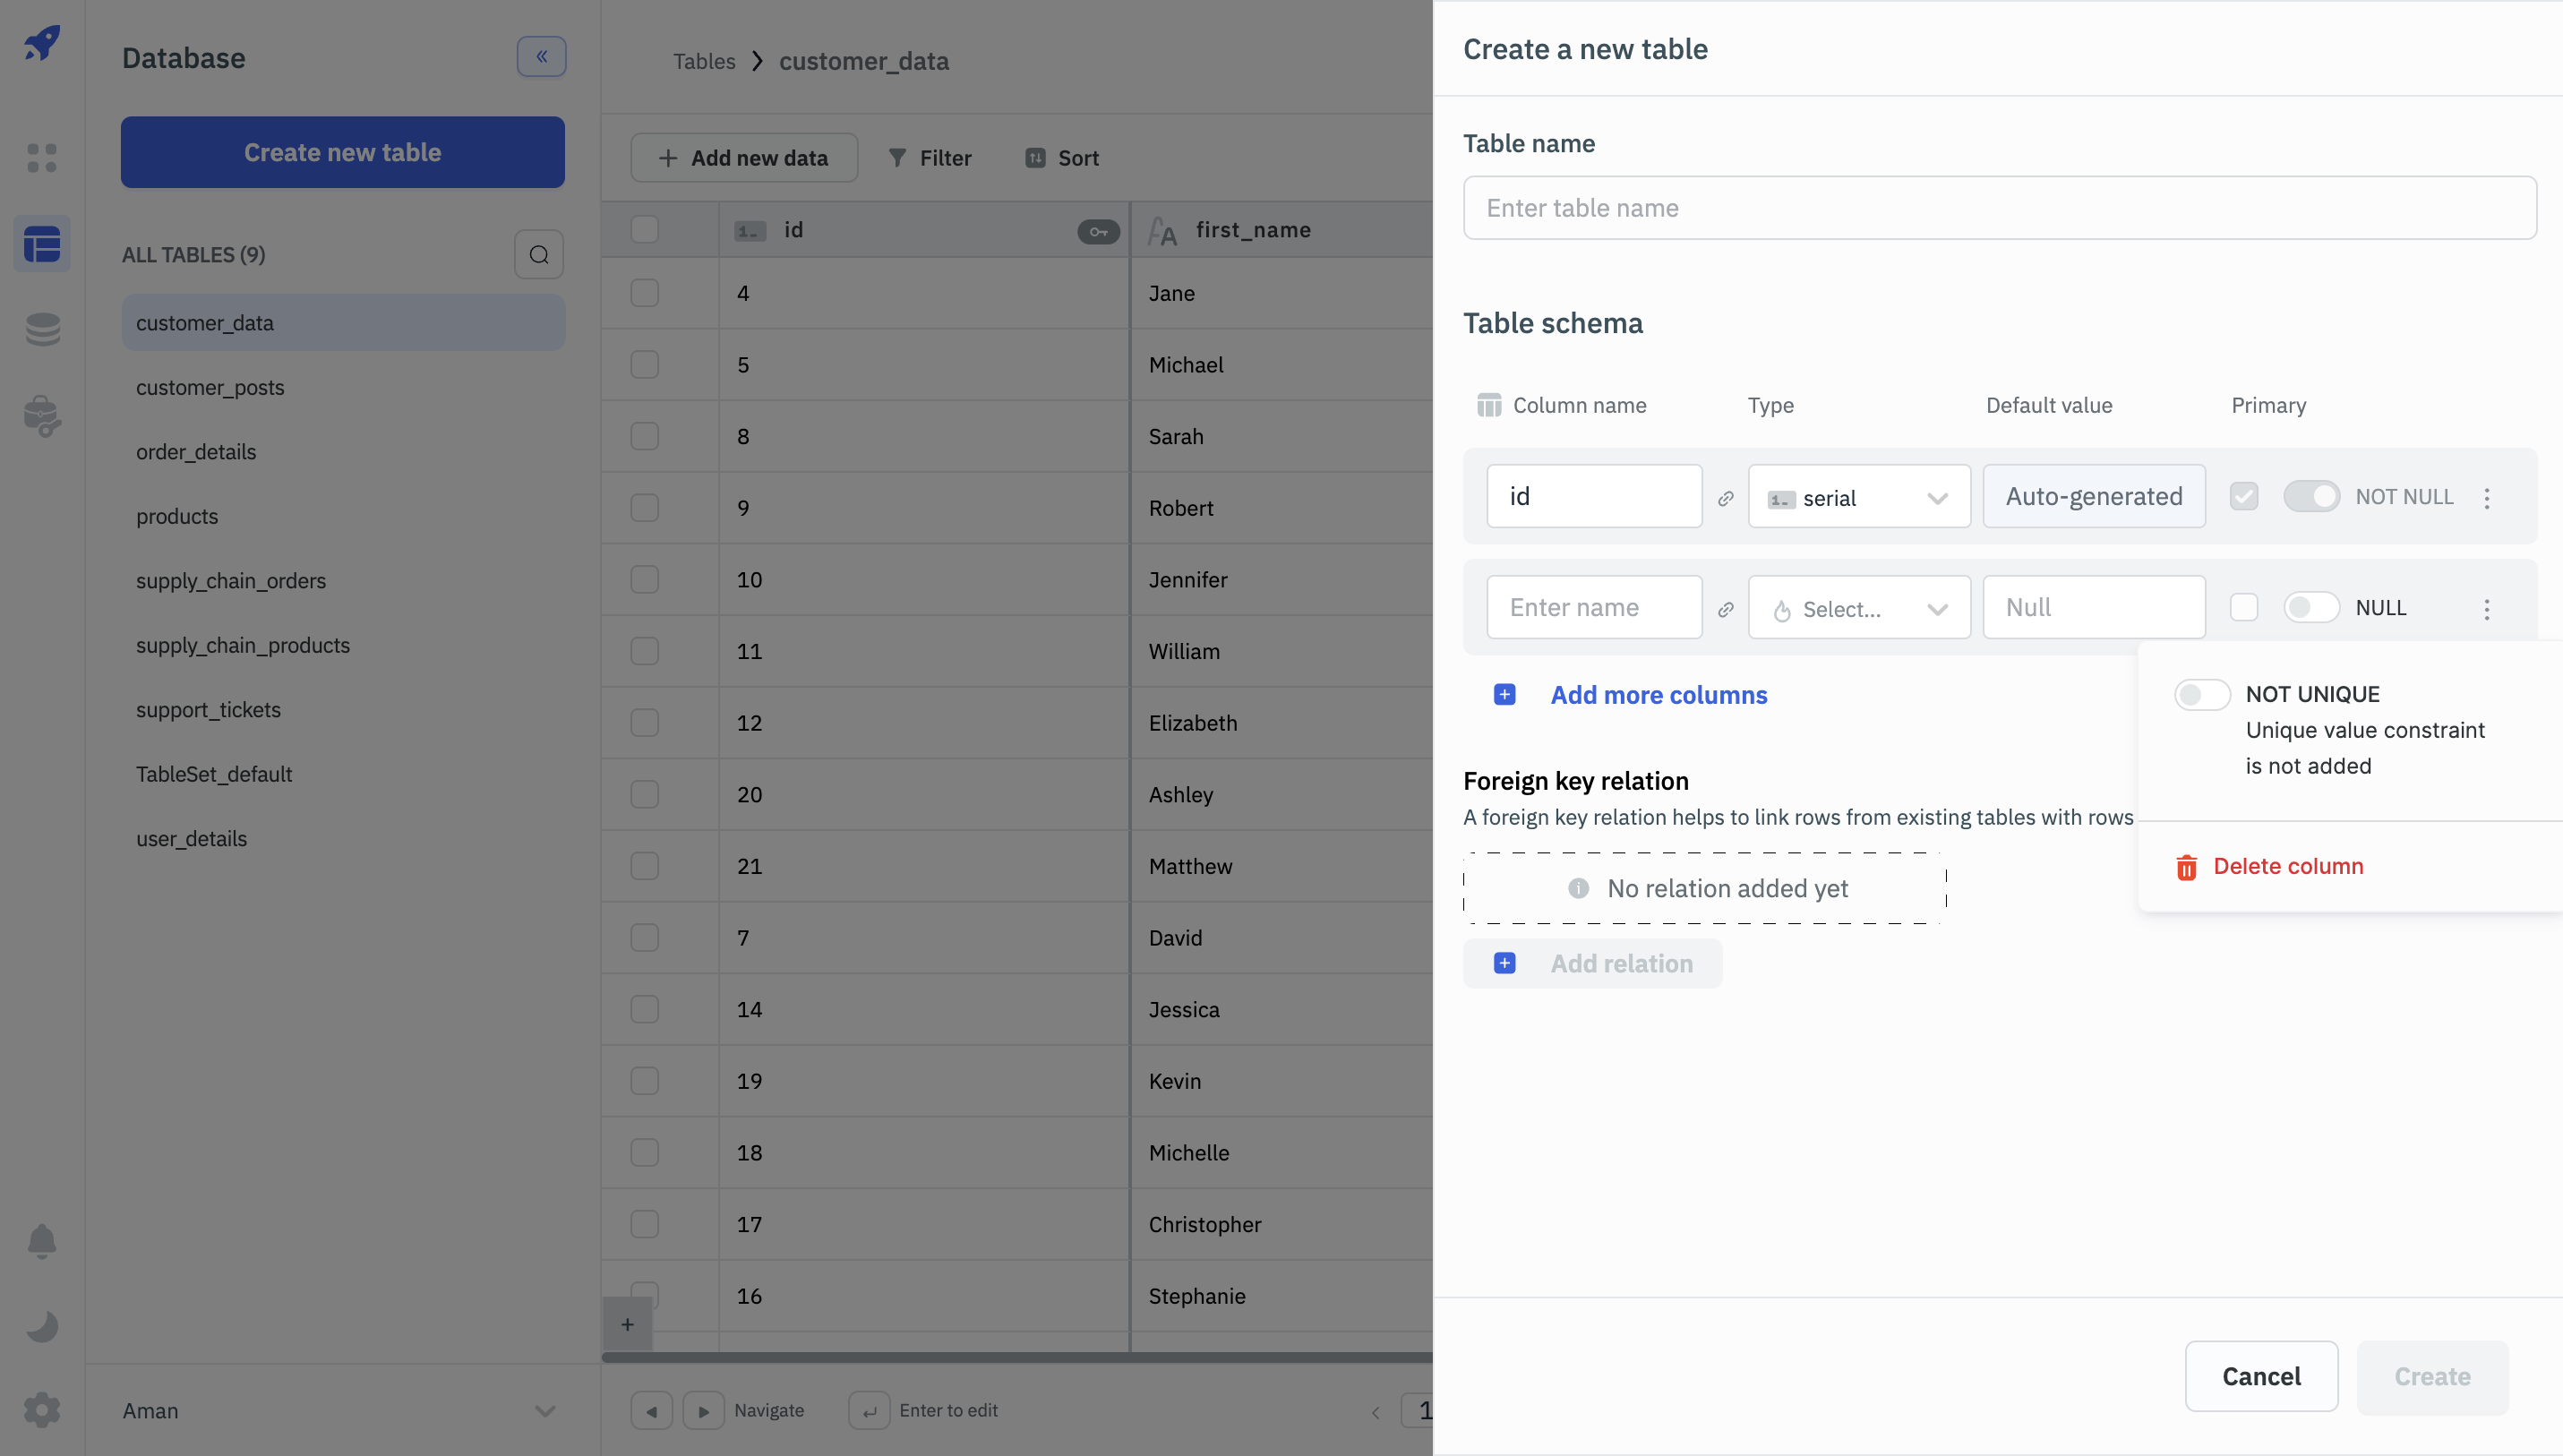
- Add Columns:
| Option | Description |
|---|---|
| Column name | Enter a unique name for the column. |
| Data type | Select the appropriate data type for the column from the dropdown menu. |
| Default value (optional) | Specify any default value to be assigned to the column. If left blank, the column will allow null values. |
| Primary Key | Check this box to designate the column as the Primary Key. Multiple columns can be selected, creating a composite primary key. |
| NULL/NOT NULL toggle | Use this toggle to determine whether the column should allow null values or require a value. By default, null values are permitted. |
| Unique toggle | Click the kebab menu and toggle the Unique option to add a unique constraint to the column, ensuring all values are distinct. By default, duplicate values are allowed. |
| Foreign Key | Click the + Add Relation button to establish a foreign key relationship, linking this column to a primary key or unique constraint column(s) in another table. |
Column Constraints
ToolJet Database supports several column constraints to maintain data integrity and enforce rules on the data stored in the tables. These constraints include:
Primary Key: The primary key constraint ensures that the values in the designated column(s) are unique and not null across all rows in the table. It serves as a unique identifier for each record in the table.
Foreign Key: The foreign key constraint establishes a link between the data in two tables, ensuring referential integrity. It requires that the values in the foreign key column(s) of the source table match the values in the primary key or unique constraint column(s) of the target table.
- Source Table: The current table on which constraint is to be added.
- Target Table: The table that contains the column to be referenced.
Unique: The unique constraint ensures that the values in the designated column(s) are unique across all rows in the table, allowing for null values.
Not Null: The not null constraint ensures that the designated column(s) cannot have null values, requiring a value for every row in the table.
Permissible Constraints per Data Type
| Data Type | Primary Key | Foreign Key | Unique | Not Null |
|---|---|---|---|---|
| serial | ✅ | ❌ | ✅ | ✅ |
| varchar | ✅ | ✅ | ✅ | ✅ |
| int | ✅ | ✅ | ✅ | ✅ |
| bigint | ✅ | ✅ | ✅ | ✅ |
| float | ✅ | ✅ | ✅ | ✅ |
| boolean | ❌ | ❌ | ❌ | ✅ |
Primary Key
ToolJet Database supports both single field and composite primary keys.
Creating Single Field Primary Key
When creating a new table, an id column with the serial data type is automatically generated to serve as the primary key. However, you can designate any other column as the primary key if desired. The primary key column can be of any supported data type except Boolean.
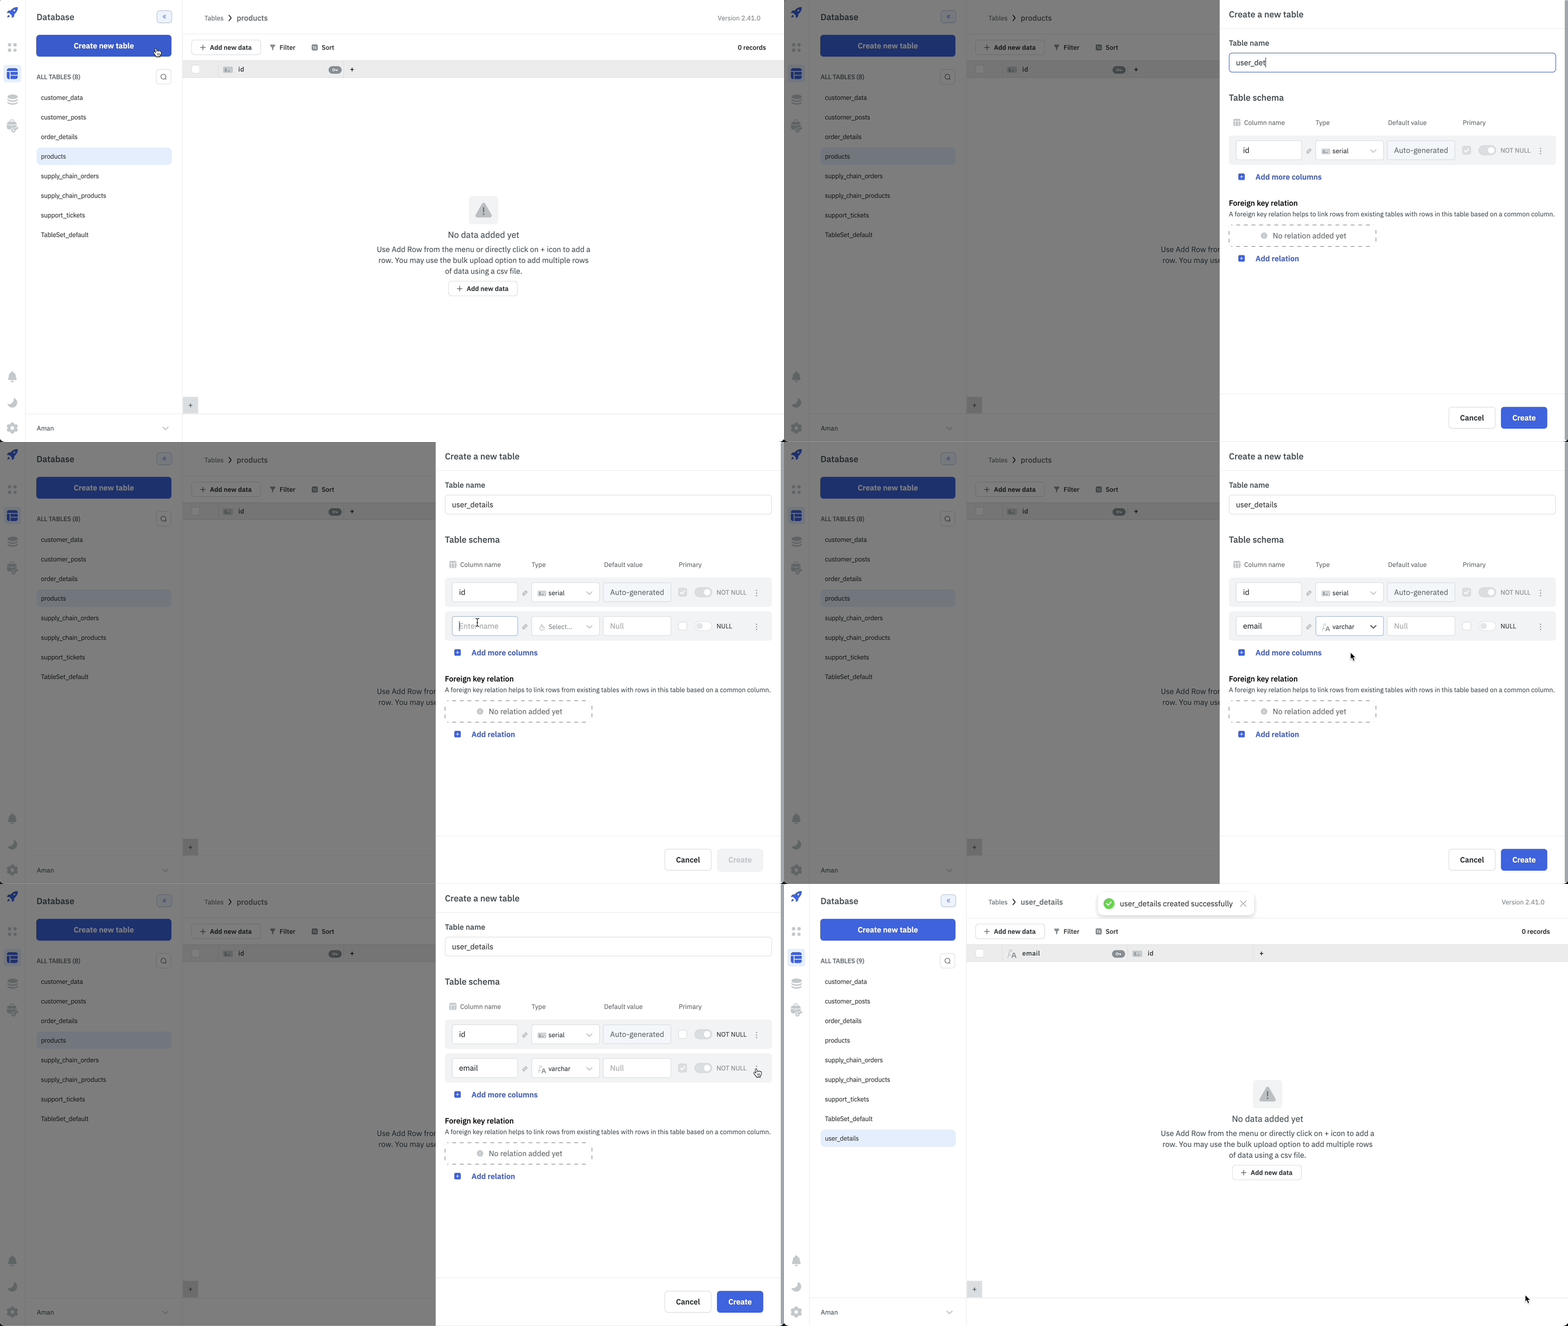
The constraints for the primary key column ensure the integrity and uniqueness of the primary key, which is essential for properly identifying and referencing records within the table. To create a single field primary key, follow these steps:
- Create or edit an existing table.
- Check the Primary checkbox on the column which you want to set as the primary key.
- This will automatically add the primary key constraint to the column.
- Click on the Create button to create the table.
Constraints
- The primary key column cannot contain null values.
- The primary key column must have unique values across all rows.
Limitations
- Every table must have at least one primary key.
- The primary key column cannot have the Boolean data type.
Creating Composite Primary Key
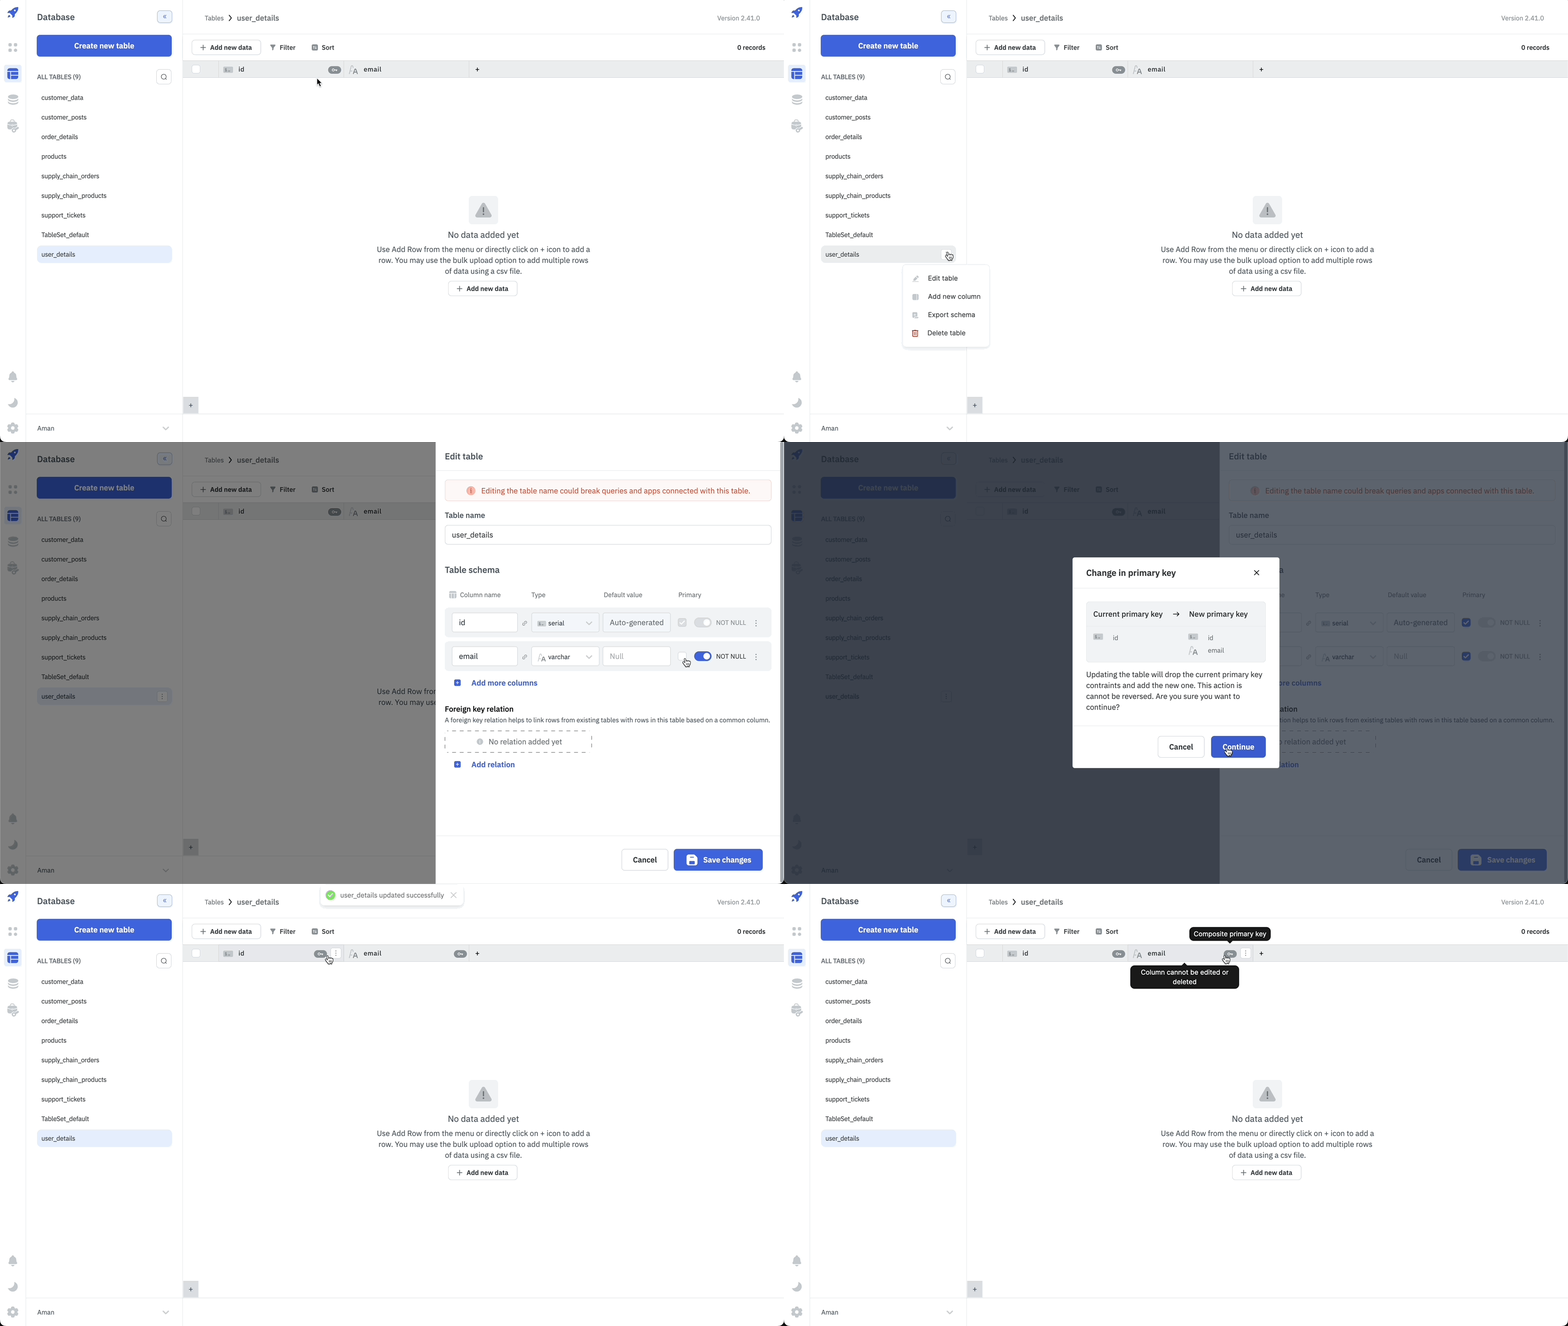
You have the option to convert an existing primary key column into a composite primary key, consisting of two or more columns. By utilizing a composite primary key, you can uniquely identify records based on multiple column values, providing greater flexibility and control over your data structure. To create a composite primary key, follow these steps:
- Create or edit an existing table.
- Check the Primary checkbox on multiple columns to set them as the composite primary key.
- This will automatically add the primary key constraint to the selected columns.
- Click on the Save changes/Create button to update/create the table.
Constraints
- None of the composite key columns can contain null values.
- The combination of values across all composite key columns must be unique for each row in the table.
Limitation
- The composite key columns cannot be of the Boolean data type.
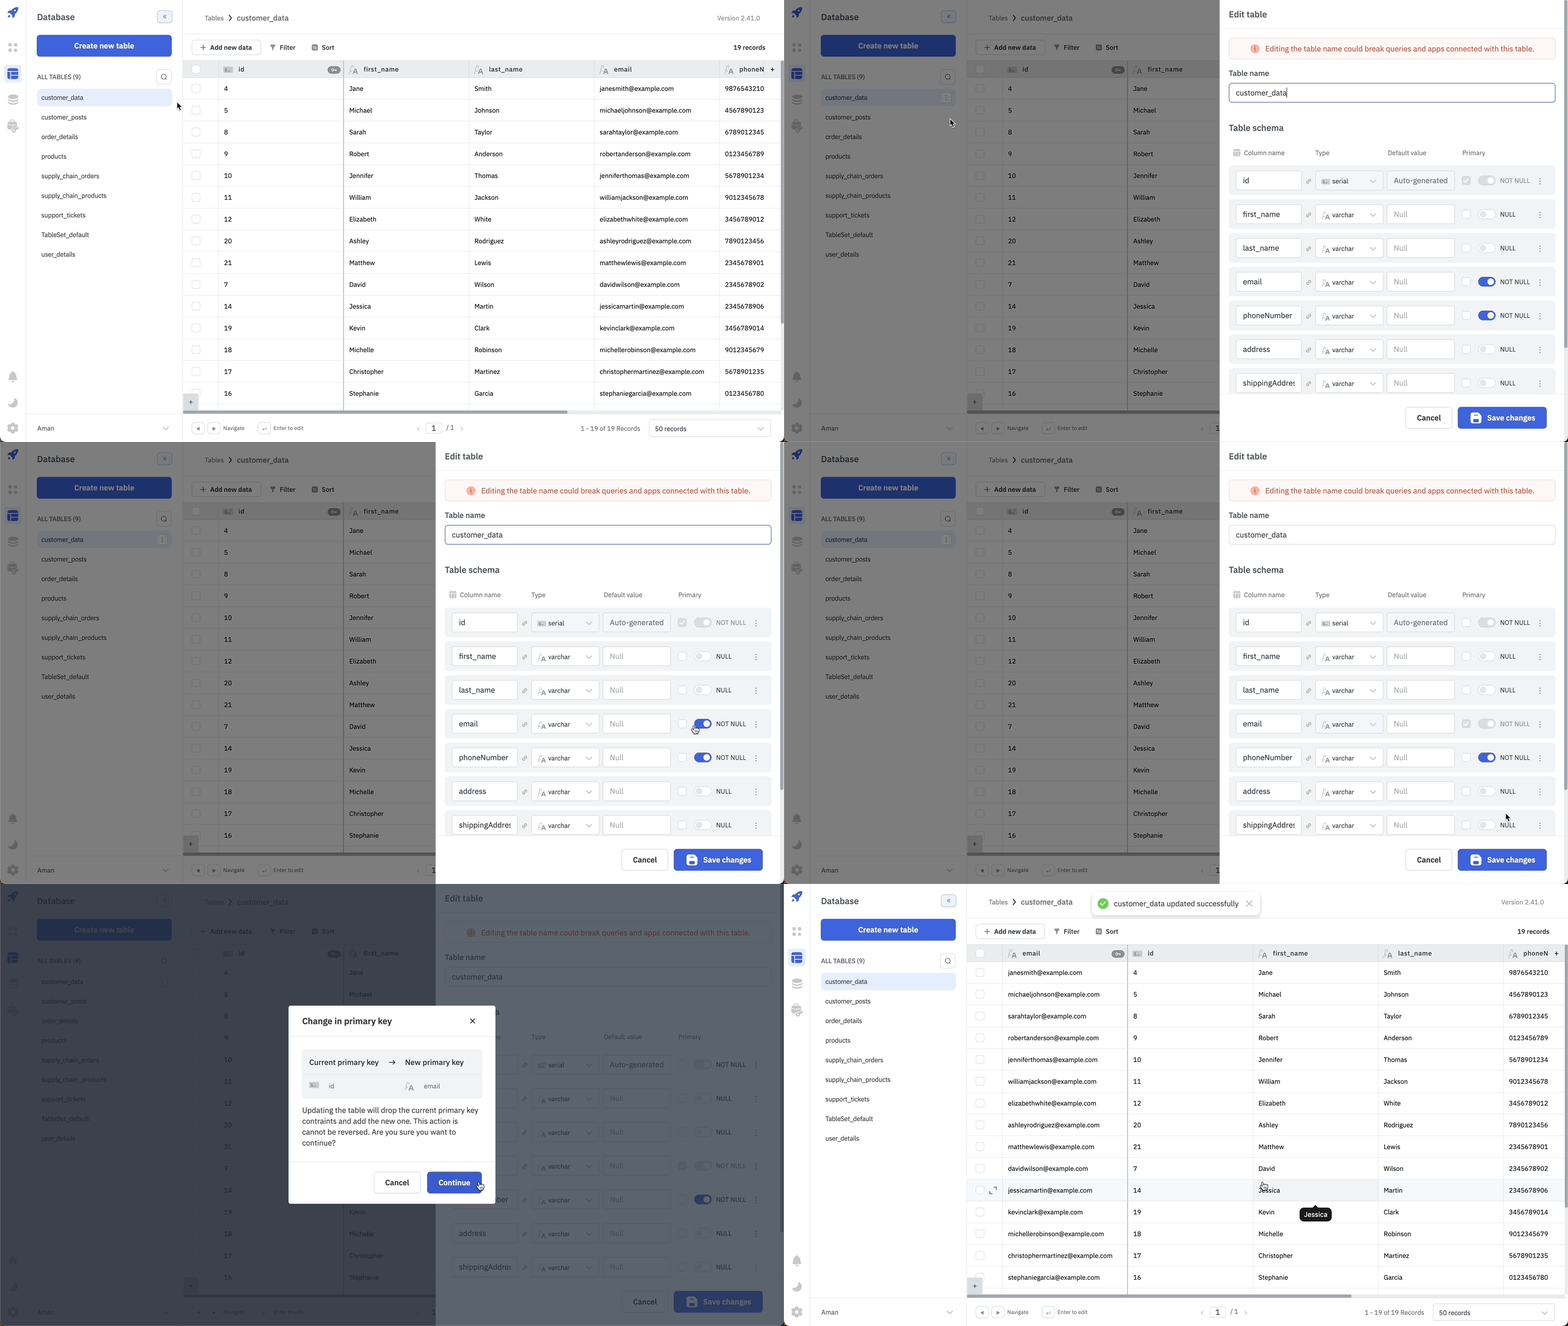
Modifying Primary Key
After creating a table, you can designate any column as the primary key, provided it adheres to the required constraints. If the chosen column already contains data, the existing values must comply with the primary key constraints. However, you cannot update or modify the primary key of a target table if it is currently being referenced as a foreign key in any other source tables. To modify the primary key, follow these steps:
- Edit an existing table.
- Check the Primary checkbox on the column which you want to set as the primary key.
- This will automatically add the primary key constraint to the column.
- Uncheck the Primary checkbox on the existing primary key column. The primary key constraints will still stay in place for this column but are no longer necessary.
- Click on the Save changes button to update the table.
Deleting Primary Key
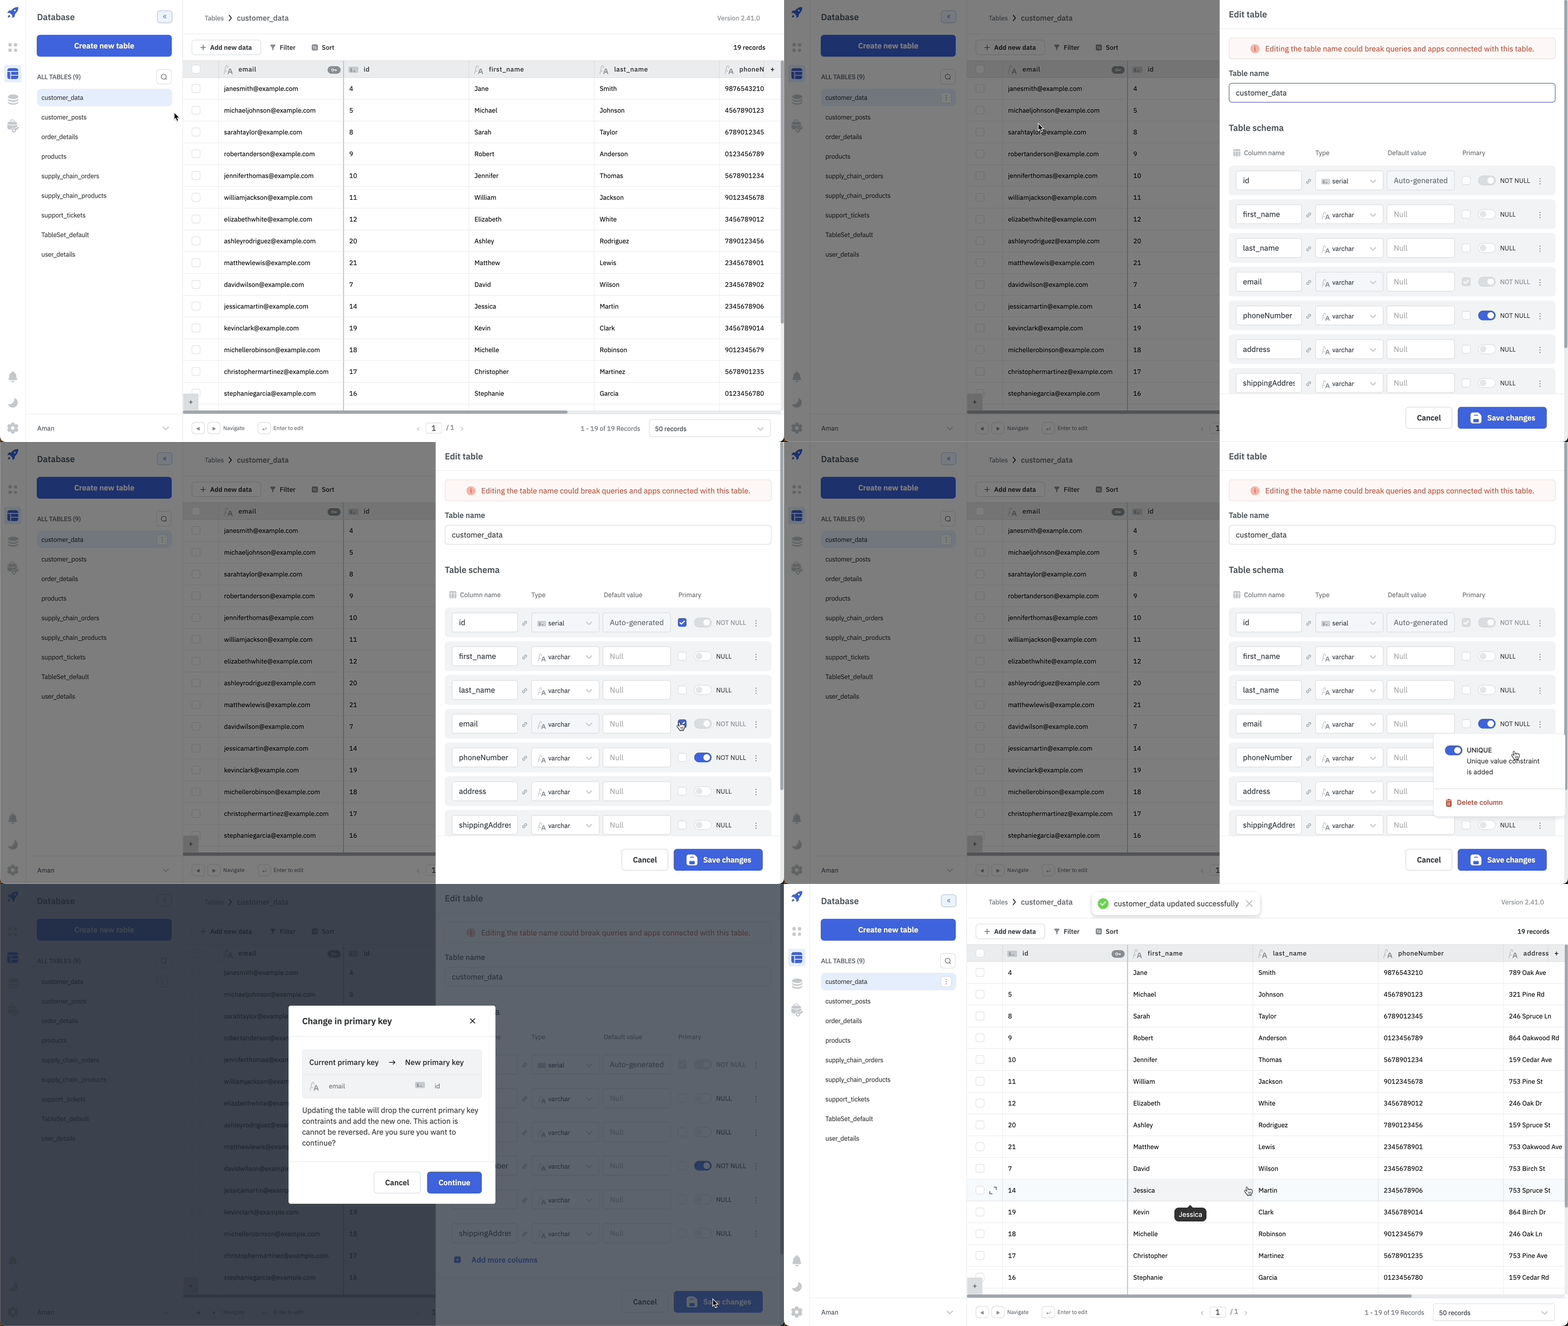
An existing primary key column can be deleted through the Edit Table panel. To delete the primary key column, follow these steps:
- Edit an existing table.
- Select a different column to serve as the new primary key for the table.
- Once the new primary key column is designated, you can proceed to the existing primary key column.
- Uncheck the Primary checkbox for the existing primary key column to remove its primary key status.
- After removing the primary key constraint, you can delete this column from the table.
You cannot delete a Primary Key of a target table if it is being used as a foreign key in any source table(s).
Foreign Key
A foreign key relation refers to linking one column or set of columns of the current table with one column or set of columns in an existing table. This relationship establishes a connection between the two tables, enabling the current source table to reference the existing target table. While creating a Foreign Key relationship, you can select the desired action to be performed on the source row when the referenced(target) row is updated or deleted.
Constraints
- The target table must contain a column having the same data type as the column in the source table.
- The column that has to be referenced in the target table must have Unique constraint explicitly.
- The target table must already exist before adding the Foreign Key relationship in the source table.
Limitations
- Self-references are not allowed i.e. Target table and Source table cannot be the same.
- No foreign key can be created with a column of serial data type in the source table.
- No foreign key can be reference a column in target table that is a part of its composite Primary key.
Exception
- The foreign key created with a column having integer data type in the source table can also reference a column of serial data type in the target table.
Creating Foreign Key
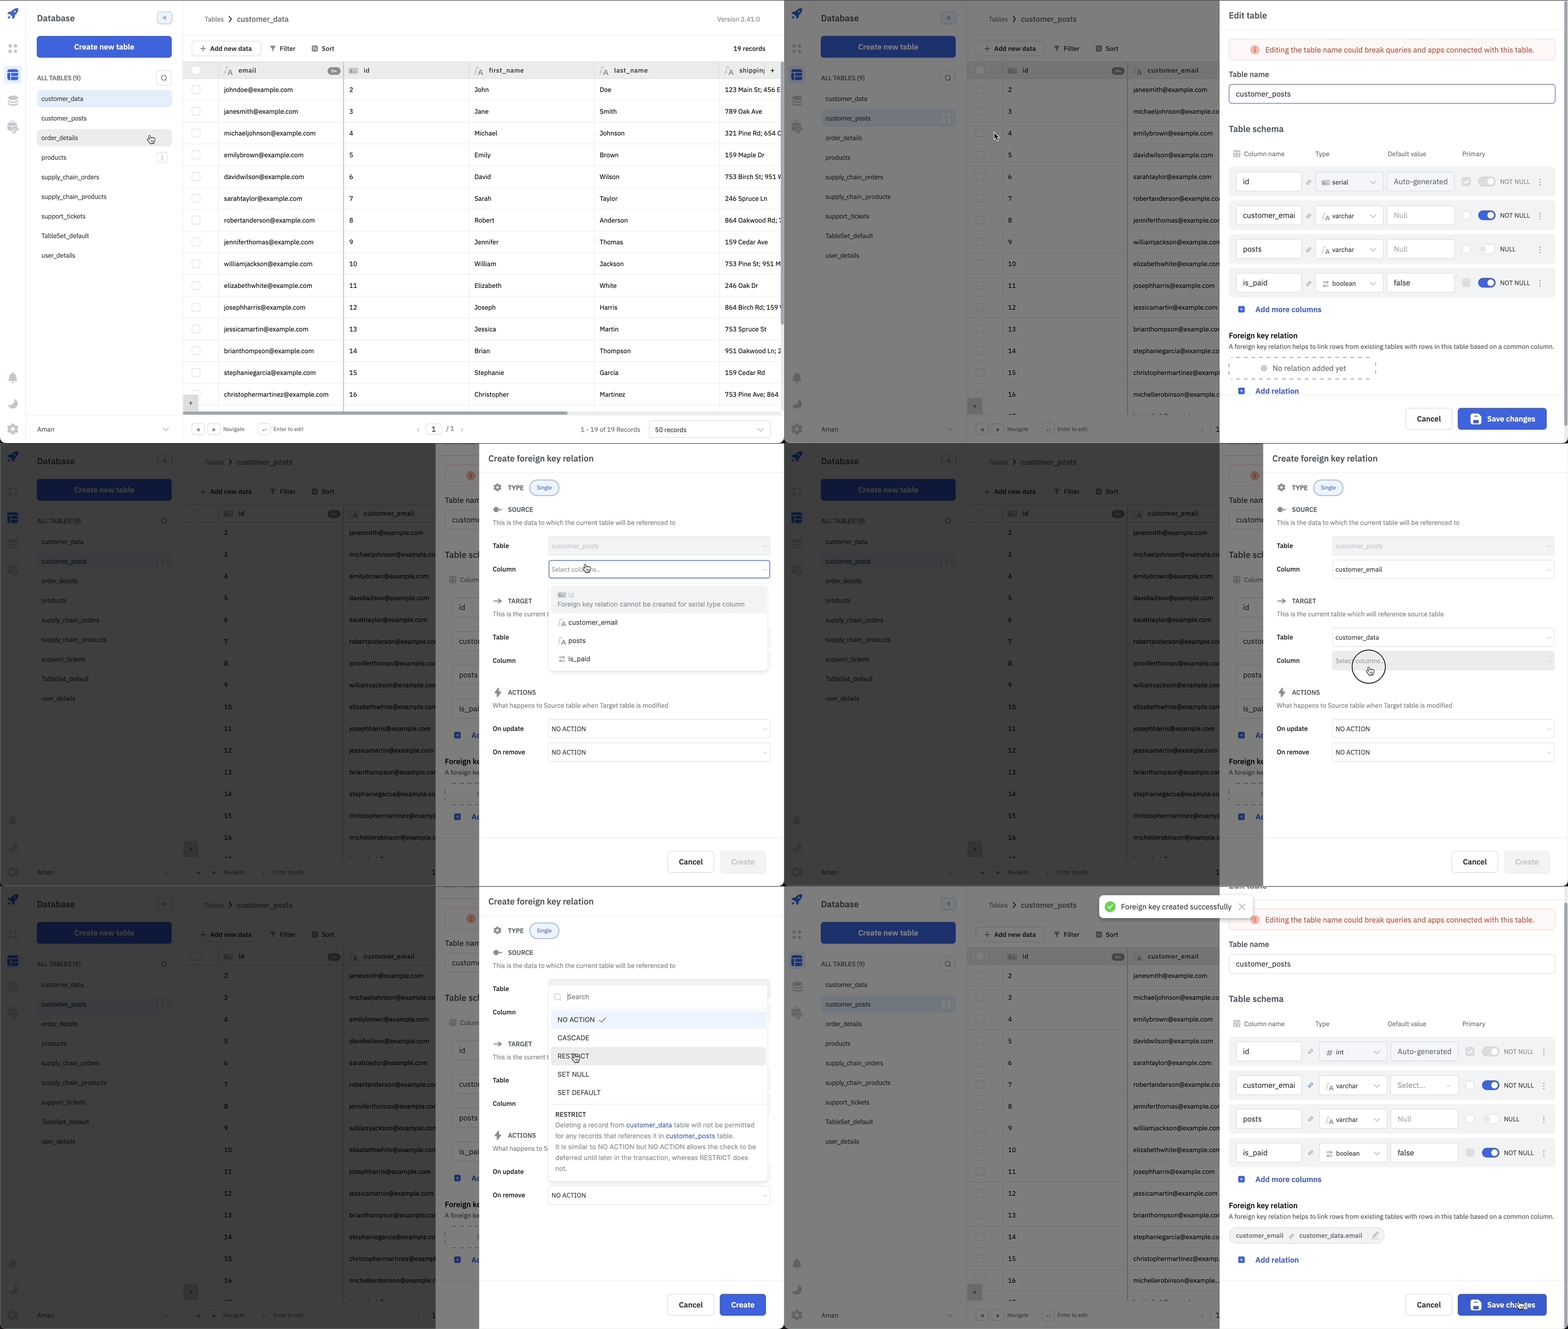
While creating/editing a table(target), you will be able to add one or more than one Foreign Keys referencing the column(s) of other existing(source) tables. To create a Foreign Key relationship, follow these steps:
- Create or edit an existing table.
- Click on the
+ Add Relationbutton under the Foreign key relation section. - The table which is being created/edited is the source table.
- Under the source section, select the desired column from the dropdown menu.
- Under the target section, select the desired target table and Column from the dropdown menu.
- Under the Actions section, select the desired action to be performed when the referenced row is updated or deleted.
- Click on the
Createbutton to create the Foreign Key relationship.
Foreign Key Actions
When creating a foreign key relationship, ToolJet Database lets you choose from several actions to be performed on the source row when the referenced row in the target table is updated or deleted.
On Update
| Option | Description |
|---|---|
| Restrict (default) | Restrict any updates on target table if any referenced row is being updated. |
| Cascade | Any updates in referenced row in target table will show up in the source table as well. |
| Set NULL | Any updates in referenced row in target table will set it's instances in the source table as NULL. |
| Set to Default | Any updates referenced row in target table will set it's instances in the source table as default value of foreign key column of source table. |
On Delete
| Option | Description |
|---|---|
| Restrict (default) | Restrict any deletion on target table if any referenced row is being updated. |
| Cascade | Any deletion of referenced row in target table will delete the row having it's instance in the source table as well. |
| Set NULL | Any deletion of referenced row in target table will set it's instances in the source table as NULL. |
| Set to Default | Any deletion of referenced row in target table will set it's instances in the source table as default value of foreign key column of source table. |
Referential Integrity
The foreign key constraint ensures referential integrity between the source and target tables. This constraint enforces that the foreign key column in the source table has one of the unique values present in the foreign key column in the target table.
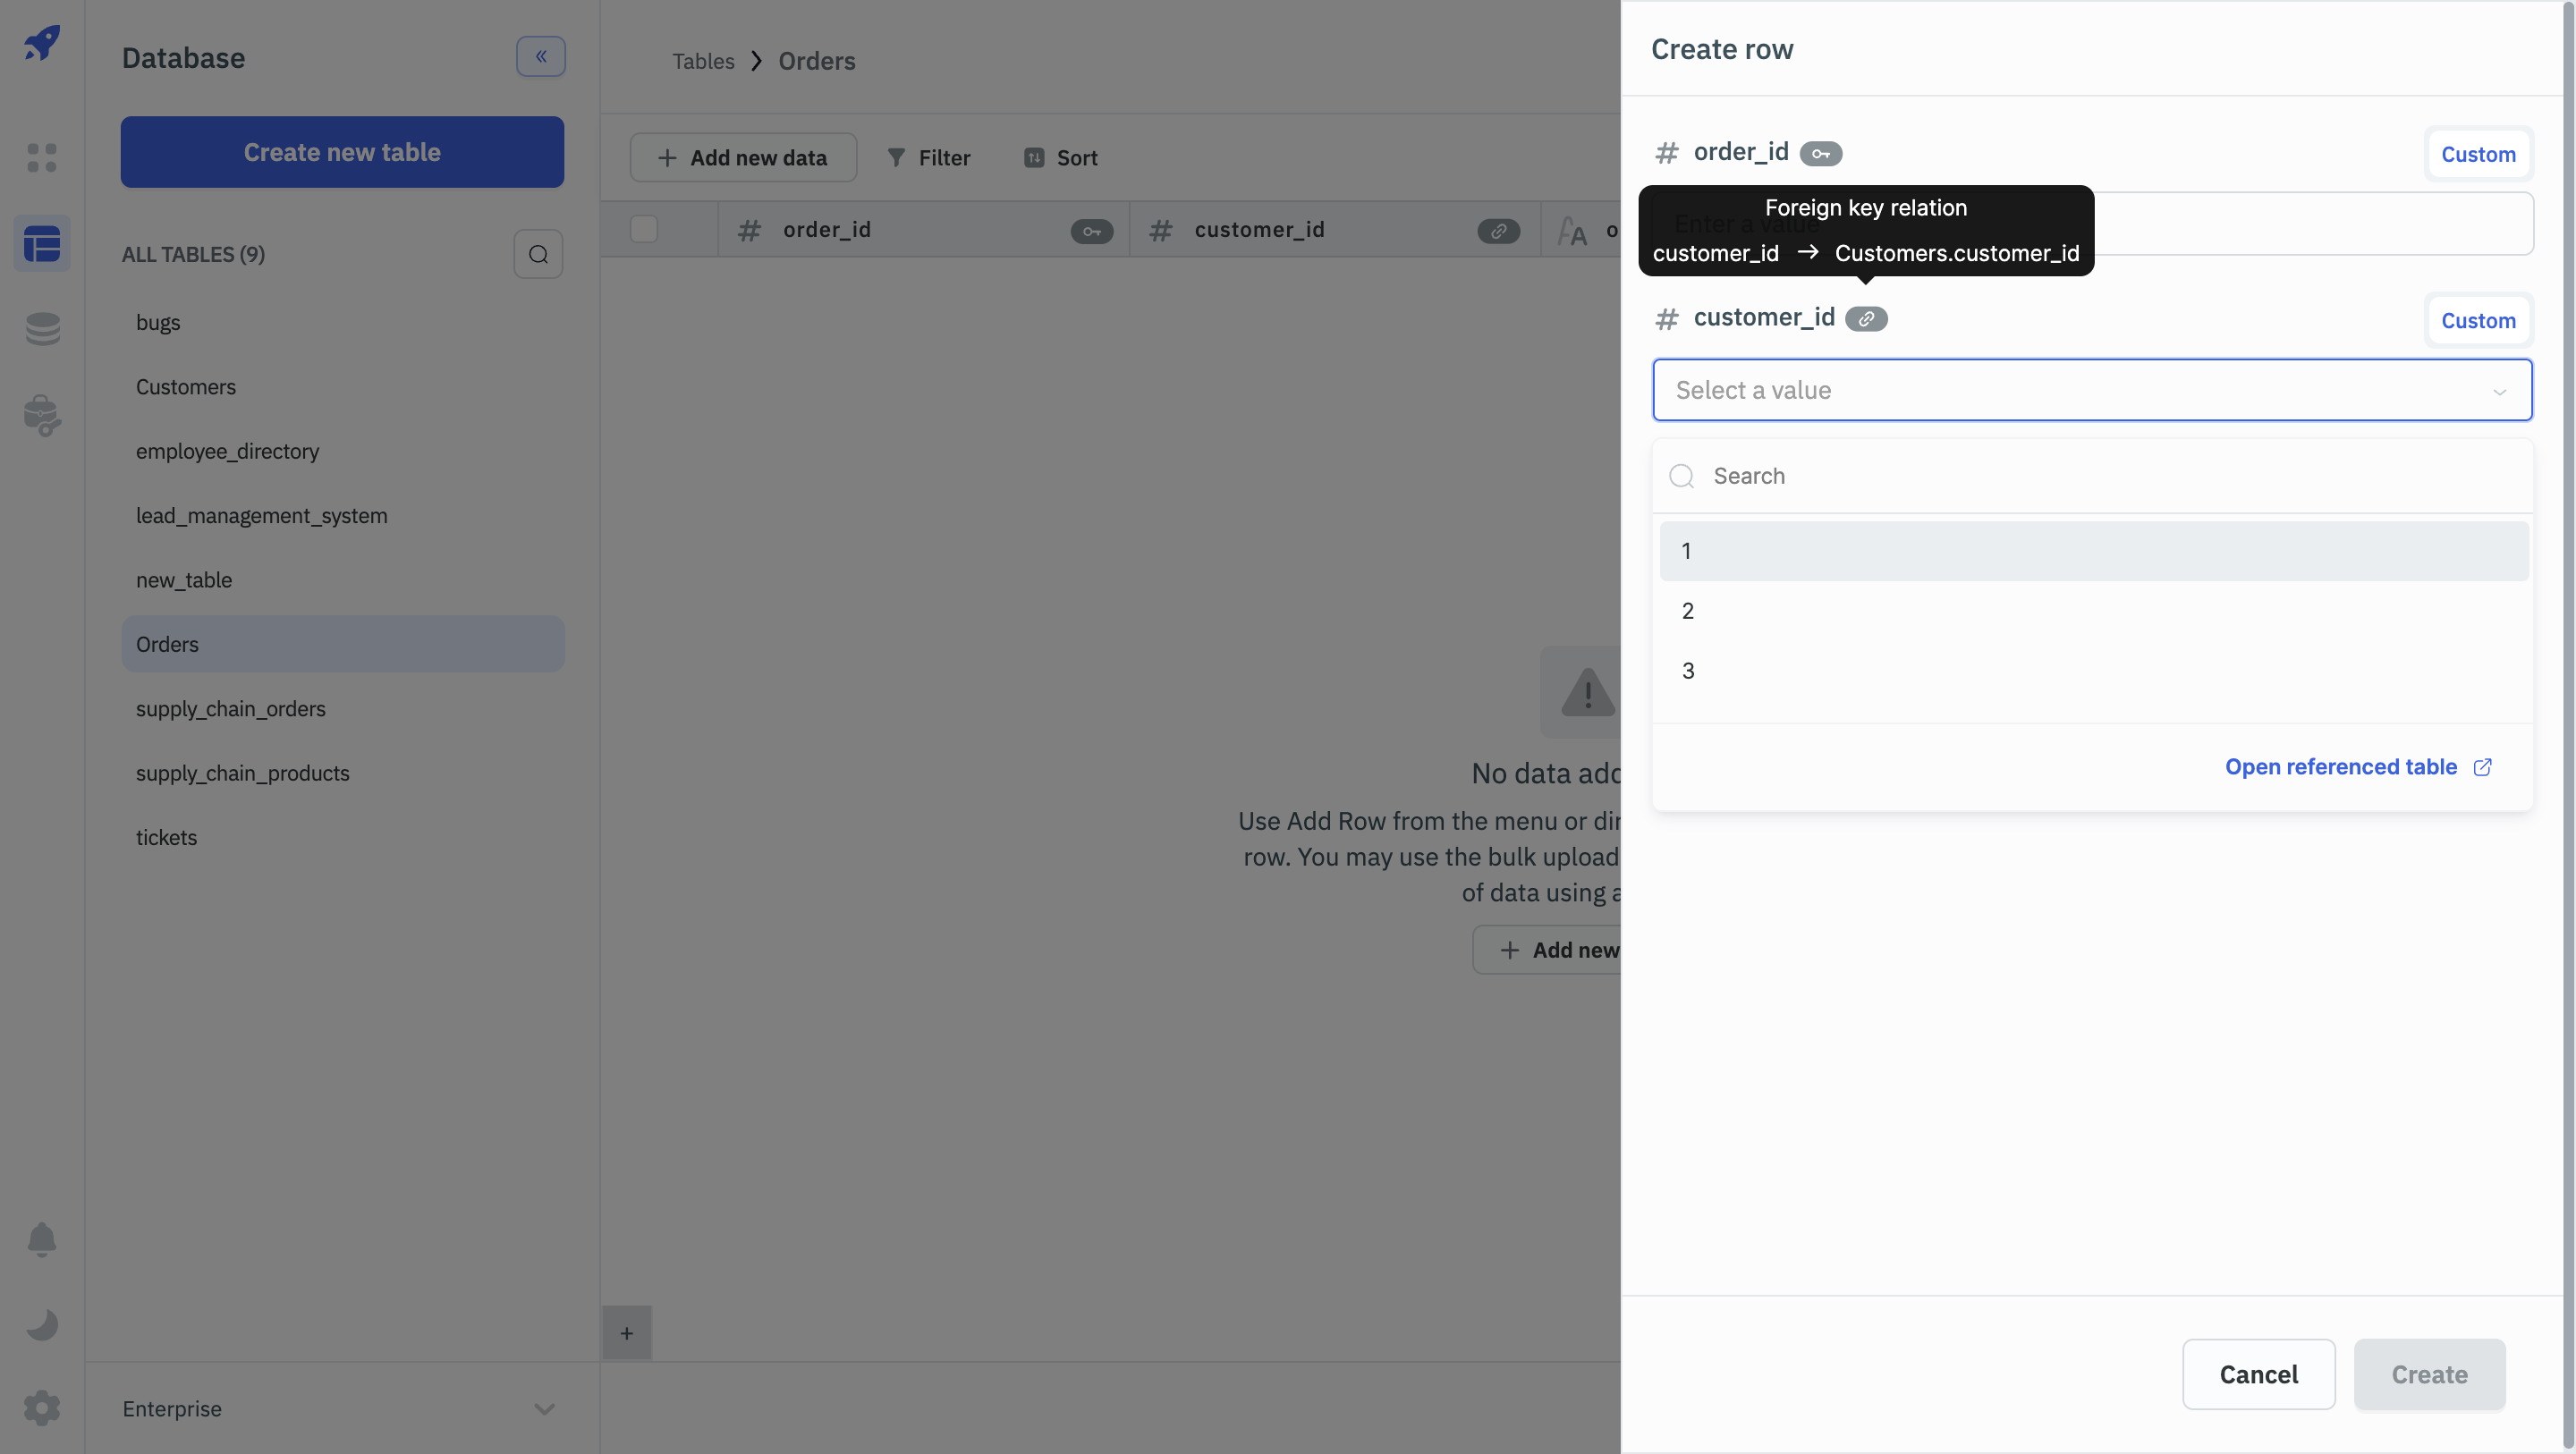
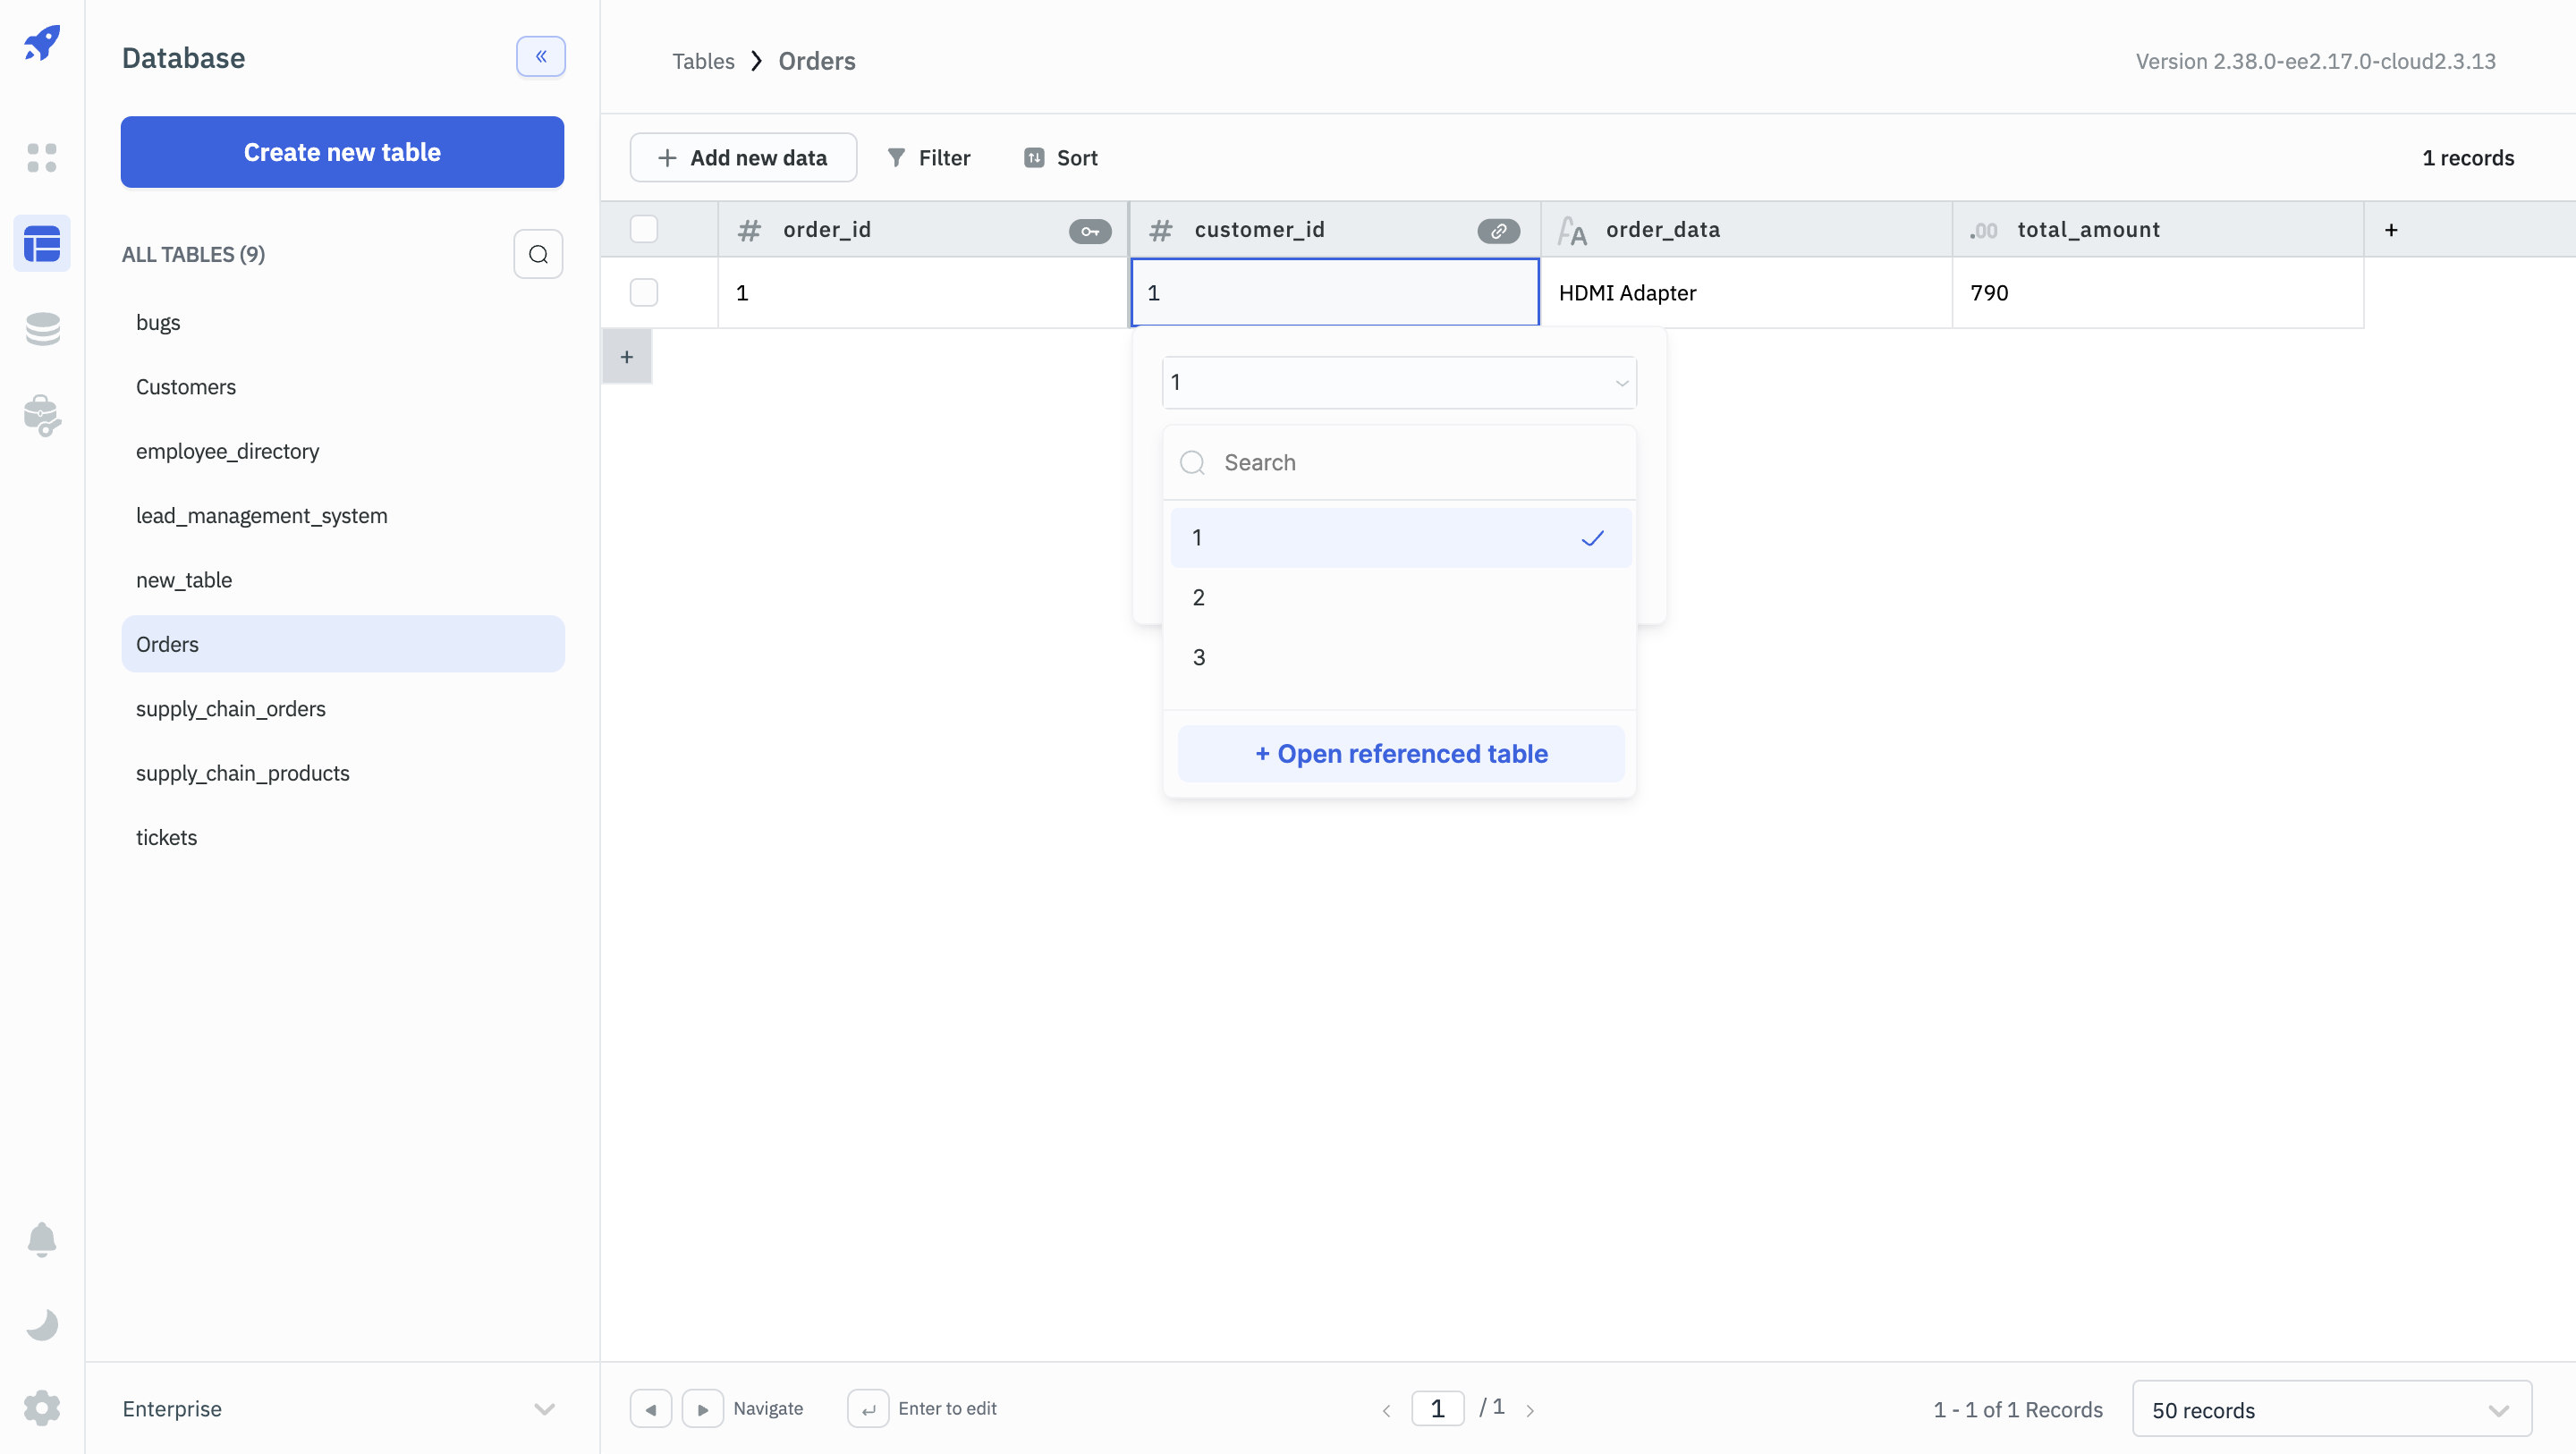
- When creating a new row in the source table the column with the foreign key relation will have a dropdown with the unique values present in the target table. This ensures that the data in the source table is always consistent with the data in the target table.
- On the bottom of the dropdown, there is a button to Open referenced table which will take you to the target table.
- When editing the value of a foreign key cell in an existing row of the source table, the dropdown will show the unique values present in the target table. This ensures that even when the data in the source table is being updated, it is always consistent with the data in the target table.
Example
Let's consider an example where we want to create a foreign key relationship between the Orders and Customers tables in an e-commerce application.
First, create the following two tables in the ToolJet Database:
Customers
| Column Name | Data Type | Primary Key | Not Null | Unique |
|---|---|---|---|---|
| customer_id | int | ✅ | ✅ | ✅ |
| name | varchar | ❌ | ✅ | ❌ |
| varchar | ❌ | ✅ | ✅ |
Orders
| Column Name | Data Type | Primary Key | Not Null | Unique |
|---|---|---|---|---|
| order_id | int | ✅ | ✅ | ✅ |
| customer_id | int | ❌ | ✅ | ❌ |
| order_date | varchar | ❌ | ✅ | ❌ |
| total_amount | float | ❌ | ✅ | ❌ |
We want to create a foreign key relationship between the customer_id column in the Orders table and the customer_id column in the Customers table.
-
Define the Foreign Key Relationship
- Edit the
Orderstable. - Click on the + Add Relation button under the Foreign Key Relation section.
- In the Source section, select the
customer_idcolumn. - In the Target section, select the
Customerstable and thecustomer_idcolumn. - Choose the desired action, for example, RESTRICT to prevent deleting a customer that has associated orders.
- Edit the
-
Save Changes: Click the Save Changes button to create the foreign key relationship.
Now, whenever you try to insert or update a record in the Orders table, the customer_id value must correspond to an existing customer_id value in the Customers table. This is also prevent you from deleting a customer that has associated orders. This ensures that orders are always associated with a valid customer, maintaining data integrity and consistency.
Supported Data Types
Data Type | Description | Example |
|---|---|---|
| serial | serial is used to generate a sequence of integers which are often used as the Primary key of a table. Whenever a new table is created in the ToolJet database, a column id with the serial data type is automatically created as the primary key of the table. | Numbers starting from 1, 2, 3, 4, 5, etc. |
| varchar | varchar data type is used to store characters of indefinite length | Any string value |
| int | int is a numeric data type used to store whole numbers, that is, numbers without fractional components. | Numbers ranging from -2147483648 to 2147483647 |
| bigint | bigint is a numeric data type that is used to store whole numbers, that is, numbers without fractional components. | Numbers ranging from -9223372036854775808 to 9223372036854775807 |
| float | float is also a numeric data type that is used to store inexact, variable-precision values. | Any floating-point number, ex: 3.14 |
| boolean | boolean data type can hold true, false, and null values. | true or false |
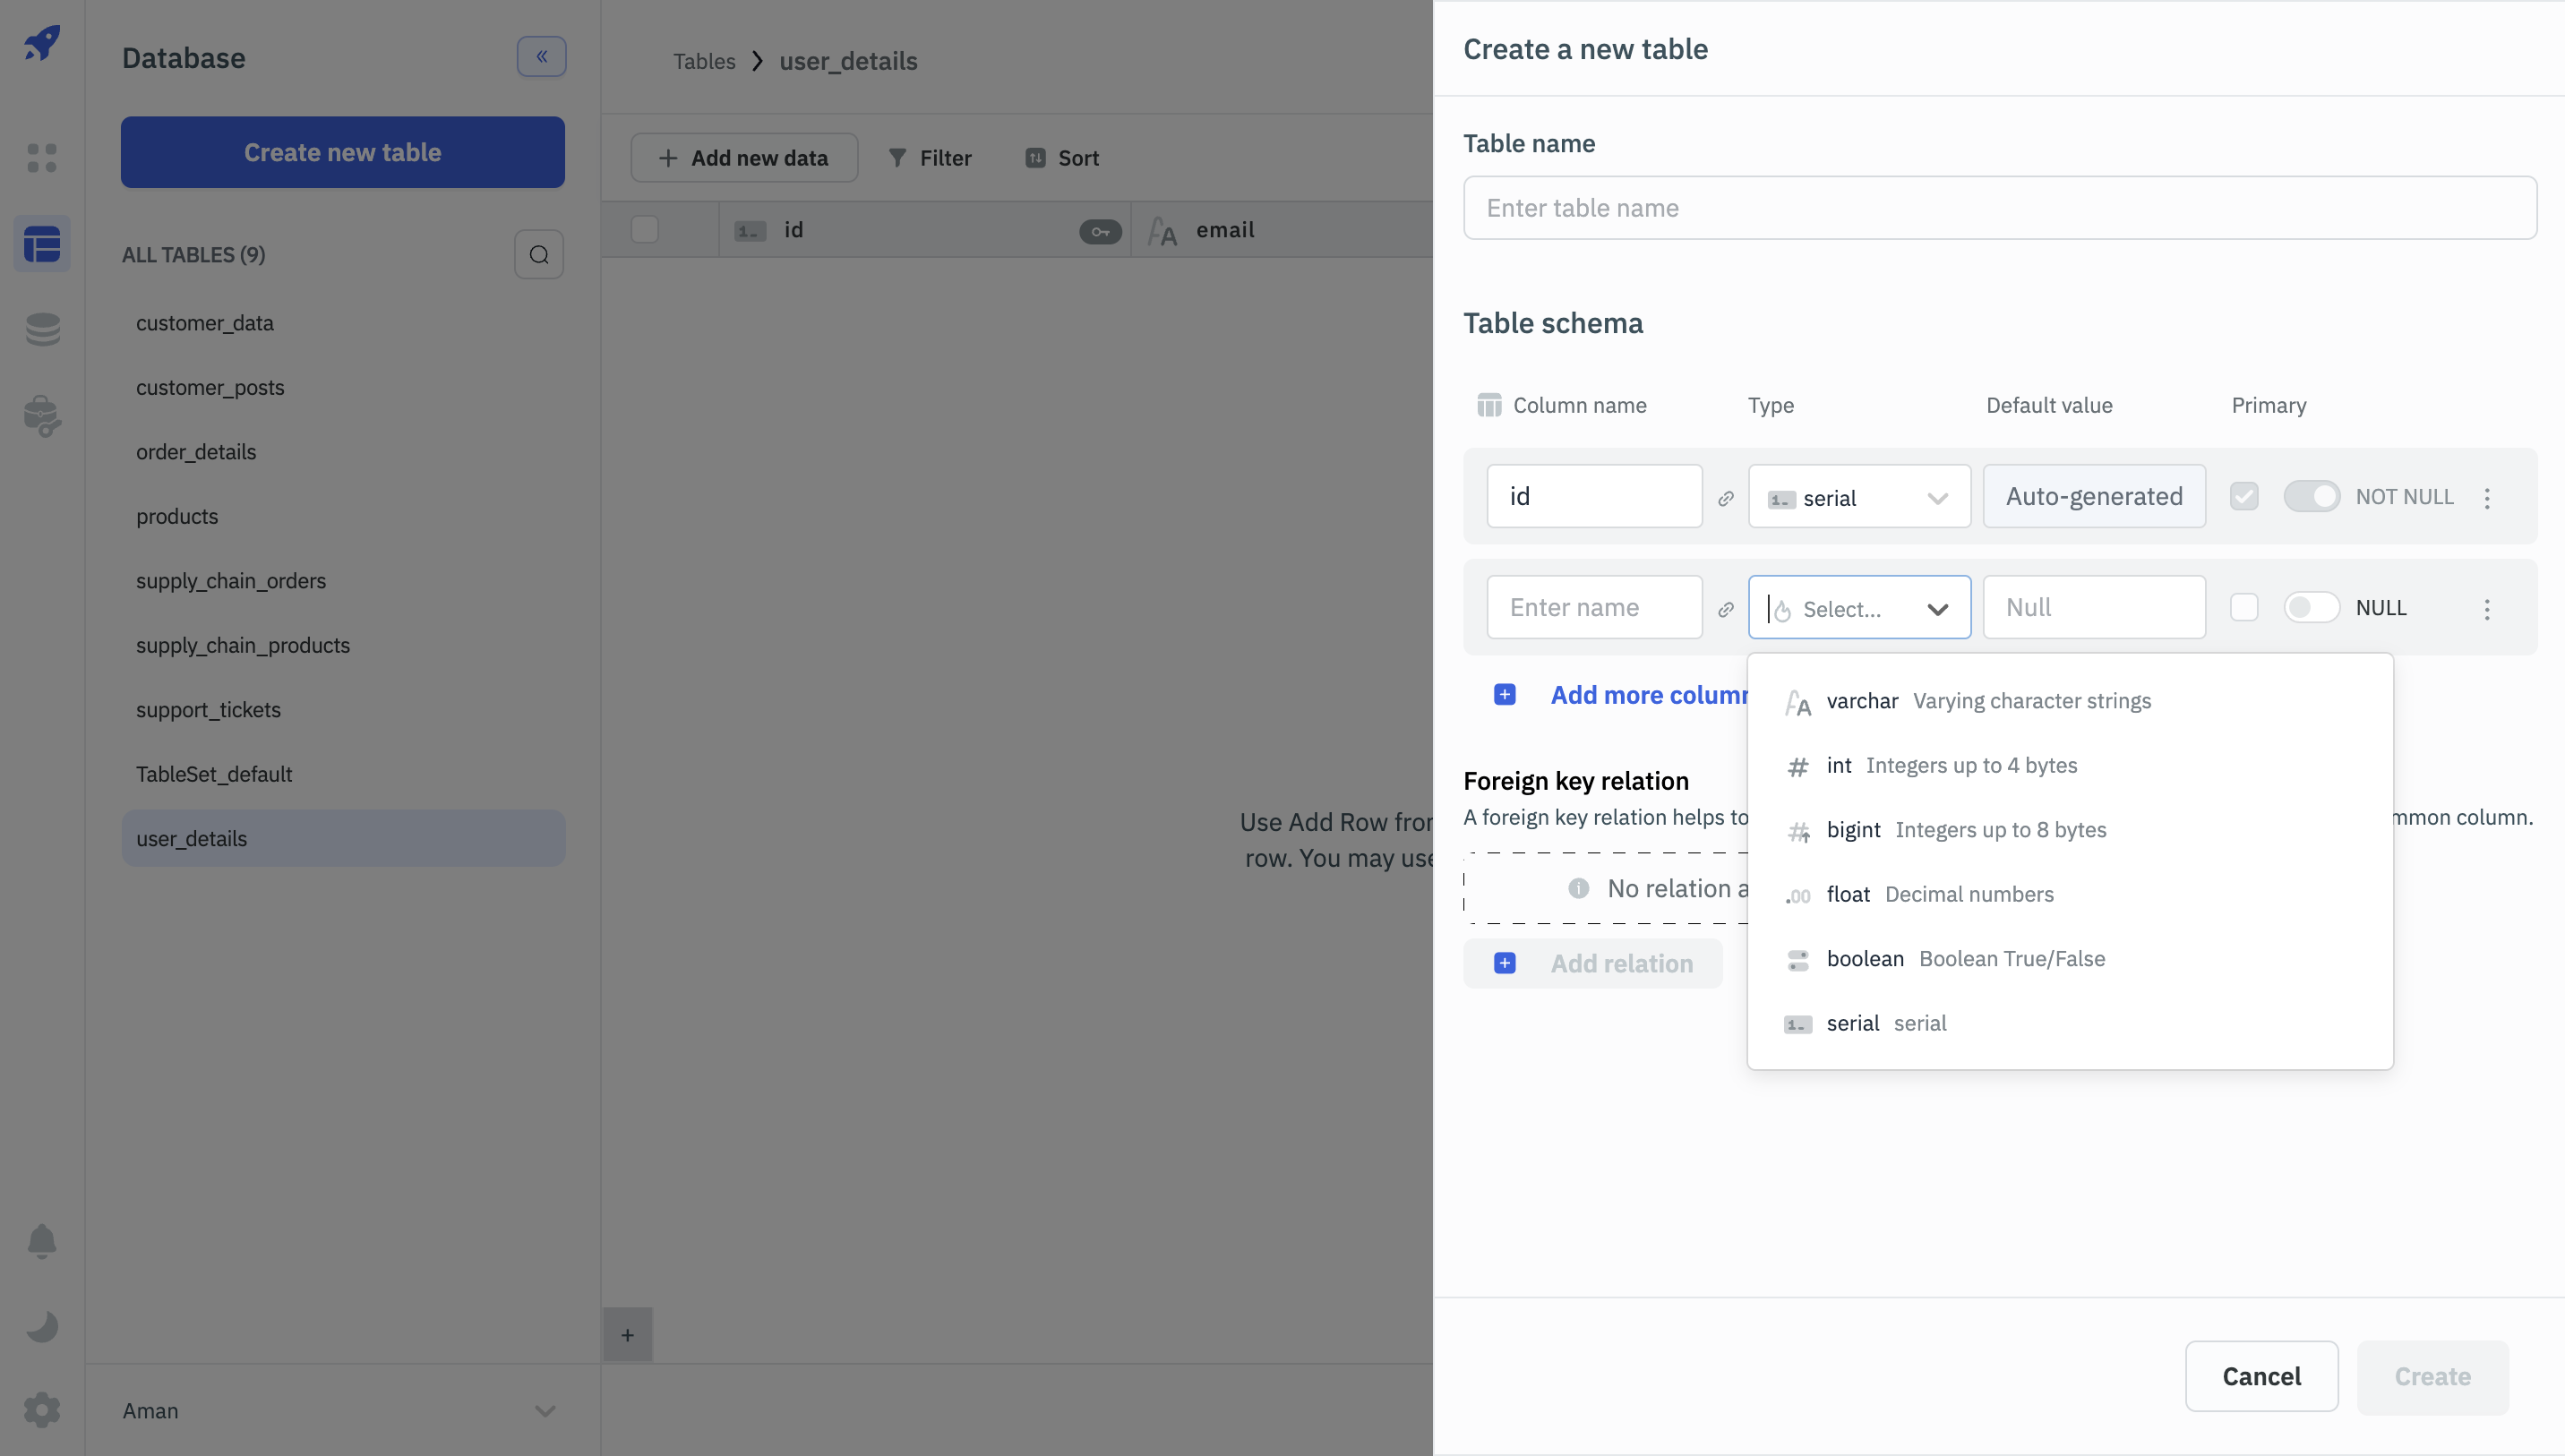
Table Operations
Search Table
Open the Search bar by clicking on the Search button and search for a table in the ToolJet database by entering the table name.

Rename Table
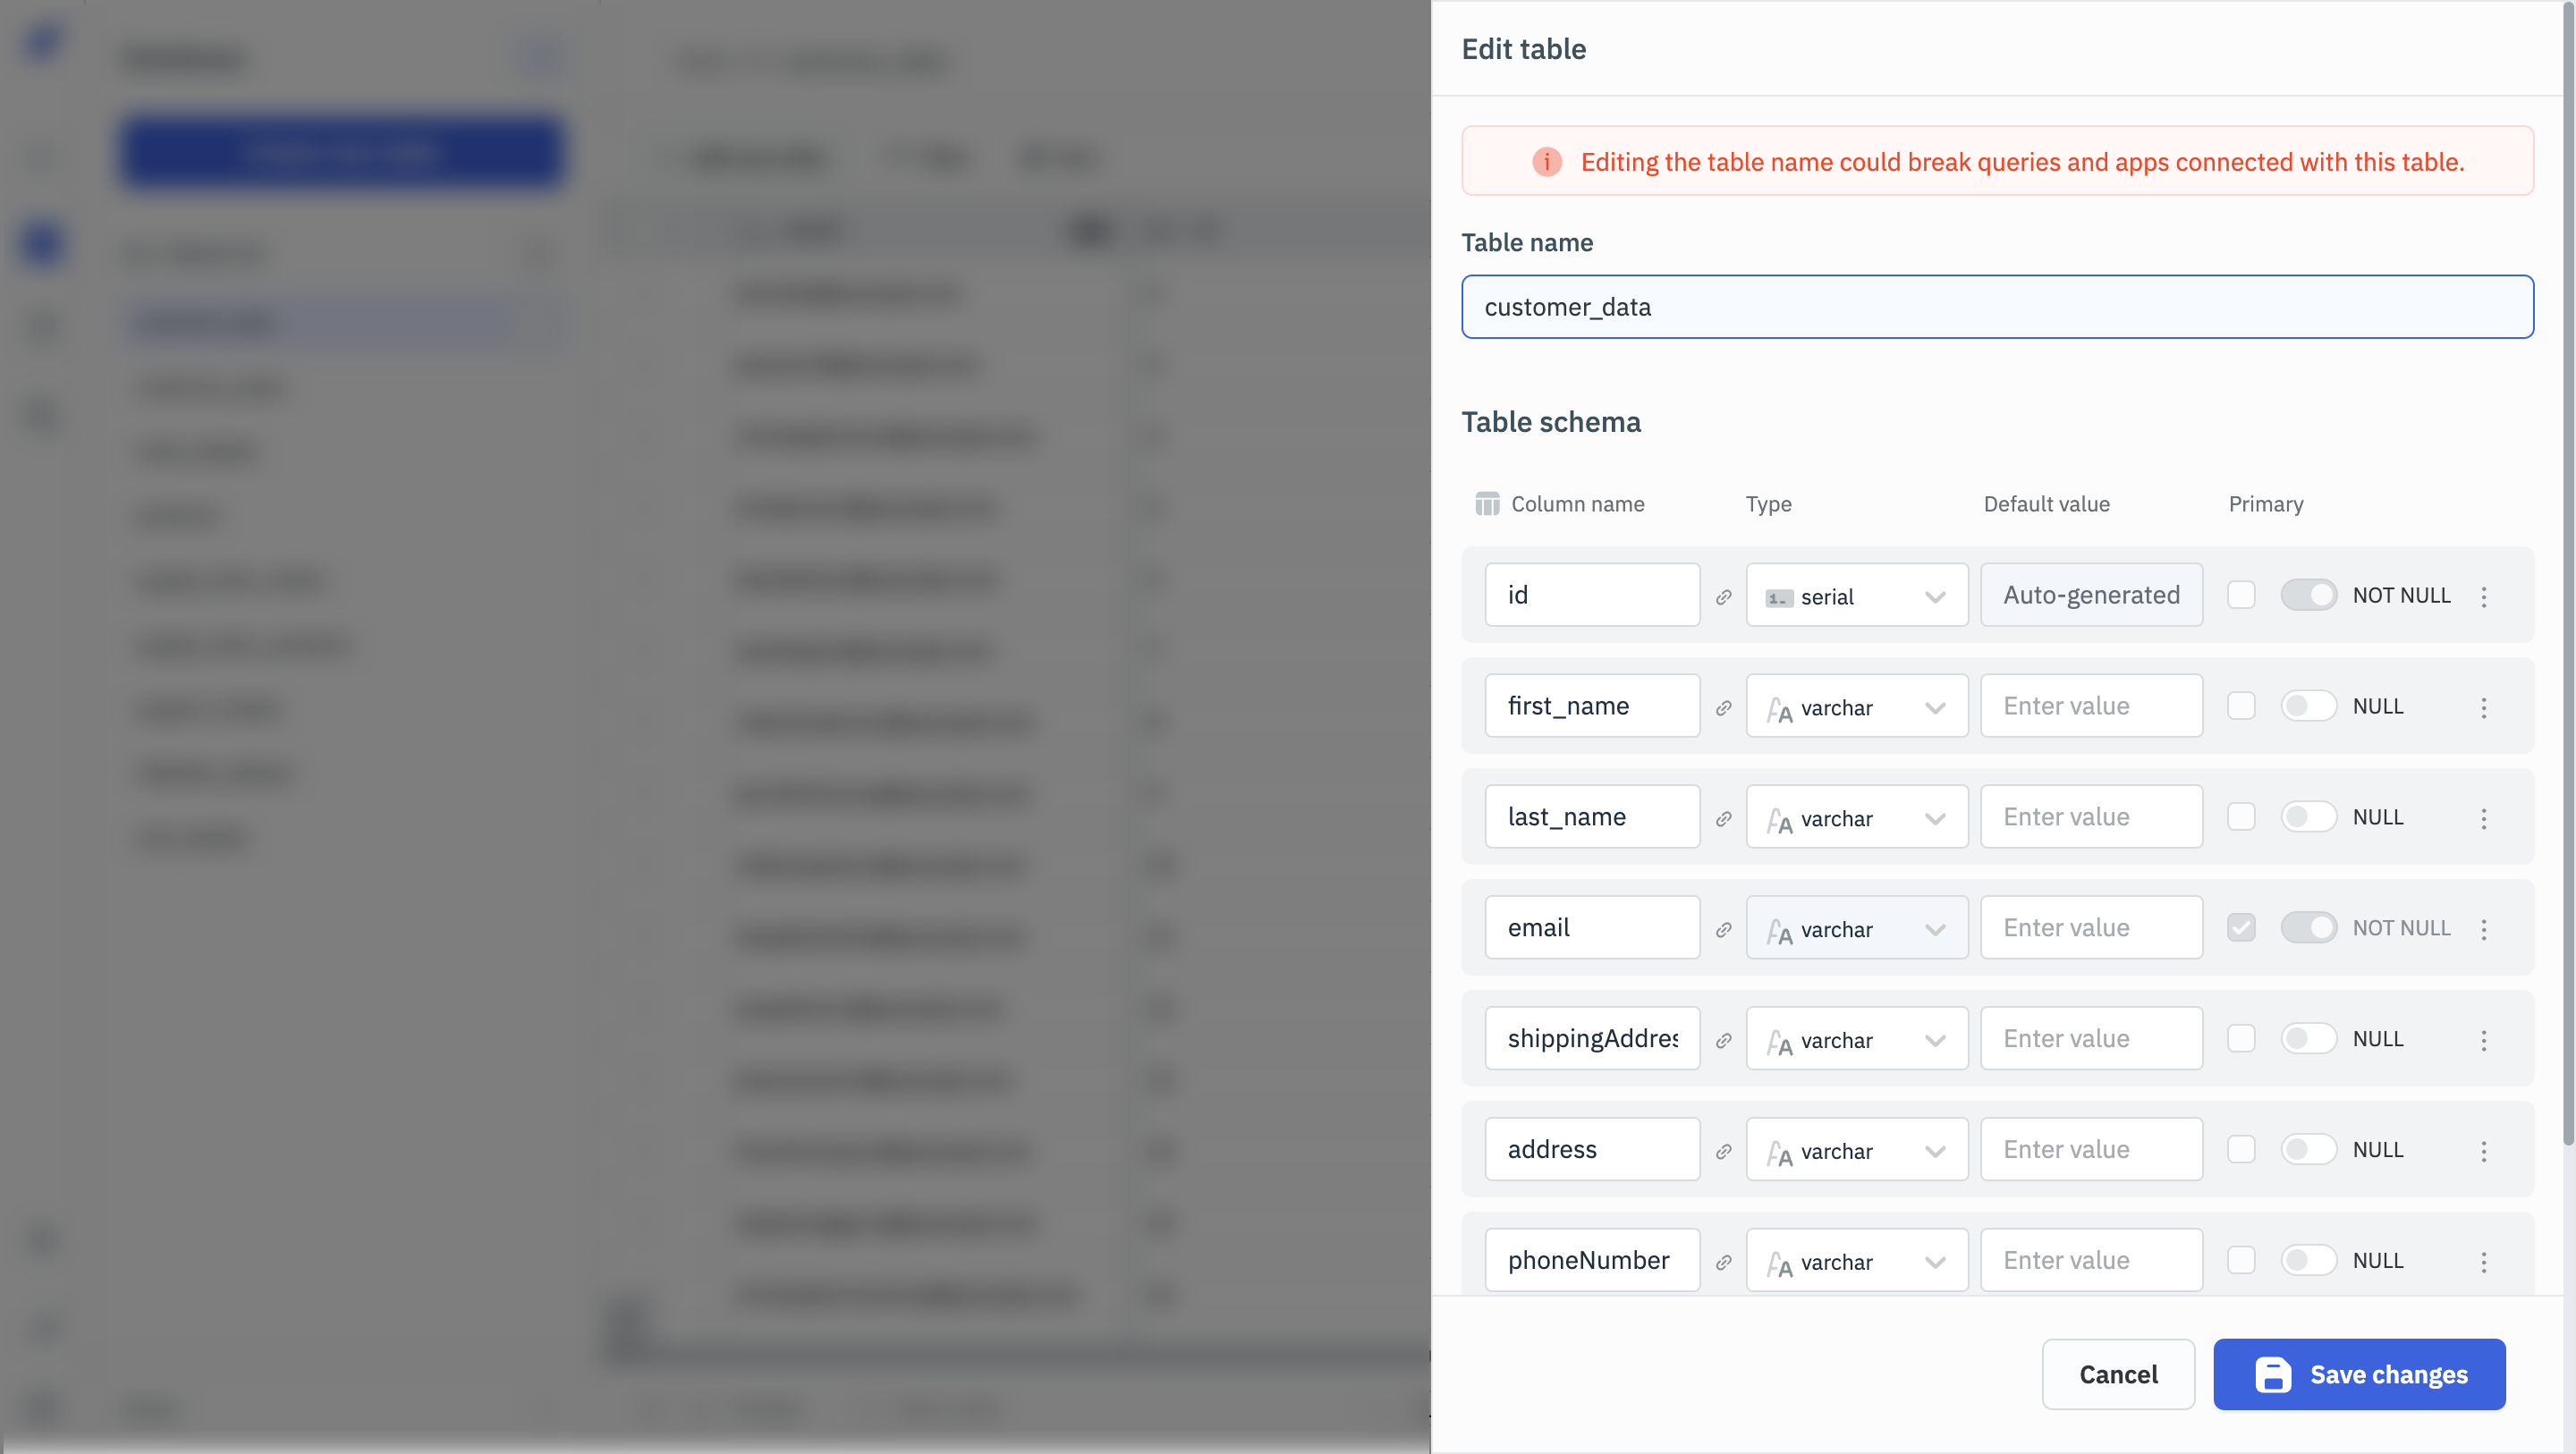
To rename a table, click on the kebab menu icon on the right of the table name and then select the Edit table option. A drawer will open from the right from where you can edit the table name.
Add New Column
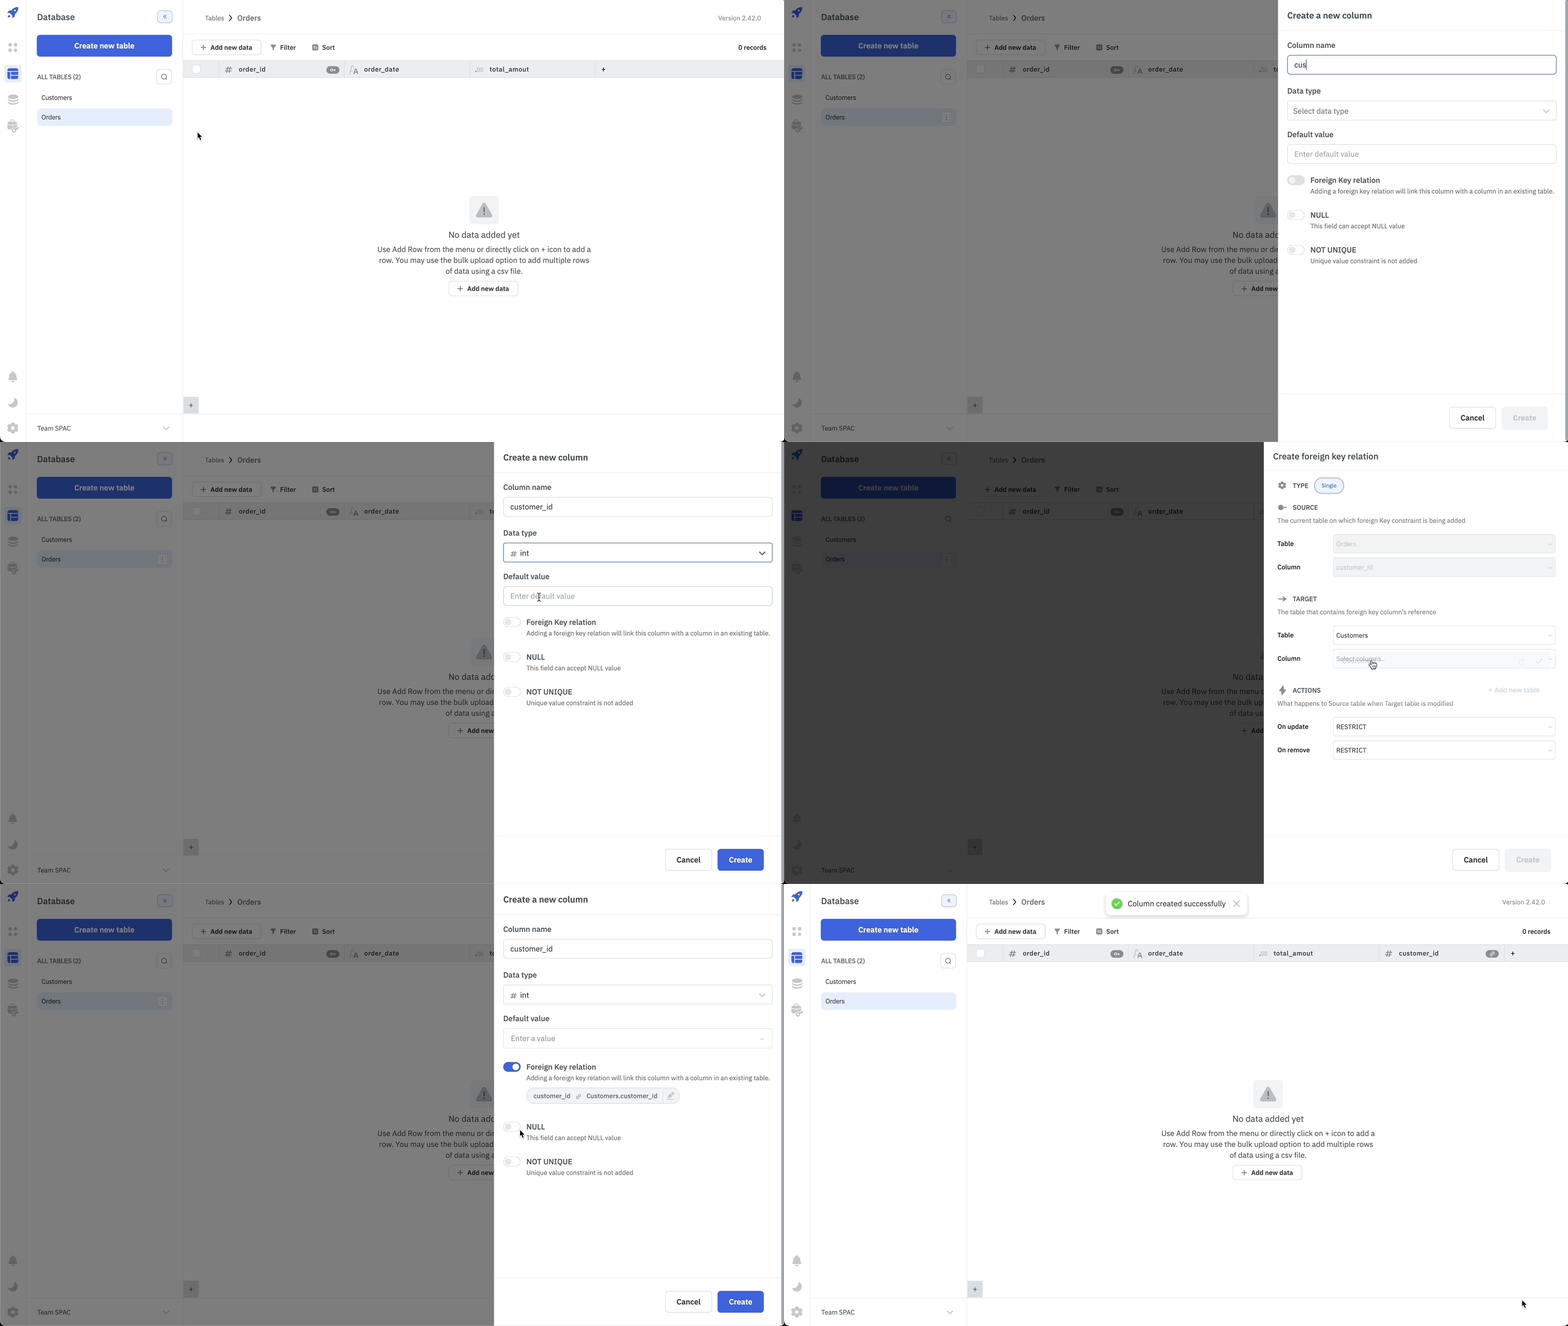
To add a new column to a table, either click on the kebab menu icon on the right of the table name and then select the Add new column option or click on the + button present at the end of the column header.
A drawer from the right will open up where you can enter the details for the new column:
- Column Name: Enter a unique name for the new column, serving as its key identifier.
- Data Type: Choose the appropriate data type for the column from the available options.
- Default Value: Specify any default value that should be assigned to the column. Optionally, users can leave this field blank. When a table contains rows and NOT NULL is applied to one of its existing or new columns, specifying a default value becomes compulsory.
- Foreign Key Relation: Click on the toggle to add a foreign key relationship to the column. This will open a menu where you can select the target table and column to reference.
Export Schema
The export schema option allows you to download the selected table schema in a JSON file. This does not export the table data or the relationships.
While exporting the app, you can choose to export the app with or without a table schema connected to the app.
To export the table schema, click on the three vertical dots icon on the right of the table name and then click on the Export option. A JSON file will be downloaded with the table schema.

Delete Table
To delete a table, click on the three vertical dots icon on the right of the table name and then click on the Delete option. A confirmation modal will appear, click on the Delete button to delete the table.

Edit Column
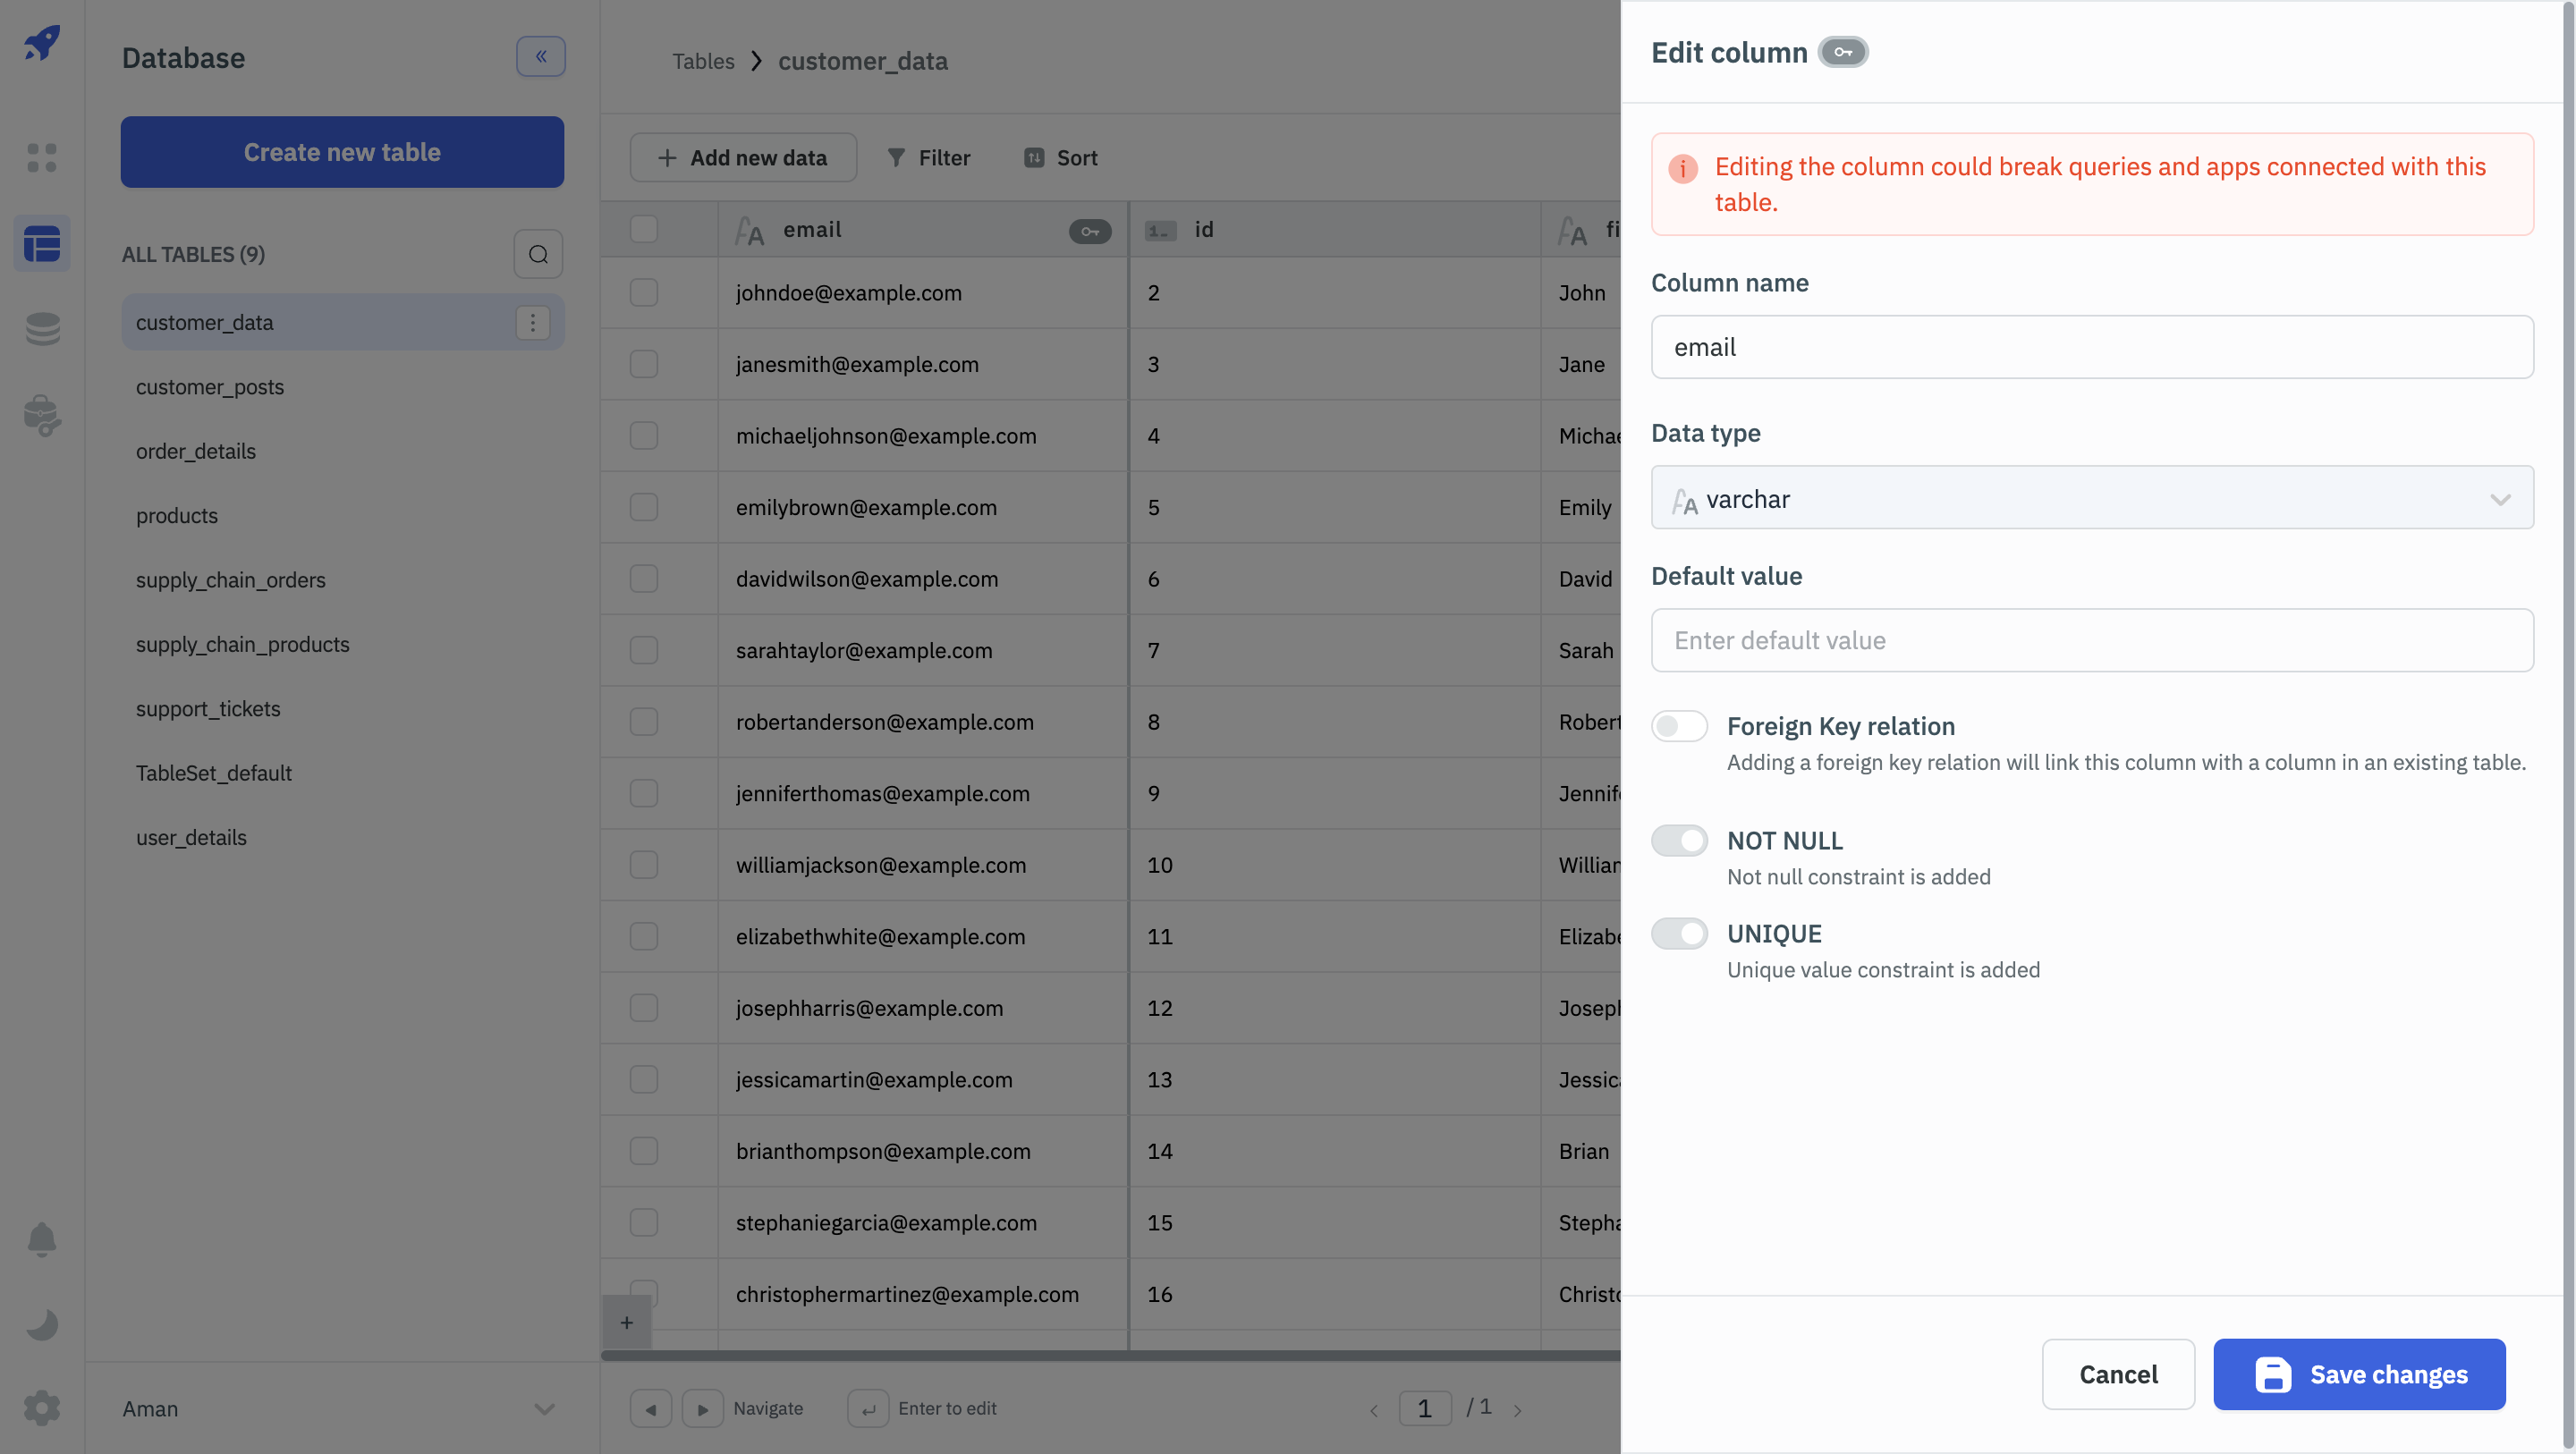
To edit a column, click on the kebab menu on the column name and select the option to Edit column. When you edit the column, the data type cannot be changed.
Delete Column
To delete a column, click on the kebab menu on the column name and select the option to Delete. You cannot delete a column if it is being used as a primary key. You will have to remove the primary key constraint from the column before deleting it.

Adding and Modifying Data
Add New Data
The Add new data button on the top of the table editor allows you to add data to the table. You can either Add new row or Bulk upload data to add the data to the table.

Add New Row
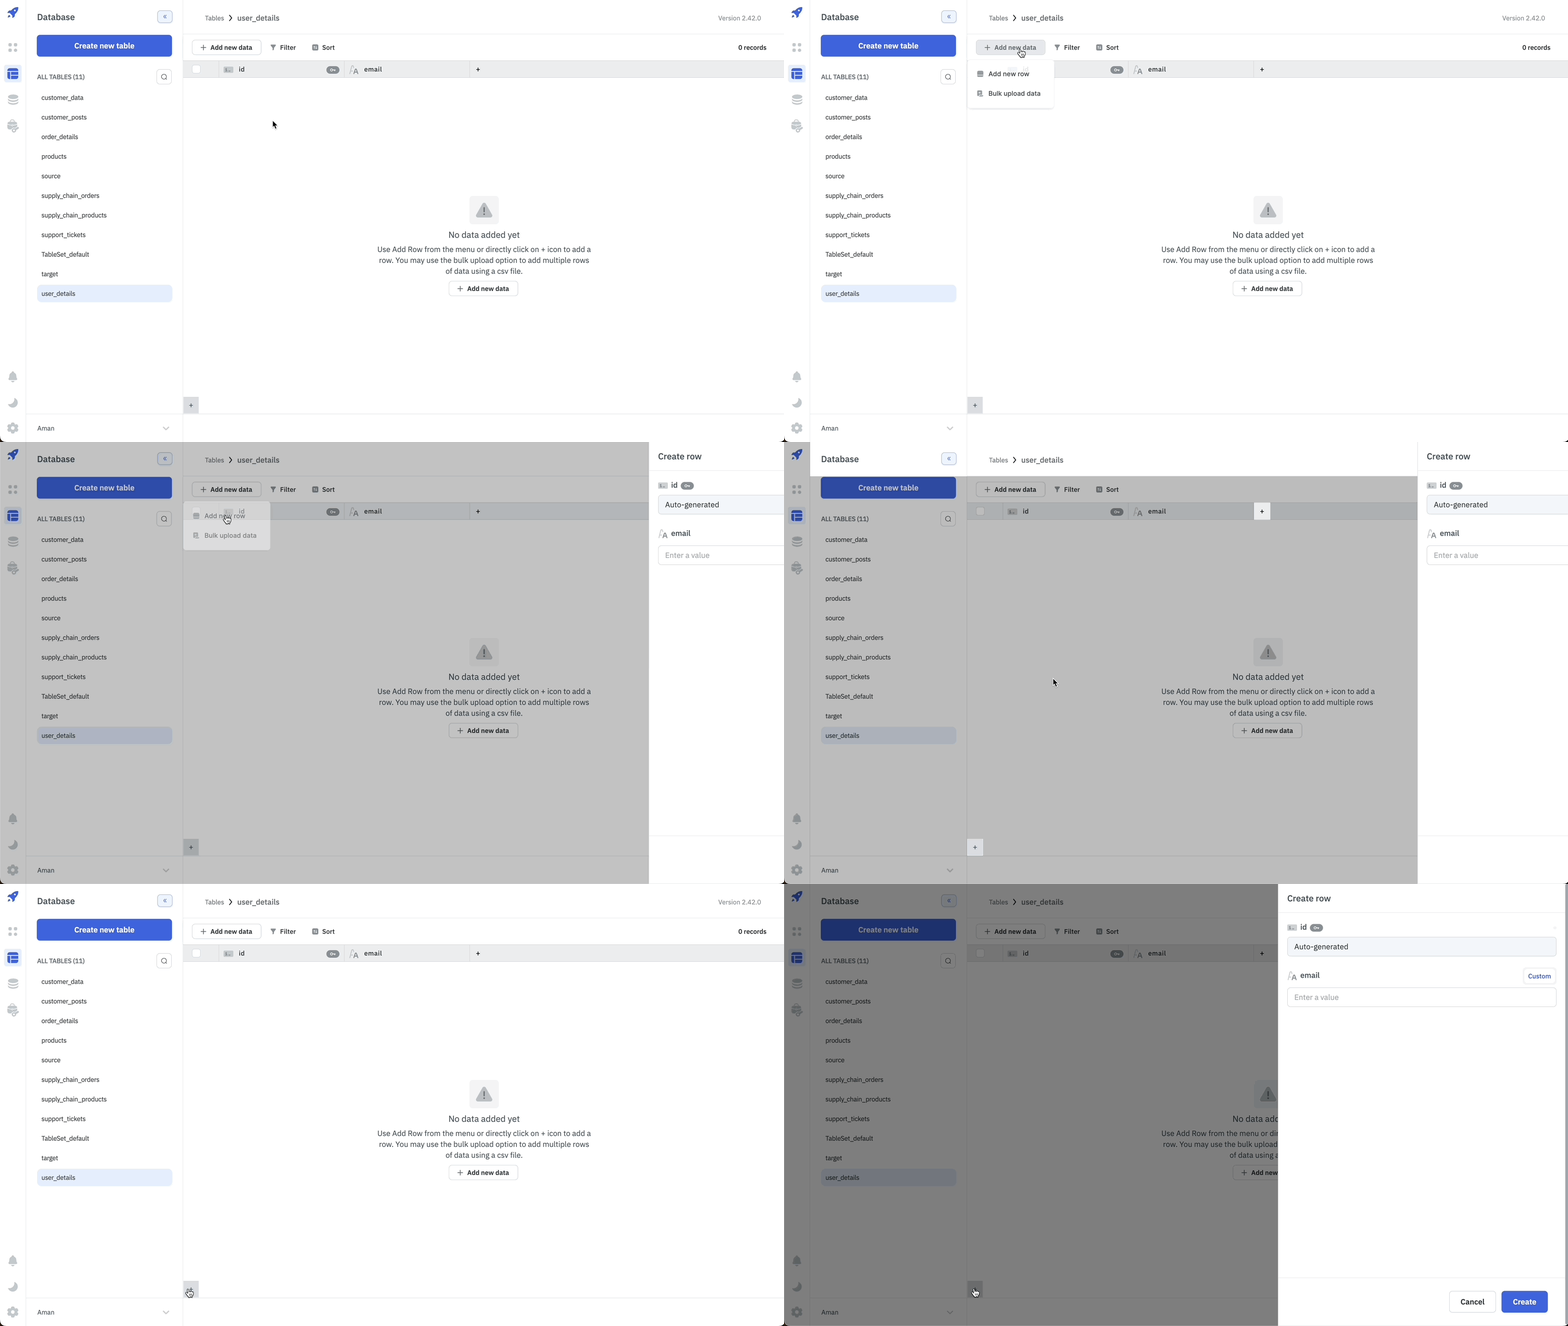
To add a new row to a table, either click on the Add new data button on top and then select the Add new row option or click on the + button present at the bottom left.
A drawer from the right will open up where the values for the new row can be provided.
Edit Row
To edit a row, hover on the row that you want to edit and the expand icon will appear next to the checkbox of that row. Click on the Expand icon to open the drawer and edit the row.

Edit a Cell
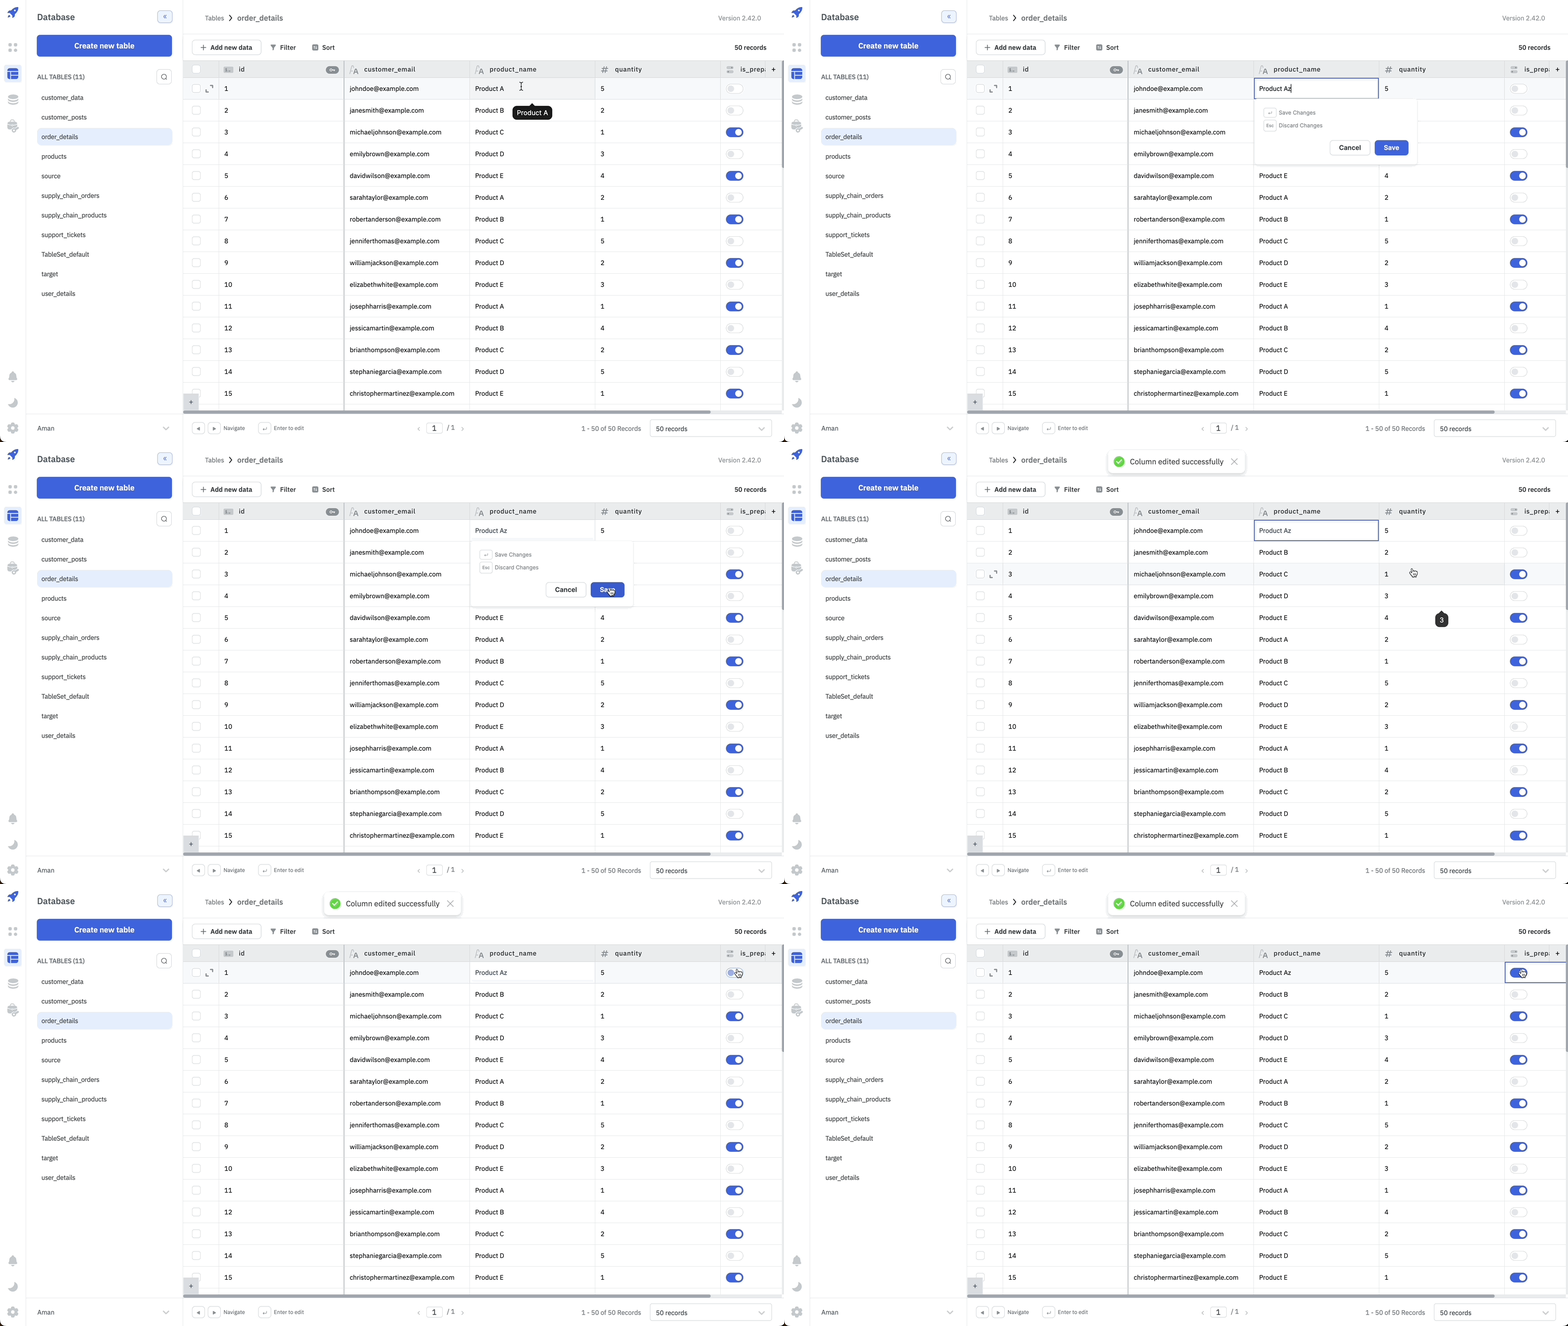
- Double-click on the cell you want to edit.
- Enter the new value.
- Click on the Save button or press Enter to save the changes.
- For boolean-type columns, use the toggle to change the value.
Bulk Upload Data
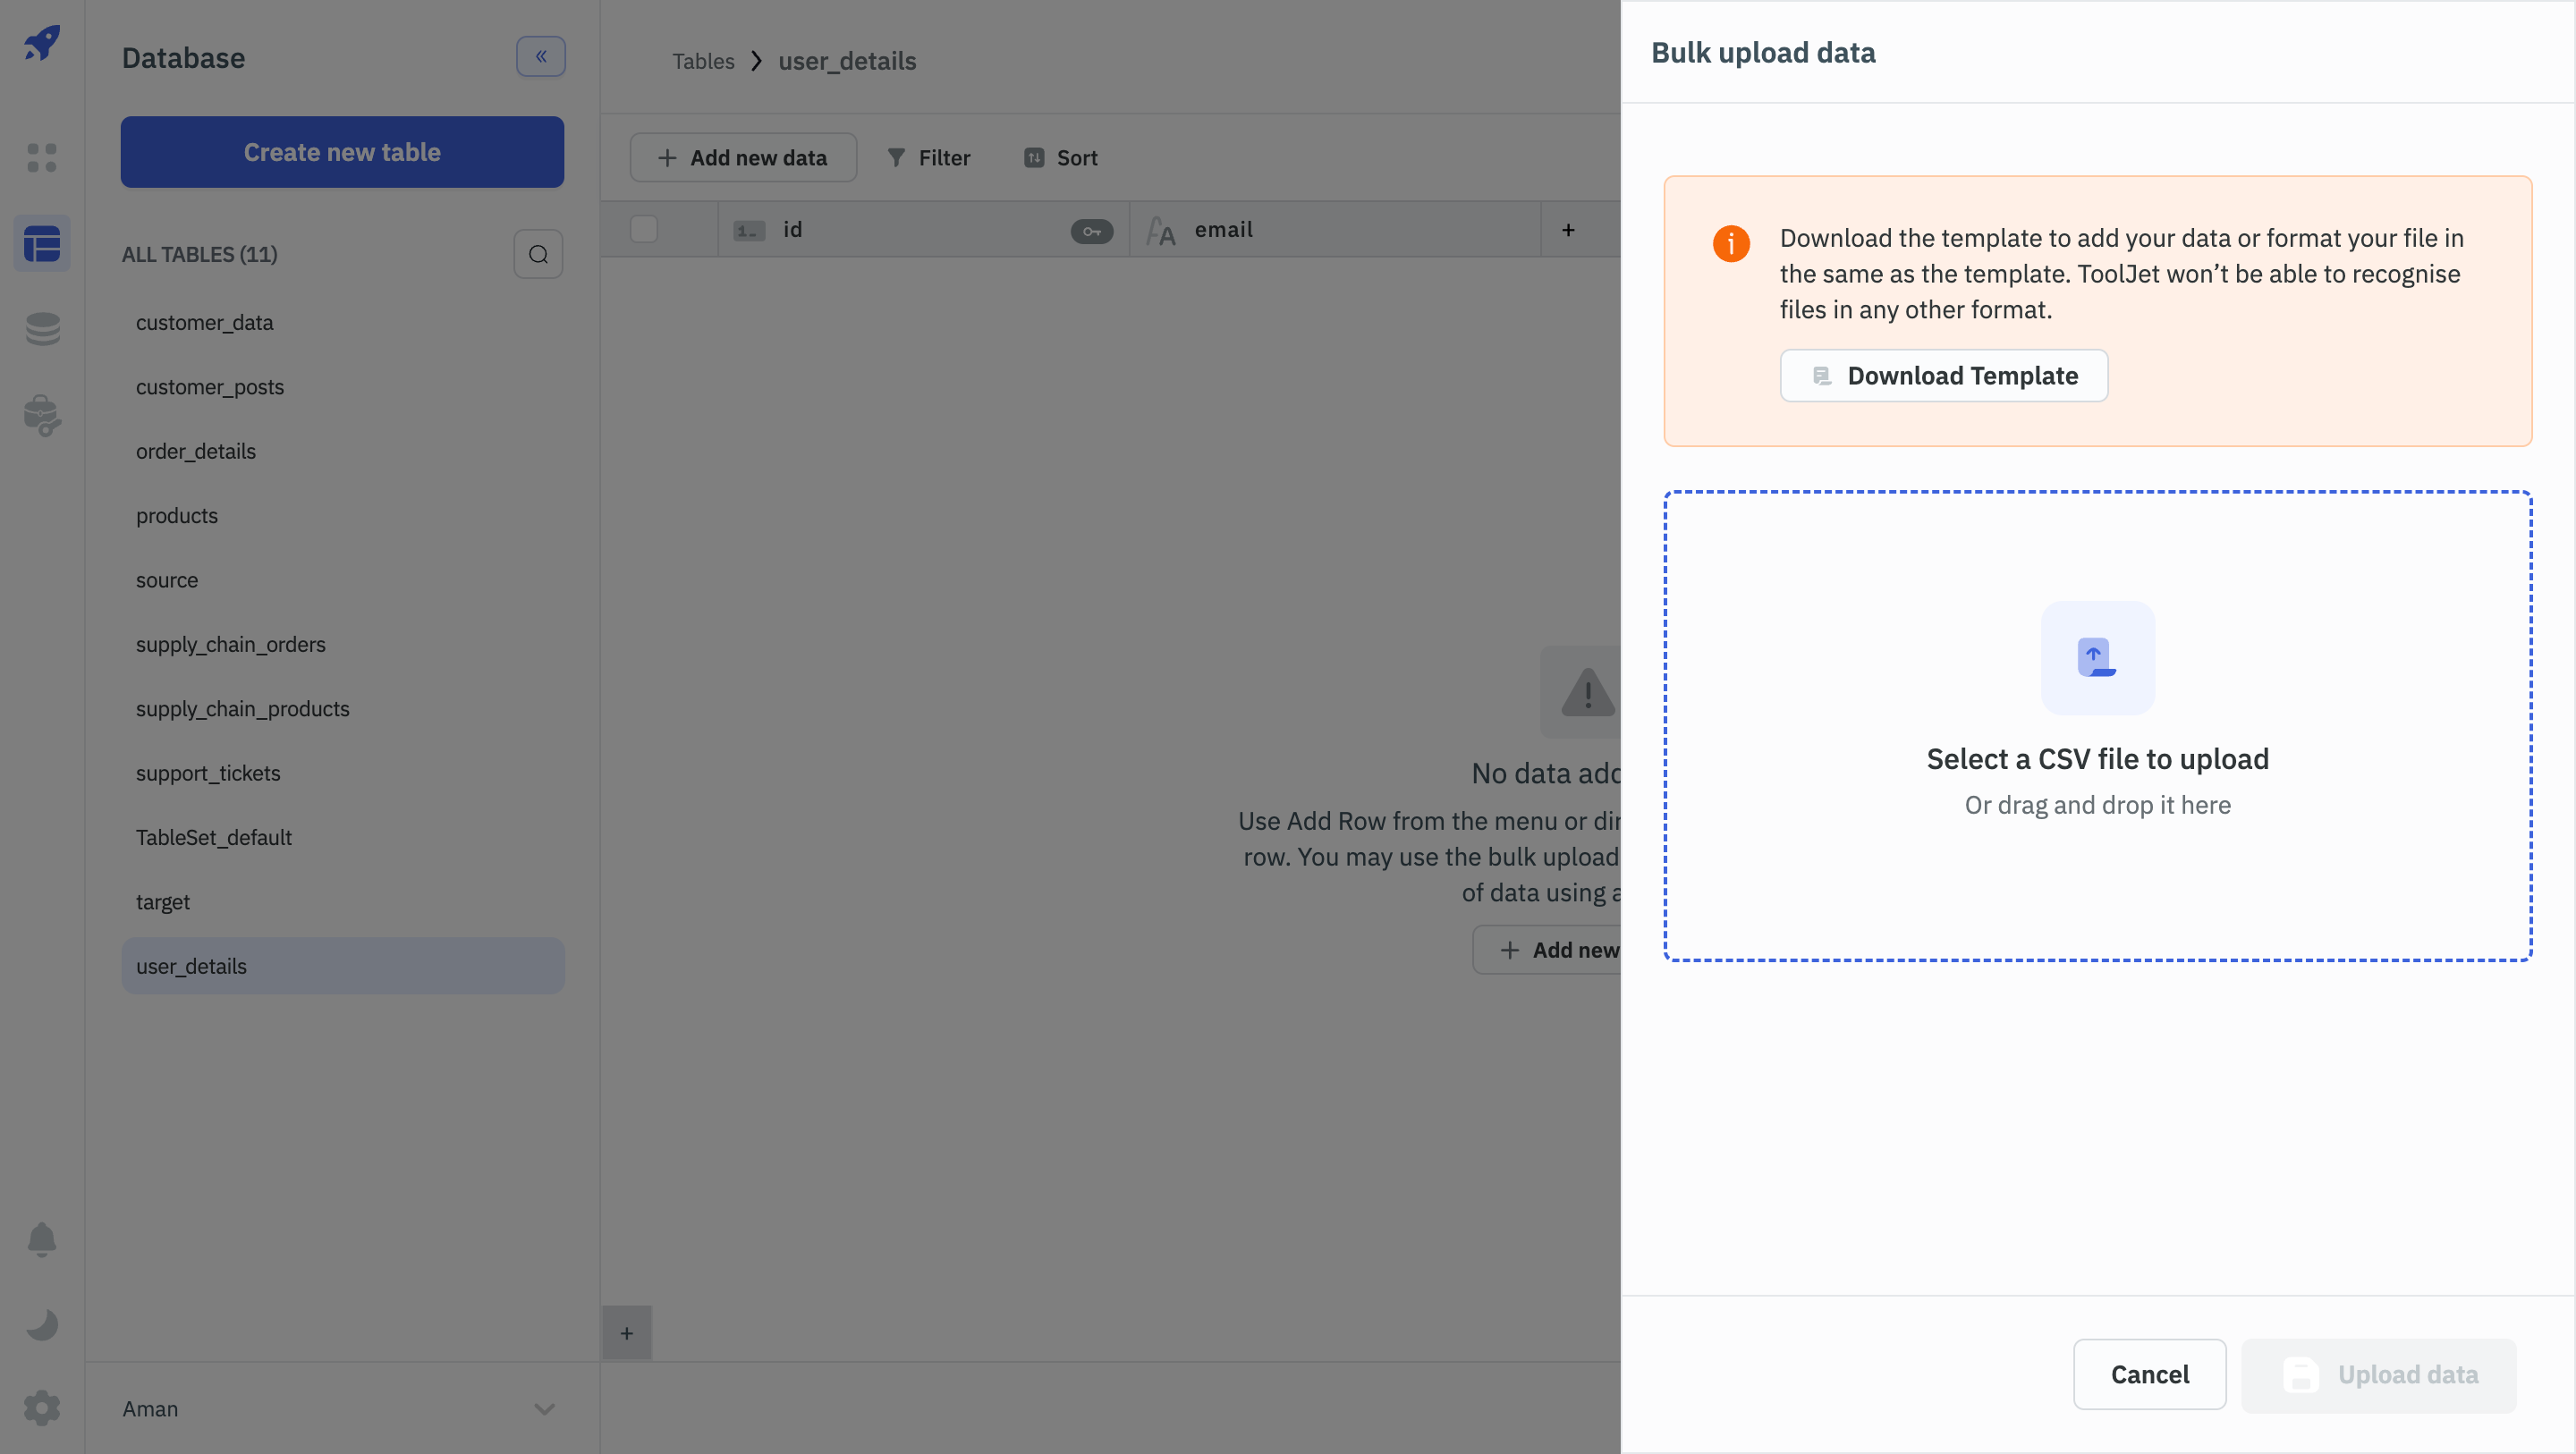
You can bulk upload data to the ToolJet database by clicking the Bulk upload data button at the top of the database editor. On clicking the button, a drawer will open from the right from where you can upload a CSV file. This file is used to insert records onto the table. If data for the id column is missing, it will insert a new record with the row data; if the id is present, it will update the corresponding record with the row data.
From the drawer, users can download the template CSV file in which they can enter the data to be uploaded to the ToolJet database's table or format their CSV file in the same way as the template file.
Once the CSV file is ready, click on the file picker to select the file or drag and drop the file in the file picker. Now, click on the Upload data button to upload the data to the ToolJet database.
Requirements:
- The data types of columns in the CSV file should match those in the ToolJet database table.
- The
idcolumn with aserialdata type should not contain duplicate values. - All the column constraints should be satisfied. For example, if a column is marked as
Unique, it should not contain duplicate values in the CSV file.
Limitations:
- There is a limit of 1000 rows per CSV file that can be uploaded to the ToolJet database.
- The CSV file should not exceed 2MB in size.
Delete Records
To delete one or many records/rows, click the checkbox to the right of the record or records you want to delete. As soon as you select a single record, the button to delete the record will appear on the top, click on the Delete record button to delete the selected records.

Filter
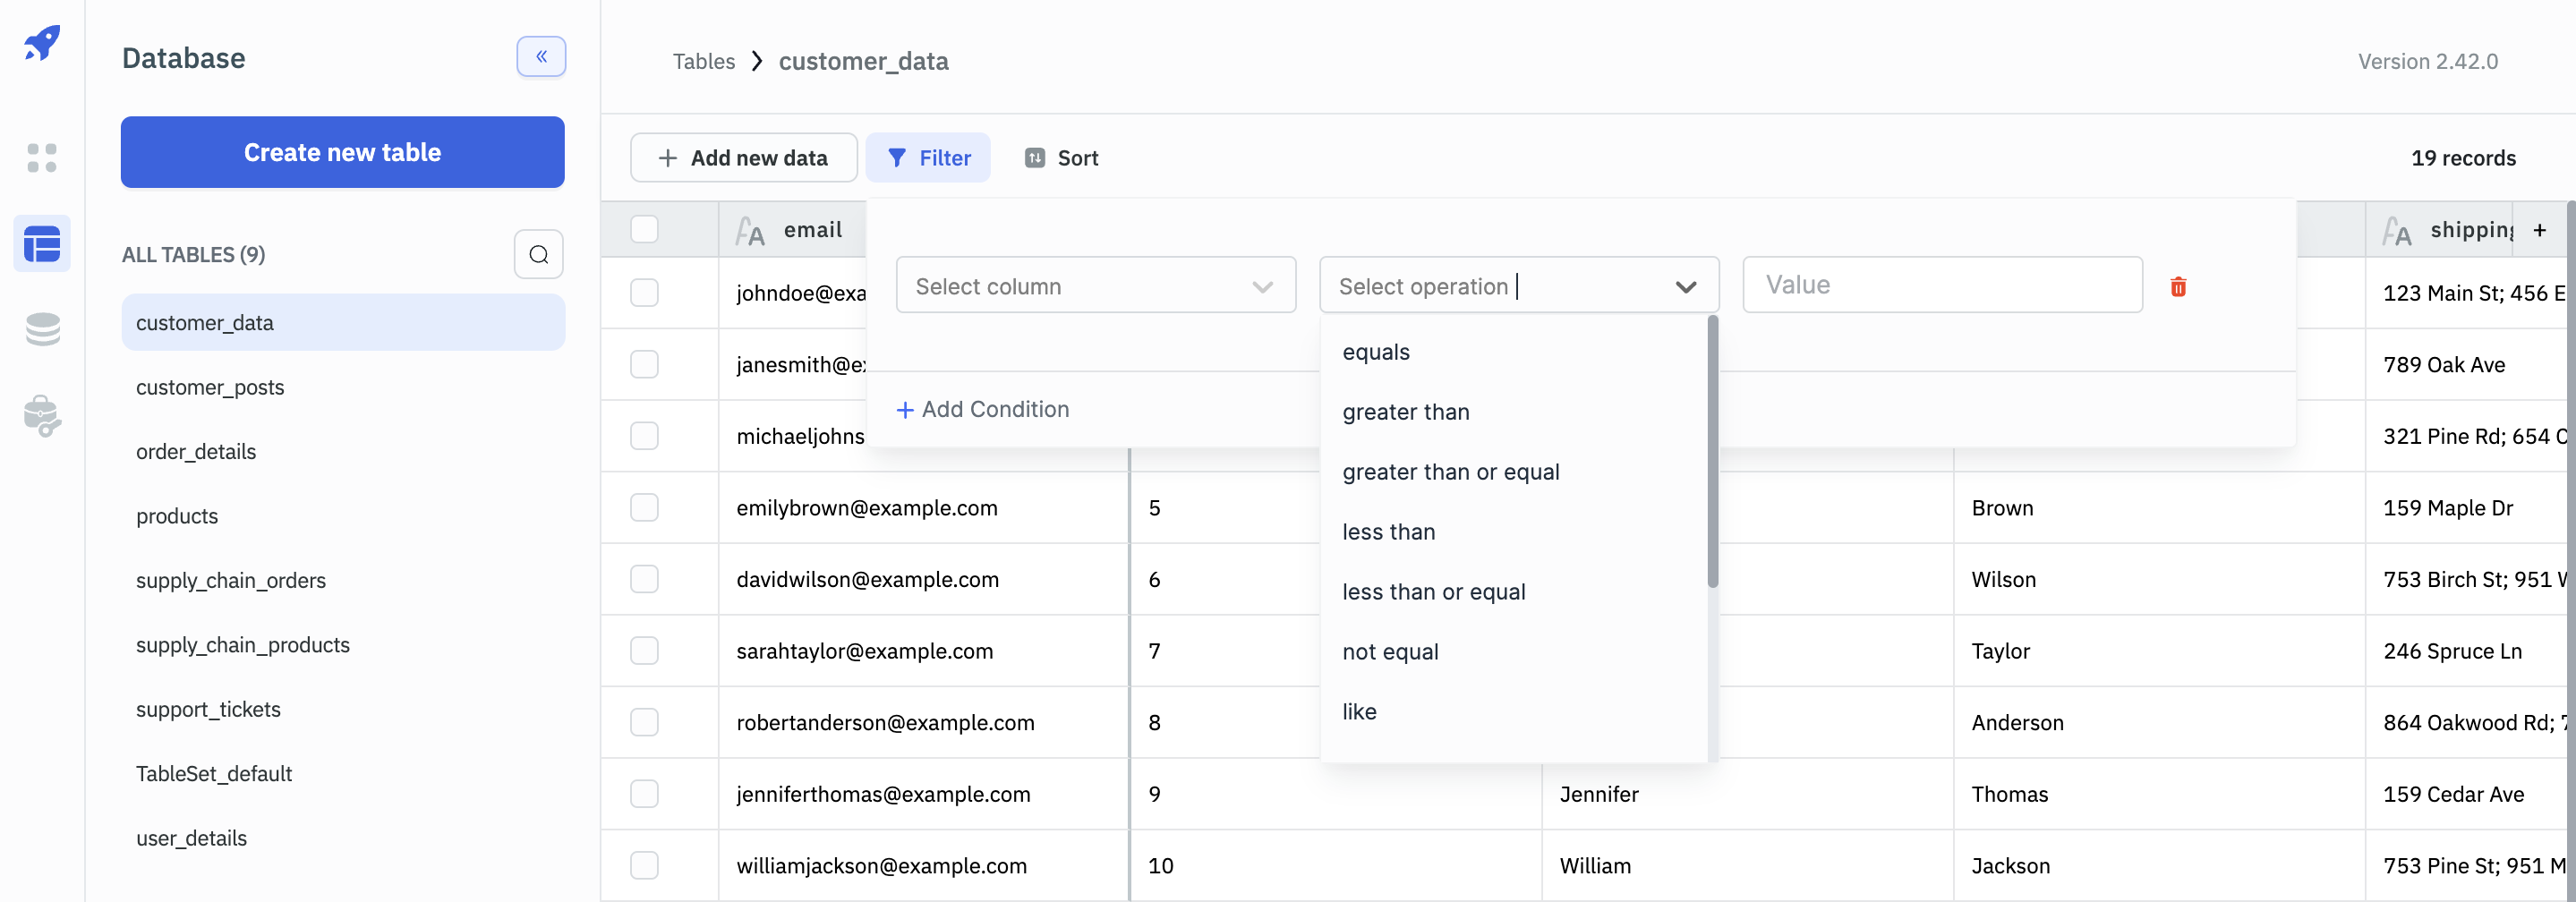
You can add as many filters as you want into the table by clicking on the Filter button present on the top of the database editor.
Adding a filter on the table data
- Select a column from the Columns dropdown.
- Choose an operation.
- Enter a value for the selected operation.
Available operations are:
| Operation | Description |
|---|---|
| equals | This operation is used to check if the value of the column is equal to the value entered in the input field. |
| greater than | This operation is used to check if the value of the column is greater than the value entered in the input field. |
| greater than or equal | This operation is used to check if the value of the column is greater than or equal to the value entered in the input field. |
| less than | This operation is used to check if the value of the column is less than the value entered in the input field. |
| less than or equal | This operation is used to check if the value of the column is less than or equal to the value entered in the input field. |
| not equal | This operation is used to check if the value of the column is not equal to the value entered in the input field. |
| like | This operation is used to check if the value of the column is like the value entered in the input field. This operation is case-sensitive. ex: ToolJet will not match tooljet |
| ilike | This operation is used to check if the value of the column is like the value entered in the input field. This operation is case-insensitive. ex: ToolJet will match tooljet |
| match | This operation is used to check if the value of the column is like the value entered in the input field. This operation is case-sensitive. ex: ToolJet will not match tooljet. This operation uses regular expressions. ex: ^ToolJet$ will match ToolJet but not ToolJet Inc. |
| imatch | This operation is used to check if the value of the column is like the value entered in the input field. This operation is case-insensitive. This operation uses regular expressions. ex: ^ToolJet$ will match ToolJet but not ToolJet Inc. |
| in | This operation is used to check if the value of the column is in the list of values entered in the input field. ex: (1,2,3) |
| is | This operation is used to check if the value of the column is equal to the value entered in the input field. This operation is used for boolean data types. |
Sort
To sort the table data, click on the Sort button on top, select a column from the dropdown, and then choose an order ascending or descending.
